
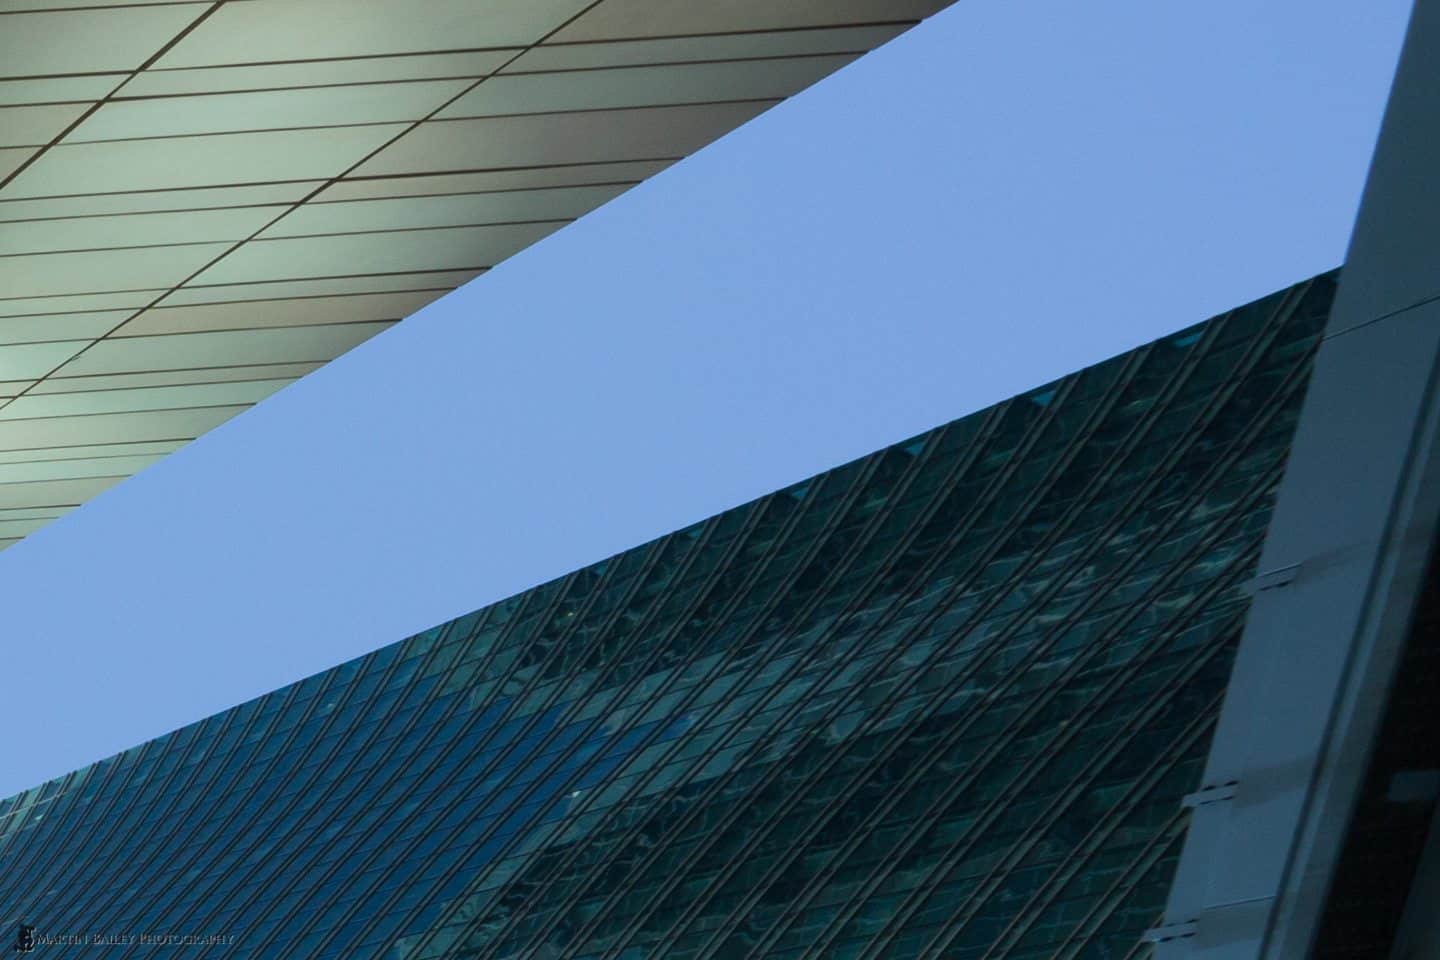
Canon have just released the EF11-24mm f/4L USM Lens, and having picked mine up on the day of release, after a few outings around the city here in Tokyo we’re going to take a look at this lens and its images today.
When I first heard about the rumours that Canon were working on a 14-24mm lens I was ecstatic, but when the rumours shifted to the range being 11-24mm, I became slightly concerned that the image quality might be compromised by making this lens start at such a wide field of view.
When Canon tagged the announcement of the EF11-24mm f/4L lens onto the announcement of their upcoming super-high resolution 5Ds and 5Ds R cameras, my concerns disappeared, as I knew that Canon wouldn’t release a less than stellar lens as a partner for cameras with such high resolution.
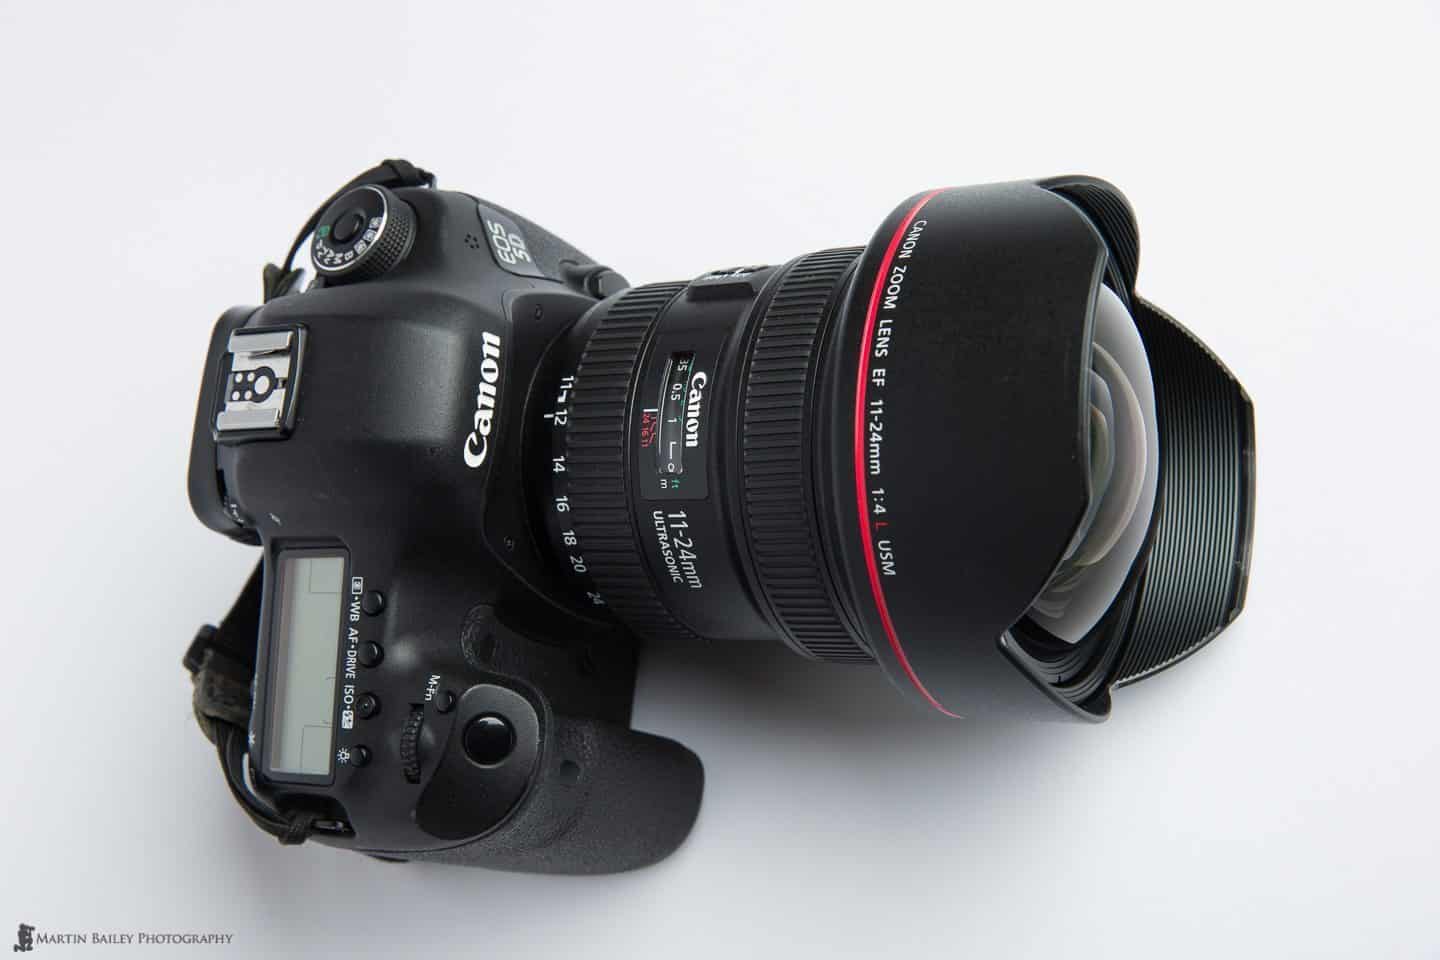
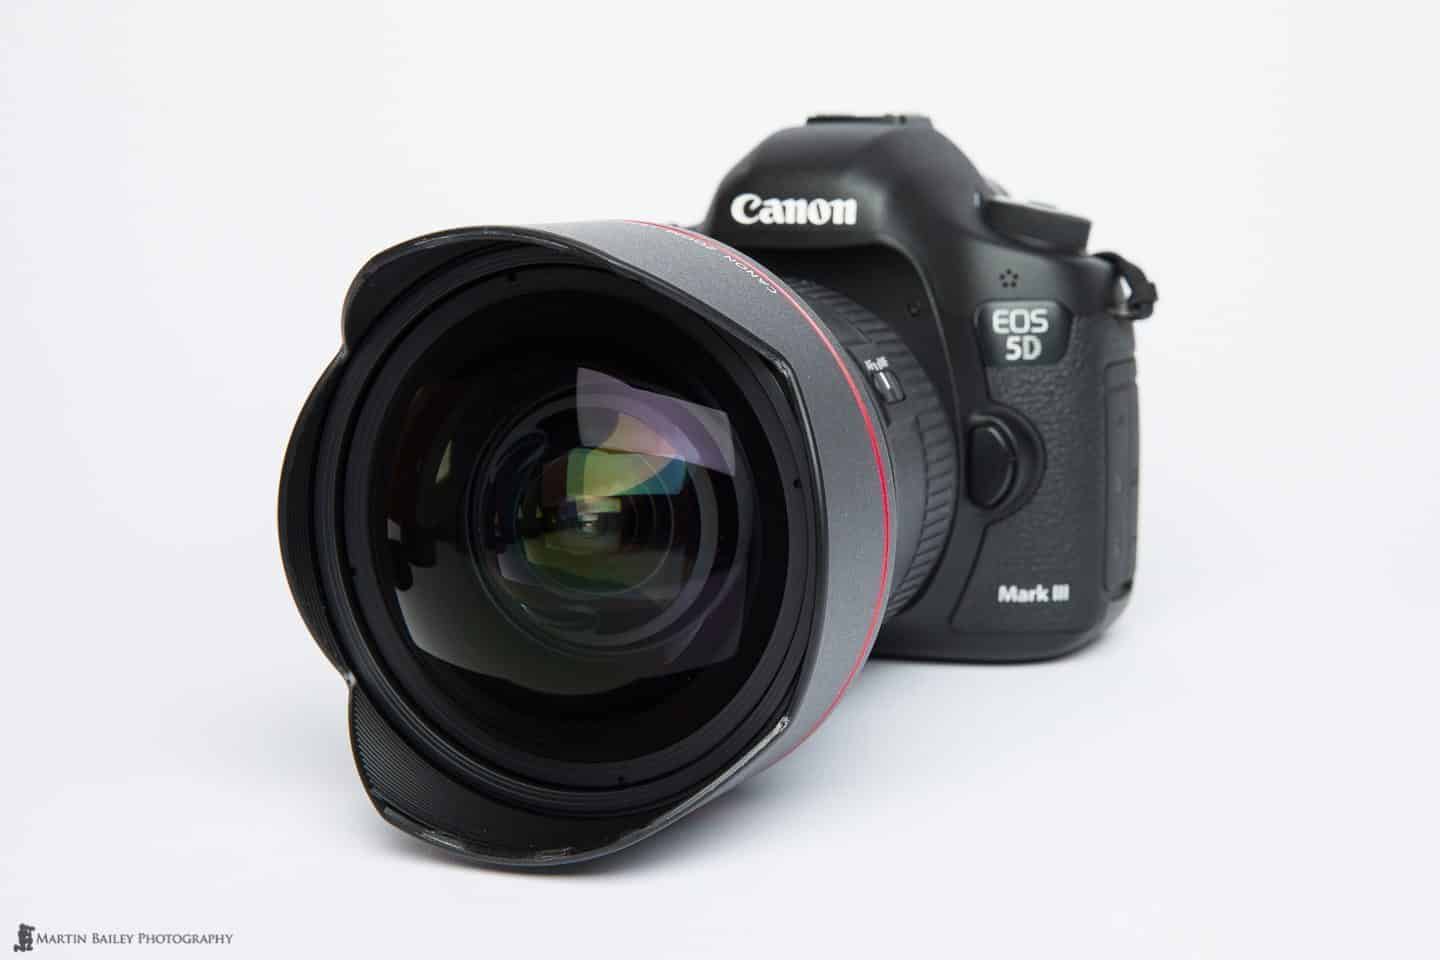
Canon EF 11-24mm Lens on 5D Mark III
It remains to be seen just how well the lens will hold up to the mammoth 50 megapixels of the 5Ds, but I’ll spill the beans up front here and tell you that on the 5D Mark III, Canon’s 22 megapixel body, the images are absolutely stunning!
This is a Large Lens!
When I picked up my 11-24mm I was initially surprised by the size of the lens. It’s big! I’d say the 200mm f/2.8 lens and 180mm macro lenses are bigger, but I don’t own these lenses, so for me, the 11-24mm is easily my biggest black Canon lens, and it weighs in at 1,180 grams / 41.6 ounces. Here is a photo of the 11-24mm with my 14mm prime and 16-35mm lenses, for comparison (below).

Canon EF 14mm, 11-24mm & 16-35mm Lenses
The 14mm prime lens, which has so far been my widest lens, weighs in at 645 grams / 22.7 ounces and the 16-35mm f/2.8 lens is actually a shade lighter at 635 grams / 22.4 ounces, so both of these are almost half the weight of the new 11-24mm lens.
Apart from even better image quality, my main goals in buying the 11-24mm lens was to replace my 14mm and 16-35mm lenses, hopefully gaining not only an extra spot in my camera bag, but also reducing the weight. I will be reducing my gear weight by 100 grams, and although it’s not as much as an extra lens worth which I’d originally hoped for, I will still now have an extra free space in my bag, which is always welcome.
I will be selling the 14mm and 16-35mm next month, now that I’ve had a chance to work with the 11-24mm. Both of these are still excellent lenses, but there is no point in owning all three of these now. Sure, there’s a gap from 24mm to 35mm, but my medium range zoom is the 24-70mm, so there is no gap in my line-up at all.

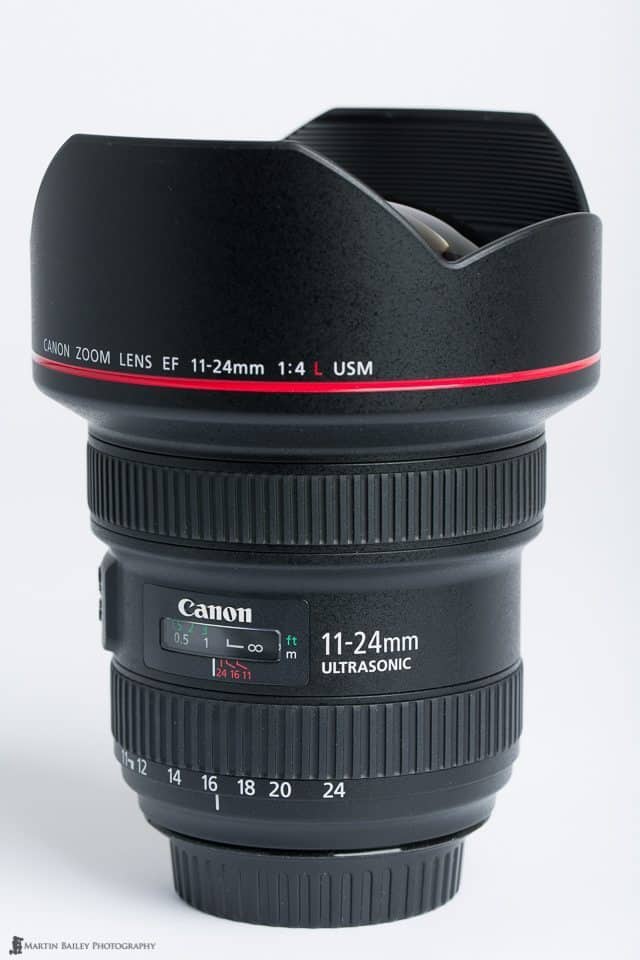
Canon EF11-24mm f/4L USM Lens with Hood
Built-in Lens Hood
The lens comes with an integral lens hood, that cannot be removed. The lens cap is a large, rather deep cover that fits over the lens hood and clicks soundly into place (right). You have to press the buttons on the top and bottom of the lens cap to take it off, which is nice and reassuring.
Unlike other lenses, where I generally take off the lens cap off and leave it off for the entire time I’m shooting with the lens, with the 11-24mm and with my old 14mm lens, I tend to take the cap off only while I’m shooting, then put it back on again straight away whenever I lower the camera.
It’s a bit of a pain to put this large hood in a pocket and get it back out each time, but I think it’s worth it to protect the front element. With it sticking out so much and being so large, I’d hate to bang it on something and scratch it.
Gelatin Filter Holder
Because of the aspherical front element, you can’t attach a screw-in filter to the front of the lens, but like the 14mm prime lens, there is a gelatin filter holder on the back of the lens. I rarely use Polariser filters these days, and because the results would look pretty whacky on a lens this wide, I’m not going to buy into any large filter systems that you add on the front of the lens.
I really only need neutral density filters, so I buy sheets of Tri Acetyl Cellulose ND filter from FujiFilm, and cut myself little squares that include the ND number and drop them into the holder as you can see (below). I actually keep these in 35mm slide film sleeves and carry them all in a single slide plastic case that I bought from my local camera store, so the system is compact and works well.
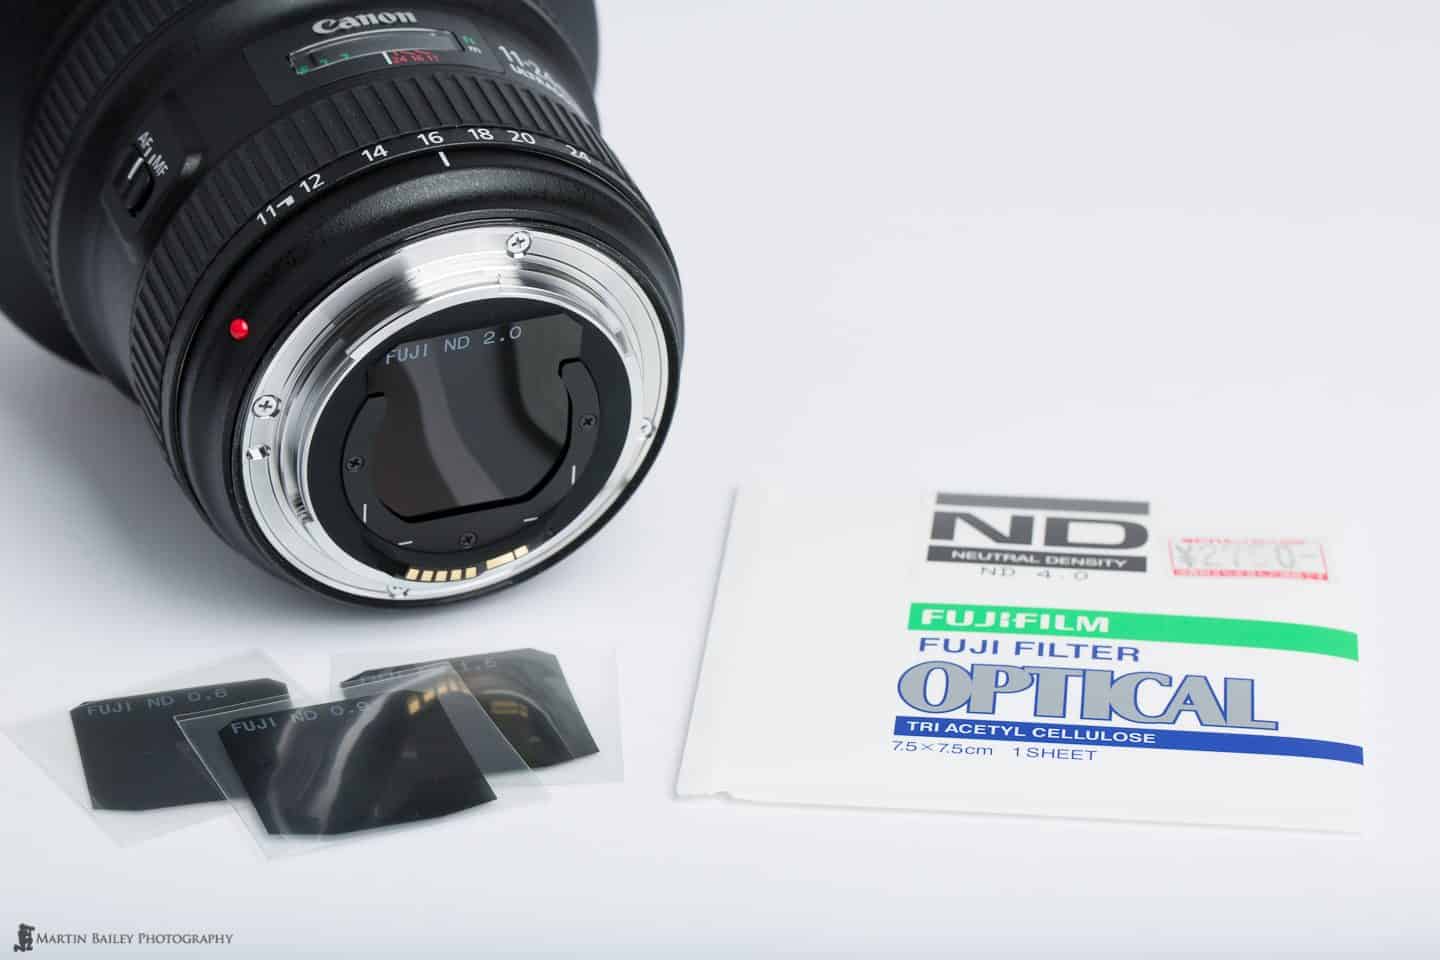
Canon EF11-24mm f/4 Lens Gelatin Filter Holder
Weatherproofing
Canon EF11-24mm f/4L USM Lens
With regards to weatherproofing, the manual says that the “Tight seal structure [of the lens] provides excellent dust-proof and drip-proof performance. However, it is unable to provide complete protection from dust and moisture.” That’s enough assurance for me to basically treat this as a weather-proof lens, especially as the lens has an internal focus mechanism, so nothing protrudes out of the front as you focus or even as you zoom.
In the field, experience tells me that most black L lenses can be used in the rain and snow without protection, although with my 16-35mm lens, from time to time I’d get just a touch of moisture inside when I shot in rain for long periods, so when possible, it’s a good idea to just drape a cloth over the camera and lens, especially as I usually use my wide angle lenses on the 5D Mark III, which is not weatherproof.
The wicking effect of a cloth is usually enough to prevent any damage in prolonged wet conditions. For just light rain I generally just let the gear get wet, and wipe off the moisture from time to time with a cloth if it starts to build up. I don’t use rain covers, as I generally just don’t like them, or feel them necessary. I work like this at my own risk though. Don’t come complaining to me if your gear dies using it this way. Understand that there is risk, as the manual states.
Example Photos
OK, so let’s take a look at some of my example photos with this new EF11-24mm f/4L lens. I literally just used this lens over a few different outings around the city, rather than doing lab tests as such, and this enables you to see how the lens performs in the real-world. This image was shot with the lens set to 11mm at f/8, ISO 400 for 1/50 of a second.
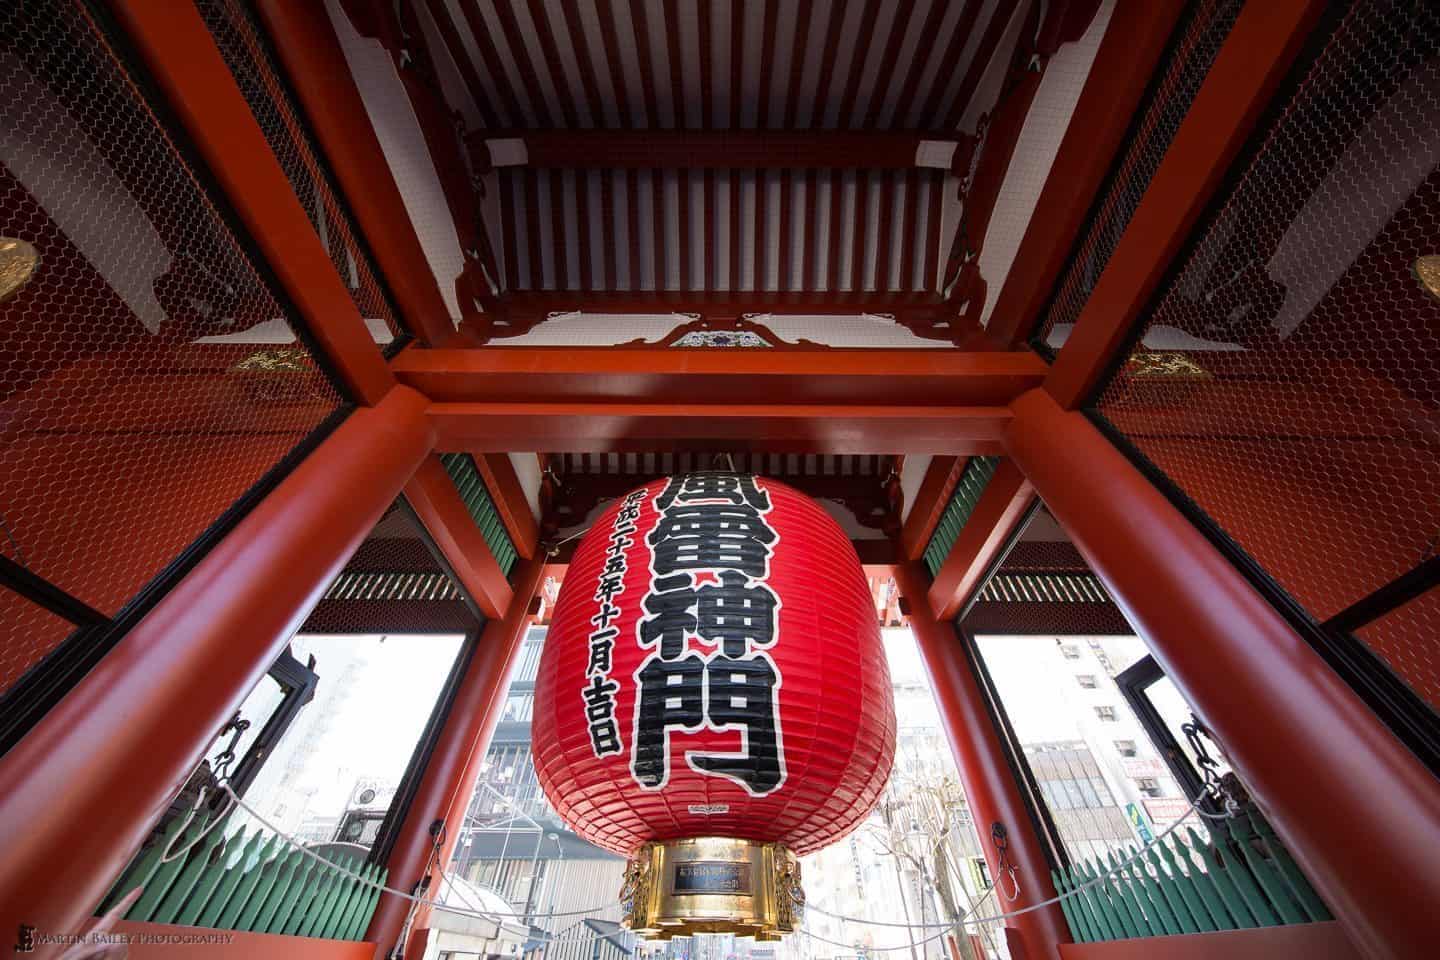
Kaminarimon Lantern @ 11mm
For you to take a look at the detail in the corners, rather than doing lots of 100% crops, here’s a download link for the full-sized JPEG image. >>Right-click here and select Download or Save as… etc.<< If you just click the link it will probably open the image in your browser, and you can then save it to your desktop etc. but right-clicking the link and selecting Download or Save as… will probably be best to get a copy onto your desktop, and then you can open it in an image viewer and zoom in to check the detail. You’ll be able to see that even though this was hand-held, with the lens at 11mm, the detail is quite remarkable, and there is not blurring in the corners, or anything like that, as you usually see with very wide angle lenses.
Occasional Chromatic Aberration
This lens has a Super UD (Ultra Low Dispersion) lens element, in addition to a UD element, to reduce Chromatic Aberration, and in the most part, these seem to have really done a good job, although in some circumstances, you might still see a tiny bit of CA creeping in.
I’ve noticed a slight amount in the corners of one or two images, but when it does occur, it’s easily handled with Lightroom’s “Remove Chromatic Aberration” checkbox in the Lens Corrections panel of the Develop module, which gets rid of it just fine with one click.
Here’s an example photo, looking straight up at the building in Shiodome here in Tokyo (below) and there’s a bit of Chromatic Aberration in the top right corner. This is the worst example I could find in a few hundred photos. This was shot at f/11, ISO 250 at 1/100 of a second, again with the lens as wide as it will go at 11mm.

Shiodome Buildings @ 11mm
Here is a 100% crop of the top right corner of the image, and you can clearly see a purple fringe along the edge of the structure there (below). Click on the image and ensure that your browser window is opened up wide enough to view the image without any resizing so that you can actually see the image at 100%.

Shiodome Buildings @ 11mm 100% Crop with Chromatic Aberration
Once I turned on Remove Chromatic Aberration in Lightroom’s Lens Corrections panel, it disappears, as you can see here (below). I think I can actually detect a very slight green fringe after the lens correction, but it’s not enough for me to be concerned about or try to correct with the sliders.
Shiodome Buildings @ 11mm 100% Crop after Lightroom Remove Chromatic Aberration
I imagine a future update to Lightroom will also bring a Lens Profile for this new 11-24mm lens, which isn’t currently listed. You can create your own lens profiles, but I won’t go to the trouble just yet. Not only is the current level of correction plenty for me, I really haven’t seen CA on enough images to warrant going to the trouble of making my own profile. Canon’s Digital Lens Optimiser feature in DPP also doesn’t yet support the 11-24mm lens, so I can’t yet say how well that handles these fringe cases either (pun intended).
Circular Aperture
The manual also states that this lens has a circular aperture to produce beautiful bokeh. What this really means is that the diaphragm has a lot of blades, so it’s as good as circular. Now, on a lens this wide, I’ll rarely be overly concerned about the quality of the bokeh, because I will rarely be getting in so close that I’ll have that shallow a depth-of-field, but I do like to work with the starburst effect that you can see in this next example image.
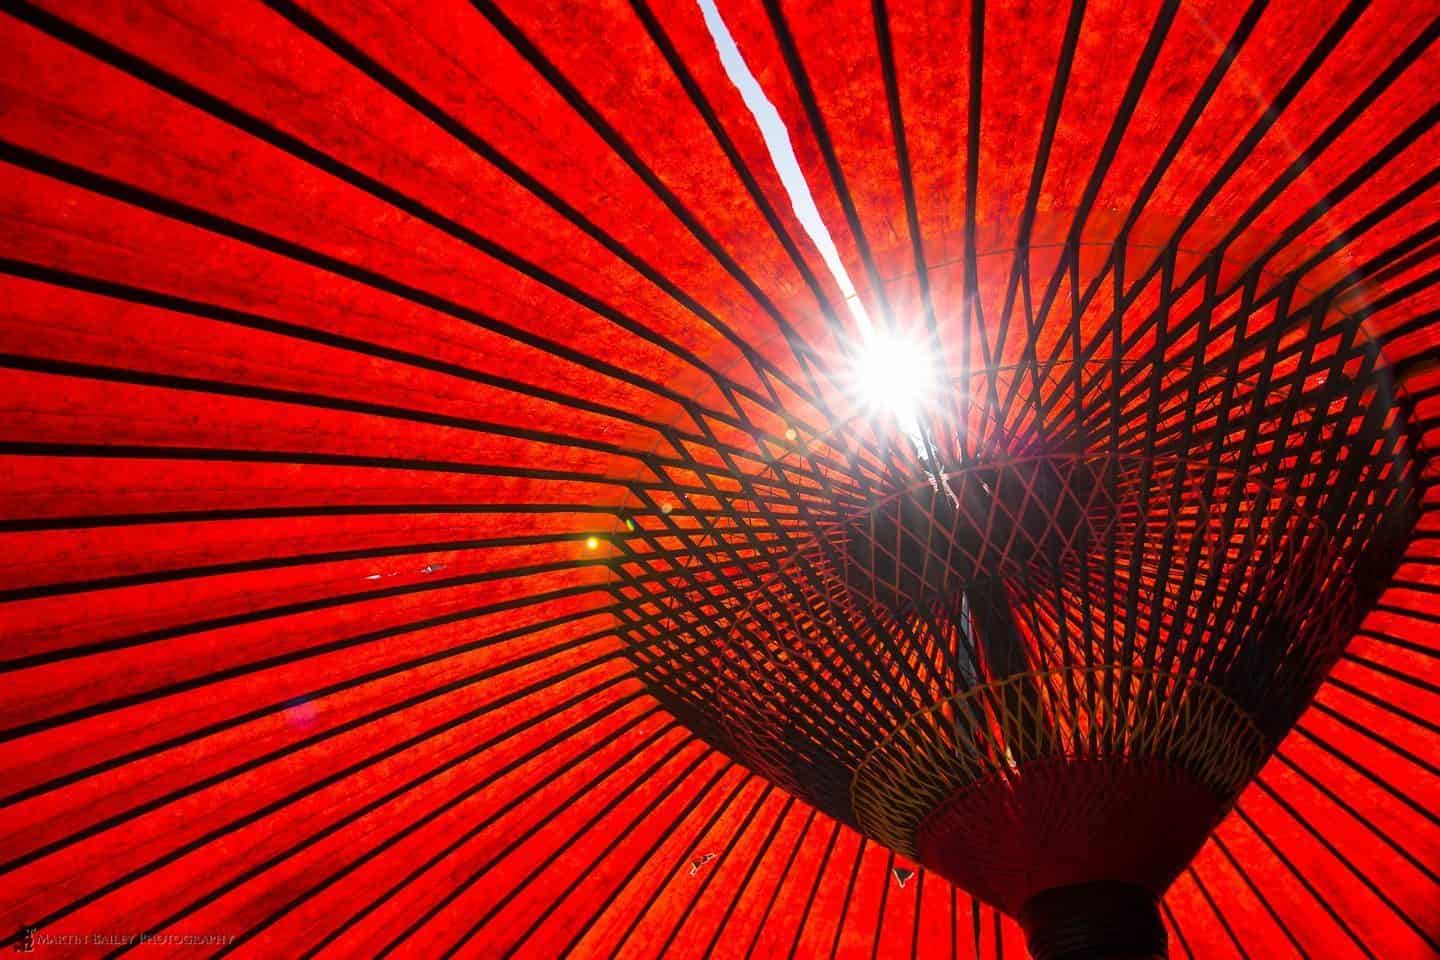
Japanese Umbrella with 18 Point Starburst
There are 18 points in that starburst, which is lovely. There were six clearly defined points to the stars created by the 14mm prime lens, as you can see in this photo of the sunrise from Bihoro Pass in Hokkaido. Which one you prefer may well be personal preference, but I personally think the sunburst with 18 points is more pleasing to the eye. The 16-35mm lens had 14 points by the way.
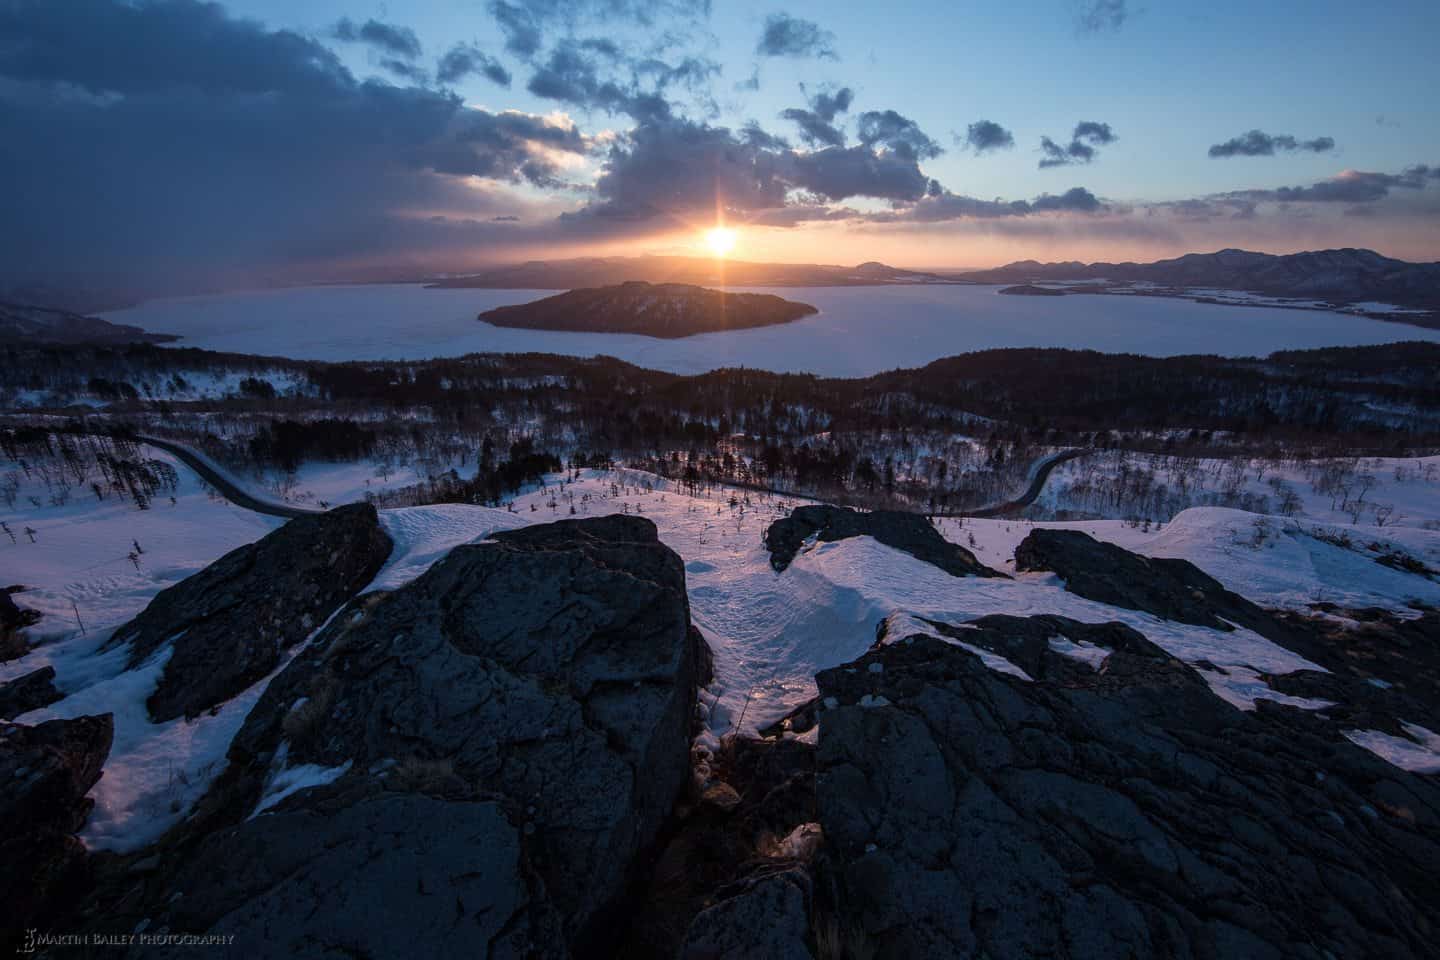
Sunrise at Bihoro Pass with Six Point Starburst
Very Little Distortion
As you can see in this next image, there is also very little distortion, even at 11mm. There is just a tiny bit of barrel distortion that is more prominent in this photo of the inside of Japan’s House of Representatives Diet building, but this again is easily fixed with Lightroom’s lens corrections, even with the current absence of a lens profile for this particular lens.
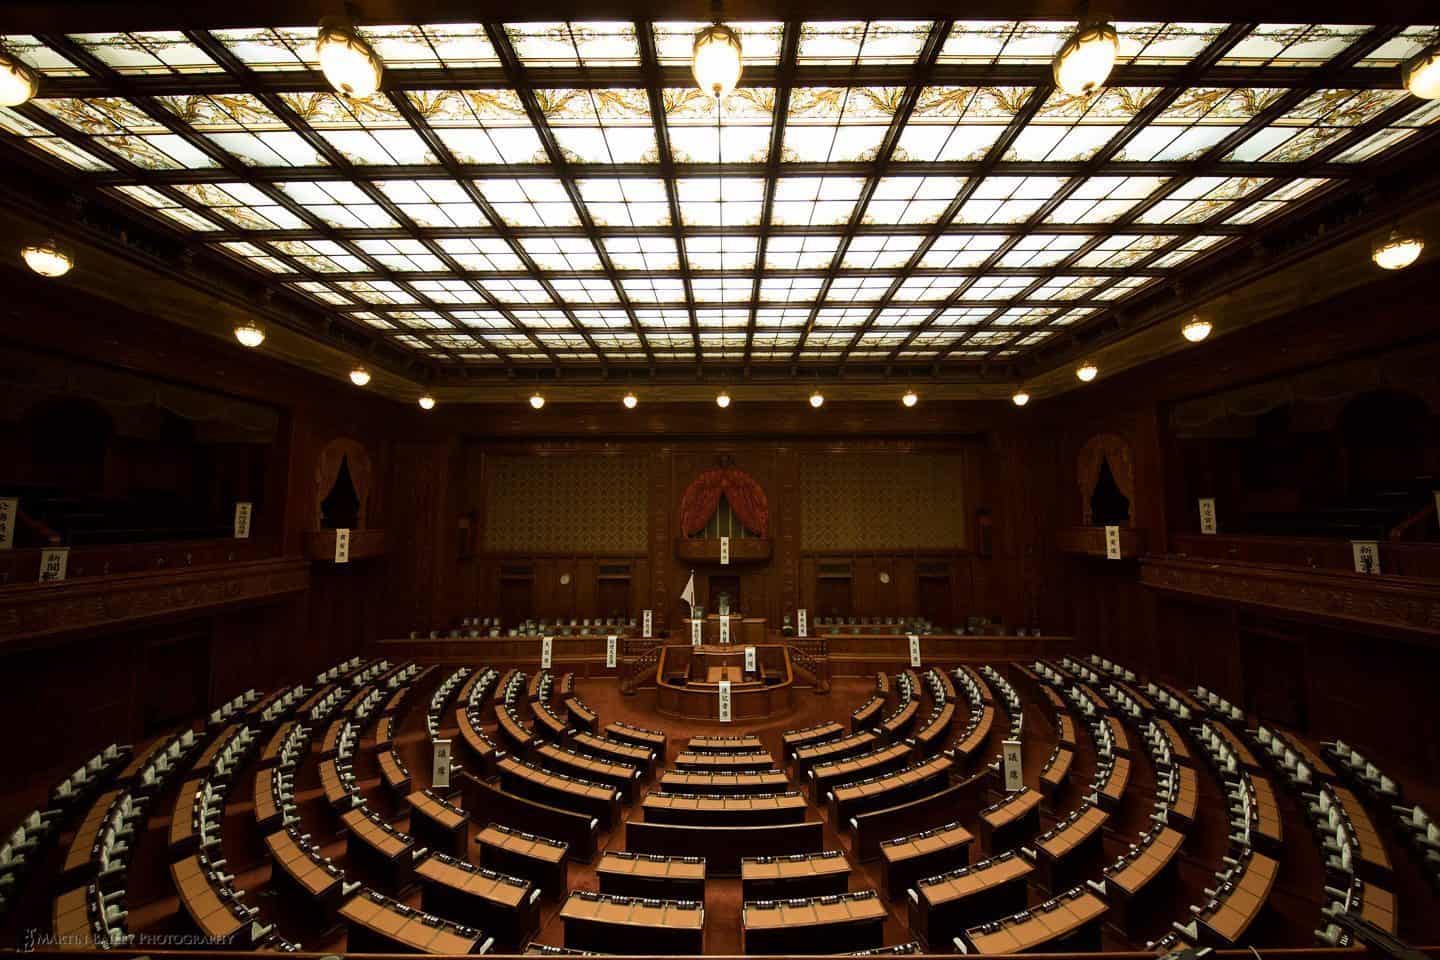
The Japan House of Representatives Diet building
Needless to say that this image was not even possible until now, with the new 11-24mm lens. I was right on the edge of the press photographers box here, at the front of all the spectator seats. Even at 14mm this image was not possible.
Also note that this image was shot with the aperture wide open at f/4 (below). Keeping in mind that it was shot at ISO 3200 for 1/125 of a second, here’s a 100% crop of the top right hand corner, so that you can see that this lens is as sharp as tacks even at f/4. Don’t forget to click on the image to actually see the image at 100%.
The Japan House of Representatives Diet building 100% Crop
Here’s another quick example shot to finish with (below) from the Tokyo International Forum Building, which I love to visit, especially with a wide angle lens like this one. I’ve converted this to black and white in Silver Efex Pro, but otherwise this is straight out of the camera, as are all of the other examples.
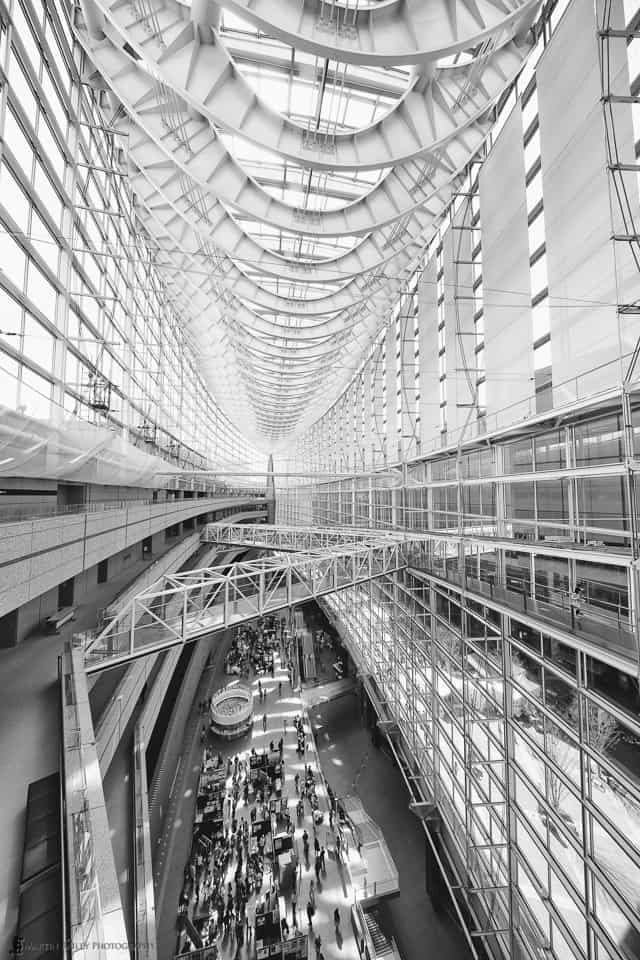
Tokyo International Forum Building @ 11mm
And here once again is a 100% crop (below), just so that you can see the amount of detail captured by this lens. Note that this is taken from the bottom edge, so again you would usually see the image starting to streak here a little, but apart from a tiny bit of distortion due to the very wide angle, there is really nothing at all to complain about in this image.

Tokyo International Forum Building 100% Crop
ASC and SWC Coatings
So, how did Canon get this lens to be so sharp while creating the worlds first rectilinear 11mm lens, and a zoom lens at that? Well, apparently there are a few things that contribute, such as the Subwavelength Coating (SWC) and Air Sphere Coating (ASC) which Canon says significantly reduce flare and ghosting.
The Subwavelength Coating is basically a layer of nano-sized cones that are smaller than the frequency of visible light, which cut down the reflectivity of the surface of the lens element. The Air Sphere Coating is exactly what it says on the box. It’s a coating on the surface of a lens element that contains tiny little air spheres, or bubbles, at fixed intervals, which, because air is less refractive than glass, greatly cuts down flare and ghosting.
You can see a bit of flare in the image of the red umbrella with the sunburst earlier, but this is without doubt less flare than we’d see without these coatings, and is actually quite pleasing to look at. It’s definitely not nasty looking flare, and I can confirm that I really haven’t seen that on any of my images shot with this lens over the last few weeks.
Canon EF 11-24mm Lens on 5D Mark III
I have not yet really had a chance to take this lens out into a great landscape environment, but I already know from my images over the last few weeks that it is going to perform excellently wherever I take it. Natural scene are actually more forgiving than the man-made lines we see in interiors and architecture, so my example images are probably more telling than natural landscapes anyway.
Conclusion
As we start to wrap this up, here are my final thoughts on the new Canon EF11-24mm f/4L USM Lens. This is an extreme lens, with a hefty price tag. The lens is currently retailing at B&H at $2,999, but when you think of all of the technology that has gone into this lens though, I absolutely do not think it’s overpriced. Note that I buy all of the gear that I review, so you can rest assured that what I say here is my own personal opinion, and I give this new lens an absolutely 100% thumbs-up!
I have literally found myself giggling like a teenager as I’ve pored over the detail in the images I’ve been capturing with the 11-24mm lens and my 5D Mark III. I am honestly not expecting the 5Ds R that I have on order to be quite this sharp when viewing images at 100%, but I do expect the results to be absolutely astonishing, and at 2.5X the resolution, even with a slight drop in sharpness, if indeed that’s what we see, it’s still going to be an amazing amount of detail to work and print with.
Renewed Faith in Canon
As kind of an aside, I’d like to talk a little about how I’m finding renewed faith in Canon as a company. For a while, as people jump ship to the mirrorless market in their droves, I’ve been a little disappointed with the lack of innovation from Canon and Nikon for a while. At this point in time though, I can safely say that I’ve never been happier to be a Canon user.
This is not a dig at mirrorless cameras, or Nikon. If I could afford to run two camera systems, I’d probably already have a mirrorless system as well, but for my wildlife work, I’ve had an absolute ball over the last couple of years with the new 200-400mm 1.4X lens, and now the 100-400mm Mark II lens and the 7D Mark II. With the upcoming 5Ds R, my landscape work will stay with Canon now for the foreseeable future as well.
Sure, I’d love to downsize my kit. I’m not getting any younger or stronger, and I feel it like everyone else when I’m carrying around my full kit, but hey, with what’s happened over the last few years, I really can now carry around my FULL kit! I mean, I can now go from 11mm to 560mm in just four lenses with the 11-24, 24-70, 70-200 and 200-400mm with that 1.4X Extender built-in.
In reality, with the 100-400mm being even sharper than the 70-200mm f/2.8 Mark II lens, I think I’ll now be dropping that in my bag instead, and have a small gap between 70mm and 100mm, but I can live with that, and still have most of the range covered in just four lenses. Although still heavy, I can actually carry it all in one camera bag. When I was using the 600mm and 300mm as well as the 14, 16-35, 24-70 and 70-200mm it wouldn’t even all fit in my bag with two bodies.
I used to carry the 600mm is a separate bag over my shoulder, and that was all so heavy it was just not possible for long distances. Now if I need to, I can at least go a few kilometres with my entire kit, and without wearing myself out. I’m not going to hike for hours unless I really have to, but that’s rarely necessary, so it doesn’t really worry me.
I think Canon have outdone themselves with this latest range of product releases, and the upcoming 5Ds R, which I will of course be among the first to report on when it arrives. I’ve never been happier to have remained a Canon user, and never been as excited with what the future holds. It’s an amazing time to be a photographer.
Support the Podcast/Blog
Anyway, if you think this lens is for you though, you can help to support my efforts here by buying with my links, and you can jump directly to B&H including my affiliate link with my short-link https://mbp.ac/11-24mm. Of course, the product price remains the same to you, but we get a modest payment from B&H when you use these links. I’ve also included a widget below with some of the other gear mentioned today, and once you click through to B&H, we get recognition for your purchases, so you don’t need to keep coming back to click through, and this all really helps to keep the ship sailing, so thank you!
Iceland Tour & Workshop
In addition to the landscape opportunities coming up in my Namibia Full Circle Tour, I am really looking forward to getting back to Iceland with the new 11-24mm lens. We have just four places left open at this point, so if you’d like to join me, check out the detail at https://mbp.ac/iceland2015. We’re going to have a blast!
Show Notes
Canon EF11-24mm f/4L USM Lens on B&H: https://mbp.ac/11-24mm
Subscribe in iTunes for Enhanced Podcasts delivered automatically to your computer.
Download this Podcast in MP3 format (Audio Only).
Download this Podcast in Enhanced Podcast M4A format. This requires Apple iTunes or Quicktime to view/listen.

Thank You for this magnificient review.
You’re very welcome Johan. I’m pleased you enjoyed it.
Very informative as usual Martin, thank you for making me want this lens!
And for good reason Chris. This is an amazing chunk of glass. 🙂
Martin, I just ordered my 11-24mm. Can you tell me where to by the sheets of Tri Acetyl Cellulose ND filter from FujiFilm? Great review, I enjoy the podcasts and the blog.
Great stuff. You’ll love it John!
I buy my Tri Acetyl Cellulose NDs from Yodobashi Camera here in Japan. I’m not sure where you can get this stuff in other countries though.
Aloha Martin,
Can’t seem to find the filters on Yodabashi’s website. Is there any other places you know if that we can get these filters? Thanks!
You’d have to search in Japanese Derrick. 🙂
https://mbp.ac/fujind
Thank you Martin! Do I have to cut these to size or will they fit right in?
Derrick, you have to cut them to size. Take a look at the photo above; I cut small squares from the full sheet, using the top left corner which has the ND rating printed on it. I put them into small 35mm film sleeves, and keep them all in a small 35mm slide case to carry them around with me. You can cut more than one from each piece of film, but only the first one has the ND rating on it.
Hi Martin,,
Thank you once again for all your great reviews and sharing your knowledge. I read this article when you first published it but only now I have a question. For my needs I am specifically interested in the 14mm range, so since you had the prime and now this new beautiful lens I would like to know if at 14mm is this lens far superior to the prime and is really worth the increased price or if the prime is equivalent or even better.?
Thank you very much for your thoughts.
Hi Ludwig,
You know, the 14mm lens was no slouch, but the image quality is better from the 11-24mm. Not really “far” superior, but it’s better, so it really depends on how much this means to you. If the 11-24mm hadn’t come out, I’d have been happy to stick with my 14mm. The other benefit though, is that I am now traveling with one lens instead of two, as I also sold the 16-35mm. Also, I shot out of a helicopter with the 11-24mm yesterday, in Greenland, and the images at 11mm were spectacular. Right now you say you only need 14mm, but if you had the versatility of the zoom, I’m sure you’d capitalize on it.
Cheers,
Martin.
Hi Martin
Thanks for your excellent review. It covered practical aspects of usage that no other review has even touched on. I purchased this lens and have been very happy with its results. It pairs beautifully with my 28-300. I want to pursue buying the filters from Yodobashi. I live in Canada and Yodobashi only ships within Japan. Can you suggest any ideas for obtaining these filters. I am currently using the Lee Filter sample pack. Thanks in advance.
Trevor
Hi Trevor,
I’m pleased you enjoyed the review.
You’ll need a friend here in Japan to ship to I imagine. I have shipped things for people in the past that went missing, so I don’t do that anymore I’m afraid.
Cheers,
Martin.