Over the years I’ve developed and evolved a pretty sound file management workflow for working with Lightroom on multiple computers, both in the office and when I’m traveling. I’ve talked about various aspects of this in previous episodes, but I thought I’d report on my current image management workflow for the mobile photographer.
I’m going to explain how I currently manage my Lightroom catalog, settings and presets, and my photographs and video archives, including how I now move from one computer to another quite seamlessly, but first a little background.
Until now, I’ve kept my Lightroom catalog on the internal hard drive of my desktop and laptop computers, and synched between the two before I made any major changes to the library. This works and if you have a fast enough network, it’s not too much of a pain to sync your catalogs, but because the previews that Lightroom creates can often become quite a hefty chunk of data, I used to leave them out of the synchronisation, which means that I’d have to rebuild previews on the other computer before I could quickly view images. If I synchronised the image previews as well, it took quite a bit longer, and that can really slow you down when you need to move computers, which I sometimes do multiple times each day.
Preparation
My entire digital workflow revolves around Lightroom, so rather than synching the Lightroom catalog and my most recent work from computer to computer, I figured that it would be easier to just put it all on an external hard drive, and move that around. I’ve been doing this a while now, and never been happier with my workflow, which is why I decided to share this today. Let’s first look at what you need to put on that external hard drive to make this all work smoothly.
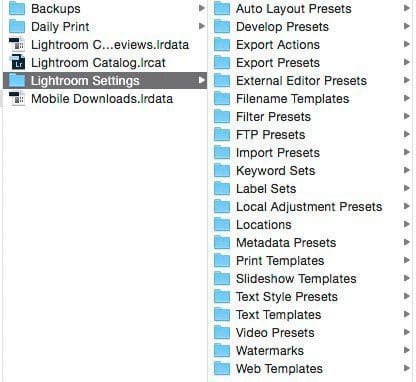
Lightroom Settings folder contents
Firstly, I recommend that you set up Lightroom so that it saves all its presets with the catalog. This means when you move the Lightroom catalog all of your settings will go with it. If you don’t do this, you’ll still have to synch the settings around separately, which we want to avoid.
To make this change go to Lightroom’s Preferences, then under the Presets tab, turn on the “Store presets with this catalog” checkbox. You’ll now see a “Lightroom Settings” folder in the same location as your Lightroom catalog (right).
If you don’t know where your Lightroom catalog is, go to the Catalog Settings and you’ll see the path to your catalog under the General tab’s Information section. There is a “Show” button there. Click that, and check that your Lightroom settings are now with your catalog. This is also of course where you’ll need to go to copy your catalog to your external hard drive. (Just copy the entire Lightroom directory, including your Lightroom Catalog.lrcat file and your Lightroom Catalog Previews.lrdata file/folder to your external hard drive when you’re ready.)
One Lightroom Catalog
Note that apart from a catalog with one image in that I use in an automated process to keep my printer from running unnecessary head cleaning processes, I have all of my images in a single Lightroom catalog. I currently have almost 300,000 images including some videos in my catalog, and it runs fine, so I like to keep them all in a single catalog.
This makes it easy to search across my entire library for images and build collections from absolutely anything I’ve shot. If you use multiple catalogs, you’ll need to decide which ones to use with this workflow, or just ensure that you move all of them to your external hard drive.
Drobo Mini
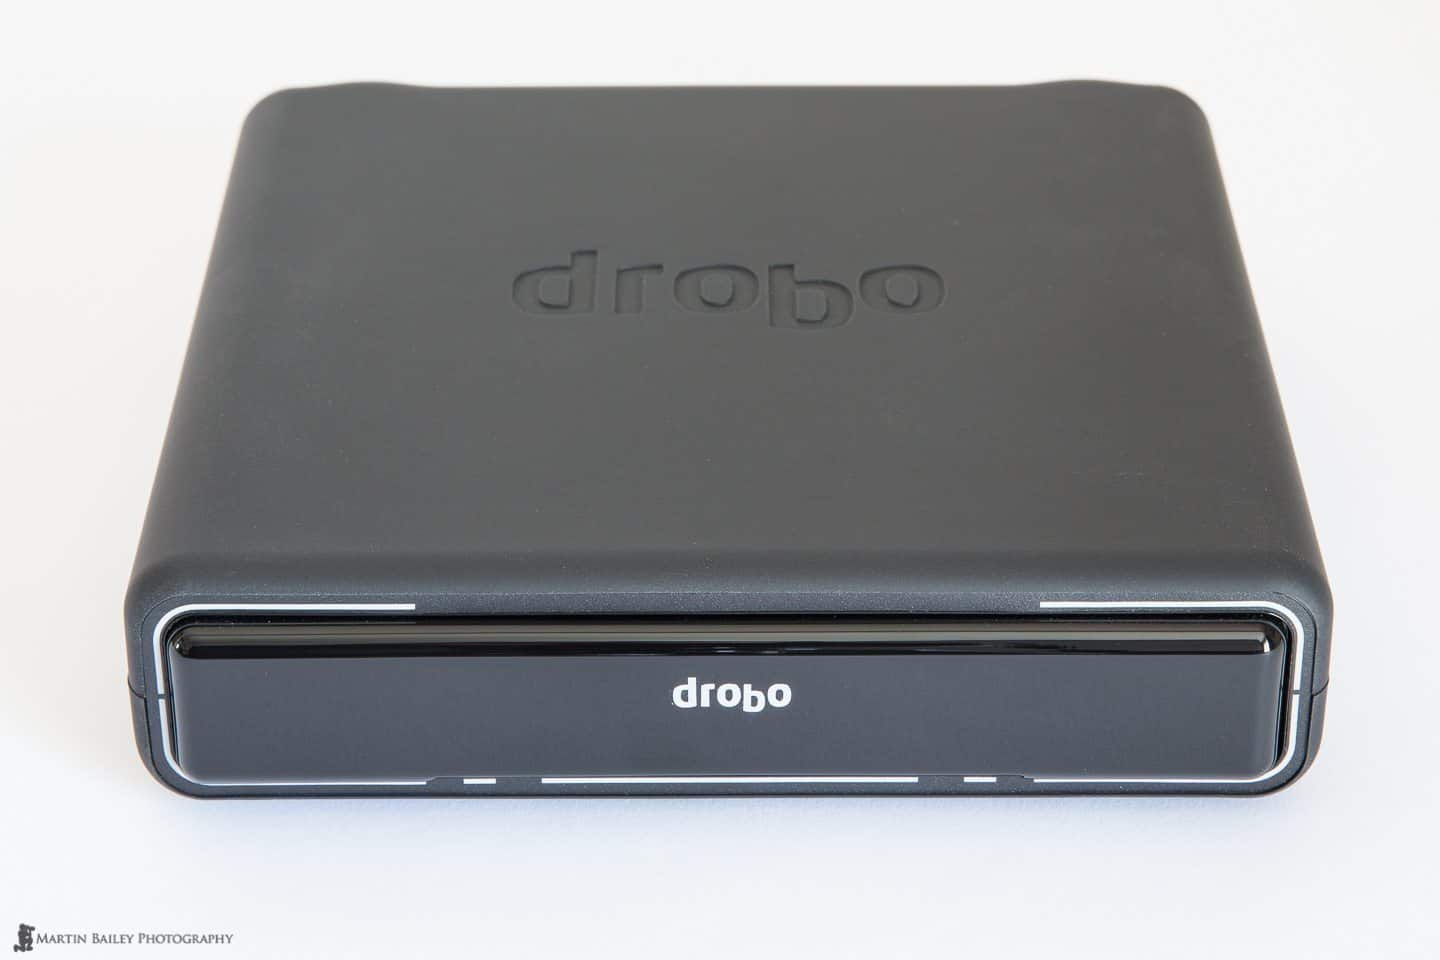
Drobo Mini
To ensure that Lightroom works as fast as it can with this portable workflow, I recently bought a Drobo Mini with 4 x 1TB 7200 rpm hard drives, and a Crucial 250GB mSATA Internal SSD which I put into the bottom of the Drobo Mini as an accelerator disk. This speeds up Drobos so much that as long as you are using Thunderbolt to connect them to your computer, you really just don’t have to worry about the hard drive speed. It’s not as fast as an internal SSD drive, but it’s fast enough to run Lightroom stress-free directly from the external hard drive.
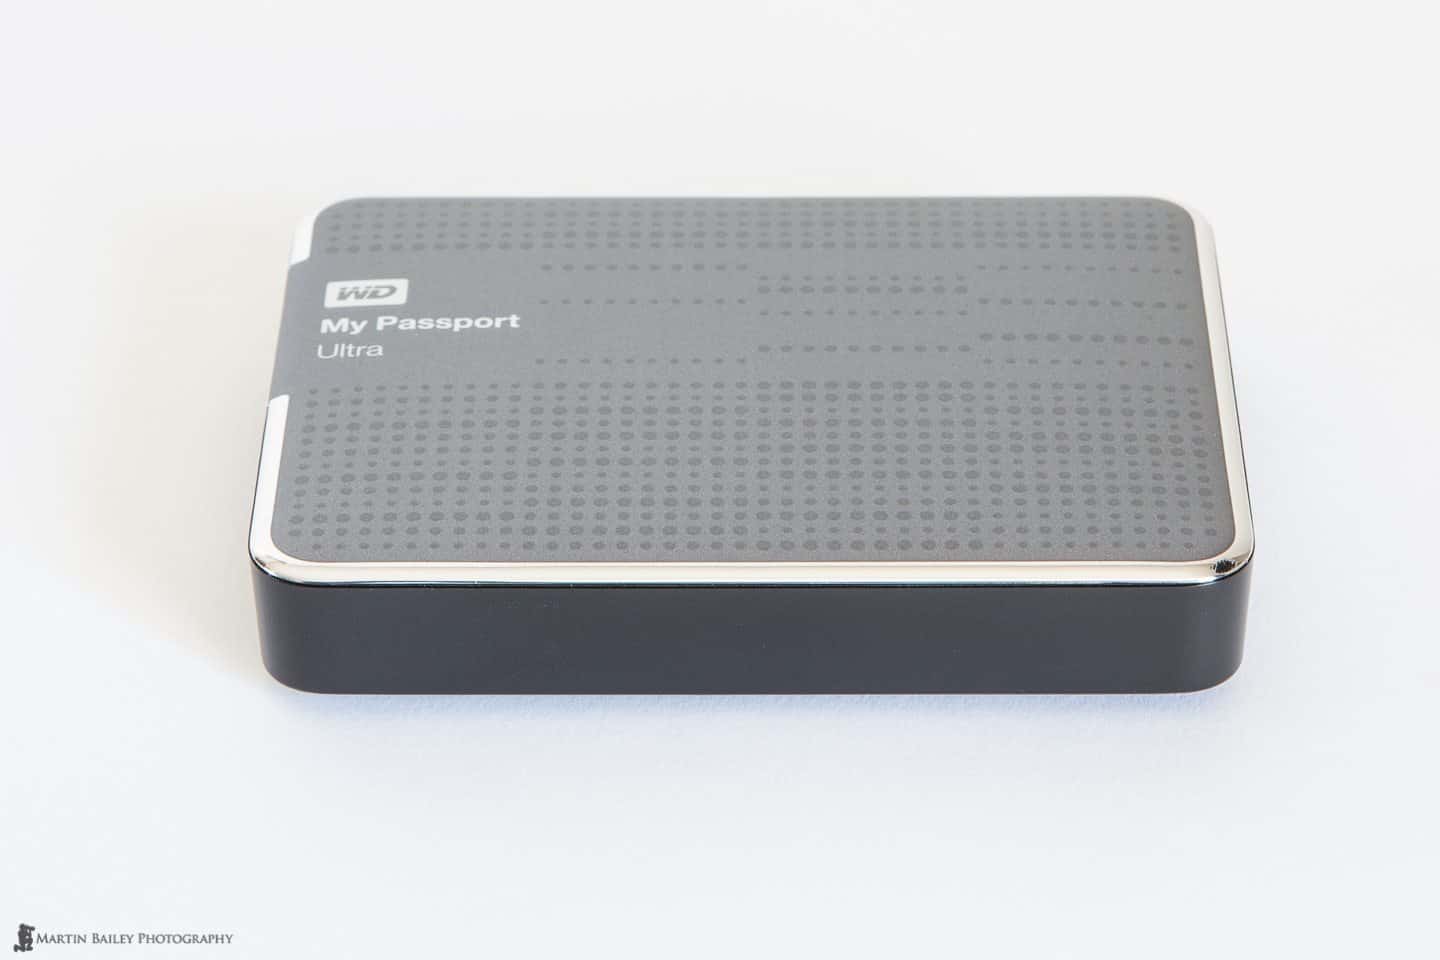
You can also run Lightroom from slower portable hard drives, but I suggest that you use at least USB3.0 connected drives, such as the WD My Passport Ultra drives that I use in my ultra-light portable workflow when I simply cannot carry the weight of the Drobo Mini in addition to my MacBook Pro. This may be necessary especially when traveling overseas, as the one downside of the Drobo Mini is that it isn’t very, well, mini. It’s quite a hefty piece of kit to carry around in addition to a laptop.
[UPDATE Aug 1, 2015: Note that I’ve pretty much stopped using the Drobo Mini. Having to plug it into the power every time I wanted to use it became quite tiresome after a while. It’s also just too big for any kind of air travel. I have now started to use Western Digital My Passport Pro 4TB drives. These are Thunderbolt only, so won’t work on Windows at this point, but they are powered by the laptop, and they are slightly faster than the Drobo Mini, so I’m now using this as my main catalog hard drive, and they are small enough for air travel as well. I have two, with the second a straight backup of the first.]
Recent Work and Final Selects on External Drive

Lightroom Catalog Contents (click to view details)
In addition to my Lightroom catalog and settings, I also keep my main archive of all of my best work to date, which I call my “Finals” or “Final Selects”, on my Drobo Mini, as well as all of the photographs and video that I’ve take during the current year. So basically most of what I need to access regularly is in one place and always available when I travel.
Main Archive on Drobo 5D
My main archive of all images and video that I’ve ever shot and not deleted is almost 7TB of data, so it’s not practical to keep all of this on my portable hard drive, and because I have every image that I thought was good enough to sell or show people in my Finals folder, it’s not even necessary.
I can still get to my raw images and any TIFF or PSD files that I might have also created from them, right there on my portable drive, so what I call my “Photo Originals” folder lives on my Drobo 5D attached to a desktop computer in my office studio. This is literally everything from every shoot I’ve done that didn’t get deleted.
Decide and Stick with Your Strategy
One thing that will cause you to get frustrated with a strategy like this, when you’re synchronising folders around and have photos in multiple places, is if you lose track of which copy is your main copy. As we can see in this screenshot (right) I have my Finals folder on both my Drobo Mini and my Drobo #1 drive (a Drobo 5D). The main reason I do this is so that it gets backed up into the cloud via Backblaze, and we’ll talk about that shortly, but it’s important to try to keep this as a backup copy, and not a working folder of images.
I do sometimes just need to reference images or grab something quickly over the network, and because my iMac stays on all the time, from anywhere in my house I can connect to the Drobo and access my Final Selects. This is also why I keep this linked to Lightroom, but I don’t do any editing or create collections from the Drobo #1 drive, because it not only causes you to lose track of changes and break your Lightroom collections while you’re traveling, but you also have to sync your changes back to your main copy. This is doable quite easily, but I find it much better to not get into that, and my portable hard drive solution that we’re looking at today helps us to avoid this too.
Diagram #1 – Base Computer
OK, so I know that this will be heavy going without some form of graphical representation of what I’m talking about, so I’ve created a few diagrams for us to reference today as I explain this further. Let’s look first at my main computer. We all use at least one computer to work on our images, so this should be useful even if you don’t use a laptop in addition to your “base computer”.

Diagram #1 iMac with Drobo Mini
Take a look at the first diagram (above) and see on the left that my workflow starts with transferring images from the camera to my portable hard drive, which is connected to my iMac. This could just as easily be a Windows machine. It’s not important what system you use. What’s important to note here is that my images go into a folder for my current year on my external hard drive, along with the Lightroom catalog and my settings and presets.
Diagram #2 – Local and Cloud Backup
As I mentioned, I keep my main photo and video archive, my “Photo Originals” folder on a Drobo 5D, which is always attached to my base computer. As soon as I’ve finished transferring images from my camera and have them renamed, and if time allows gone through and done my first quick edit of my images, then I copy the folder for that shoot to my Drobo 5D, here called Drobo #1.
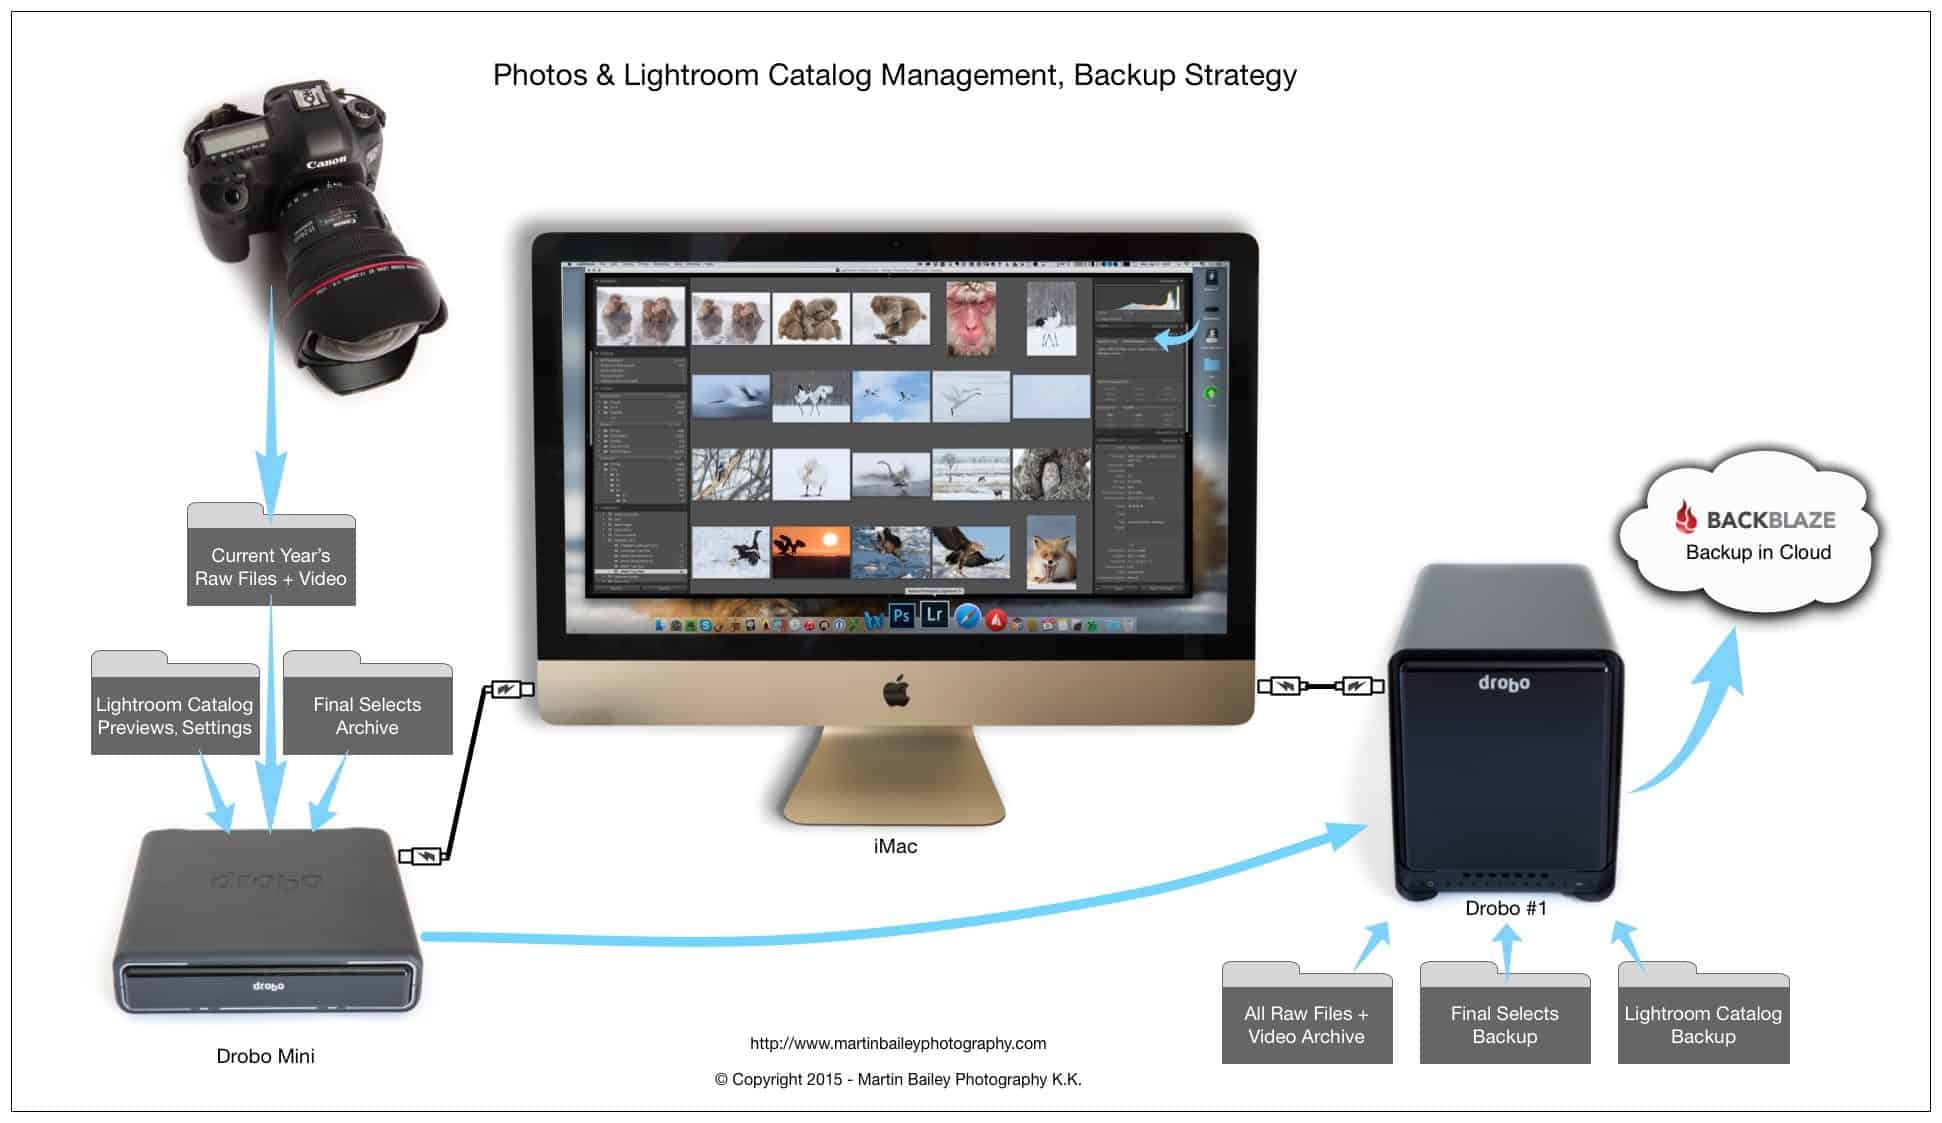
Diagram #2 iMac with Drobos and Cloud Backup
As you can also see from the diagram, because I have Backblaze set up on my iMac, as soon as I copy any new images to my Drobo 5D, they start to backup into the cloud. I will continue to synchronise changes to this Drobo 5D as I edit the images from my shoot, but I want to start to get my cloud backup started as quickly as possible. Any later changes will also sync into the cloud, so there’s little reason to wait on this, unless you are paying for data upload.
Diagram #3 – Second Backup for Paranoia’s Sake
There’s one last element of this base computer setup that I’d like to talk about before we move on, and that’s my second Drobo 5D which is purely for local backup purposes. I know this is a little paranoid, but bear with me. The Drobo 5D can have one hard disk fail without losing any data. If a hard disk fails, you simply pull it out and put a new hard disk in, and the Drobo automatically writes the necessary data back to the new hard drive, and you are safe against hard disk failures again.
In my paranoid mind though, that’s not enough to feel safe. I could have a second hard disk fail before my data is fully secured after replacing the first one, and the entire unit could fail too, leaving me with nothing local to fall back on. Assuming my Backblaze backup had already completed, I could of course download or have them send me my cloud backup on hard drives, but that takes time and I’d be panicking for days until my data was restored, so I just prefer to have a second local backup, as we see in this third diagram (below).

Diagram #3 – Second Drobo Mirrored Backup
ChronoSync for File Synchronisation
For all of my file synchronisation I use ChronoSync from Econ Technologies. This is the only operating system specific part of my workflow that we’ll touch on today. ChronoSync is only for the Mac OS. When I used Windows, I used to use a command line tool called Robocopy, but I haven’t used that for years, so I won’t go into the Windows alternative today. If you have a great tool that you’d like to recommend for Windows, please drop a note in the comments section below.
ChronoSync is an incredibly powerful file synchronisation tool. It’s important that you actually read the help to avoid deleting files unintentionally, but once you have a good understanding of how it works, it can make life a lot easier. One of the reasons for this, is because you can save your synchronisation tasks and open them again later to rerun them. For example, after I’ve transferred my images from my camera to my Drobo Mini, to copy them to my Drobo 5D and start my Backblaze backup, I simply launch a saved Sync task that will look for anything that has been changed or deleted from my 2015 folder on my Drobo Mini (see below) and copy or delete it from my Drobo 5D as necessary.
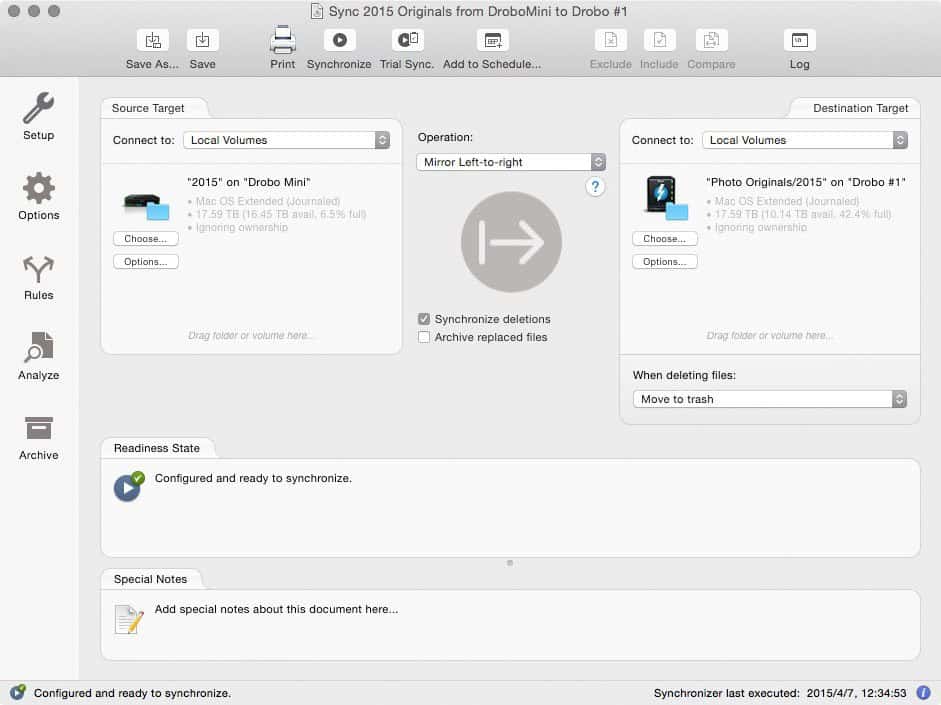
ChronoSync Screenshot
As I work on my files from a new shoot, or make any changes to my earlier 2015 files on my Drobo Mini, I just run this task again. For the whole of 2015, the current year, I will use my Drobo Mini as my main archive, and the Drobo 5D 2015 folder will be my backup, so I generally just Mirror the changes across. If necessary, you can do a synchronisation and copy any changes that you make to the target drive back to your main copy, simply by changing the Operation that you see in the middle of the screenshot.
A couple of important things to note here are that I usually run the Trial Sync with the button in the toolbar before I actually execute the sync task. This is like a dummy run, and you get a dialog to see what will be copied or deleted, so you can check that you haven’t made any stupid mistakes before you actually make them. The other thing is that you can select wether to delete files immediately, move them to trash, or move them to an archive folder instead of deleting them. I don’t like the Move to Archive option because you end up with archive folders everywhere, but I do like to turn on to just move the files to the trash, rather than delete them immediately. This is just another safety net.
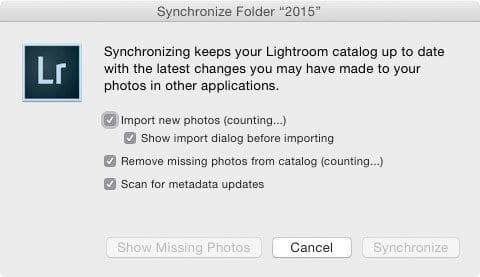
Lightroom Synchronize Folder
Synchronize Folders in Lightroom
Because I also have a 2015 (current year) folder in my “Photo Originals” directory on my Drobo 5D, once I’ve synched any images, I right click the folder in Lightroom, and select “Synchronize Folder…” This tells Lightroom to check the contents of the folder for anything new or removed, and you can also have it check for metadata changes as well.
Lightroom Export to Copy “Finals”
Once I’ve completed my editing of a shoot, and have my “Finals” or “Final Selects”, I copy these to the appropriate year in my Finals archive folder. Everything from the current year goes into a single folder. If I created a TIFF or PSD copy of my raw file, say to create a black and white version in Silver Efex Pro, or did some work in Photoshop, then I will keep both the raw file and the new format files together. If no copies were made, I just copy the raw files to the Finals folder.
Because I star rate my images to help with filtering, when I’m ready to copy my files, I just filter out anything with two stars or above. In my rating system, 2 stars means an original raw file. 3 stars is anything that I will present to Offset for consideration for inclusion in my stock library. 4 stars are images that I consider good enough to show people or use in a blog post etc. 5 stars are what I consider portfolio quality images.
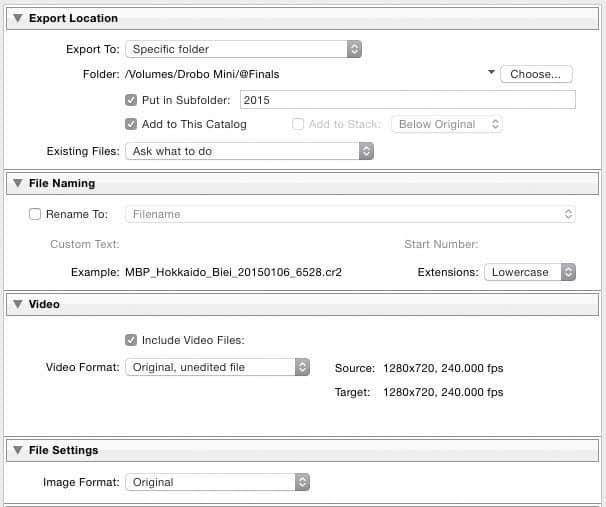
Lightroom Export Original Files
So, when I’m ready to copy my final selects to my Finals folder, I simply filter anything 2 stars or above from my original shoot folder, and use a Lightroom Export preset to copy these images to my Finals folder on my Drobo Mini and my Drobo 5D.
At this point, I copy to both locations because I can add the images to the Lightroom Catalog at this point, and that saves me from synchronising the Finals folder after copying files across manually or using ChronoSync.
The important thing to note here is that although this is an Export, I’m not creating a JPEG or any other new format. I select “Original” as the format, under both the Video and File Settings sections. This ensures that the files are simply copied to the new locations, whether they are a raw file, or a TIFF or PSD etc.
Once I’ve setup something like what we see in the screenshot here (right) I just save this as a Preset, then when I want to copy my Final selects to my Finals folder, I just have to select them and right click them, then select “Copy Original to Drobo Mini 2015 Finals” which is what I called the Preset, and I have a second preset to copy to my Drobo 5D.
Mirroring Entire Drives with ChronoSync
To close the loop on the last diagram before we move on, I guess I should just mention that to mirror the contents of my first Drobo 5D to my second, I also use a ChronoSync Task, but because we will mirror the root of the drive, I set up a few Rules to prevent ChronoSync from copying and overwriting some important system files, as we can see in this screenshot (below).

Sync Drobo #1 to Drobo #2
OK, so now you’ll see that we have a pretty sound process in place for managing images based on a Lightroom catalog and a few ChronoSync tasks that we can launch and run when changes have been made. It’s a little more complicated than simply transferring images to the hard drive inside your base computer, but remember, there’s one key advantage to having everything that you need to use regularly on that external hard drive.
Diagram #4 – Image Library Portability
With your workflow set up this way, all you have to do to access your images on another computer, is to eject your portable hard drive from the base computer and plug it into another computer. Whether you are in another part of your house or office, or on the other side of the planet, if you plugin your portable hard drive, you have access to everything necessary to start Lightroom and continue working as you would on your base computer.

Diagram #4 – Image Library Portability
Because Lightroom remembers the last catalog that you opened, it automatically goes to the external hard drive, even if you open Lightroom with the application icon. Of course, to cause this to happen, when you first move your Lightroom catalog to the external hard drive, you’ll need to double click on the catalog in its new location to force it to open from there, but as long as you have Lightroom set up to open the last catalog, that’s the only time you’ll have to do this. You can also select File > Open Catalog… and navigate to your new catalog location too, but again, you’ll only have to do this once.
Of course, because the main archive of all of your images, what I call my “Photo Originals” lives on a hard drive on your base computer, so that won’t be accessible, but when Lightroom can’t see anything, it just marks the folder with a question mark, to let you know that it’s offline. You can still click on the folders, and if you have previews created, you can even see the images. If you need to be able to edit photos that are essentially offline, you can enable this by going to Library > Previews, and selecting Build Smart Previews, but without that you can’t edit images in the Develop module etc. until you get back to your base computer. The point is though, Lightroom handles this gracefully.
Backups While On The Road
WD My Passport Ultra 2TB
The other items that you’ll notice in Diagram #4 (above) is my mobile backup drives. I use WD My Passport Ultra USB3.0 drives, because I think they provide great cost performance at just $99 for the 2TB drives. These are a little fatter than the 1TB drives, but I like to be able to backup my entire “Final” selects library on to these drives as well as my current year’s “Photo Originals” folder.
Now, as you know, I’m paranoid, so when I’m traveling, I actually make two backups of my images. This means that as I shoot, I backup all of my current year folder to two backup hard drives. Backup #1 and Backup #2 in diagram #4. Again, I use ChronoSync for this, and just save a task for each backup, and run it as necessary. Because I only have two USB ports on my MacBook Pro, I actually have to eject and plugin new drives when I want to run my Time Machine backup, but because my Drobo Mini connect with Thunderbolt, I can have both Backup drives attached at the same time as well.
You can even create Containers in ChronoSync, which can contain multiple sync tasks, so if you want to backup your images to both backup drives without intervention, you can do that quite easily. This is useful if you want to for example start off your double backup before taking a shower etc.
I know that some of you will consider it overkill to have a total of three backups of your images while traveling, but depending on where you’re going, I think it’s necessary, and generally do this whenever I’m on the road. I actually had one of my three external hard drives fail near the start of 7 weeks in Antarctica, and that was scary enough. If that had been my only backup drive, I’d have been climbing the walls.
Ultra-Portable Alternatives
As I mentioned earlier, the Drobo Mini is a hefty drive to lug around, especially if you’ll be jumping on international flights etc. so here are a few ultra-portable alternatives that work seamlessly with this workflow.
1) The first and most obvious alternative, is to simply synchronise your Lightroom Catalog to the hard drive of your laptop, but of course this requires that you have a large enough internal hard drive or SSD to hold your Lightroom Catalog, your Preview images and also maybe the images you’ll be shooting as you travel. This is great if you have an internal SSD, because they’re lightening fast to work from, but big SSD drives are expensive, and if you’ll be traveling for a long time, it will likely fill up.
2) The second lighter alternative is to use a lighter but still external hard drive, like my WD My Passport Ultra drives as the main archive and for your Lightroom catalog etc. This isn’t as smooth and stress free an experience as working with the Drobo Mini, because these drives are much slower, but it works, and is a nice affordable second choice if you are going to be shooting a lot. Lightroom is pretty good at finding your images etc. on the new drive as well. At least on a Mac system.
If Lightroom can’t find your images when you open the Catalog on a different drive, signified by the folders having a question mark against them, just right click the top level folder and select “Find Missing Folder” in the shortcut menu, then navigate to the folder on your new hard drive. This will remap everything, including your previews, and in my experience will not corrupt your catalog or anything.
Set a Hard Drive Letter for Windows
If you use this method of using a portable hard drive in a Window environment, you’ll probably need to ensure that the drive letter doesn’t change as you move the external hard drive around. I don’t remember exactly where you do this right now, but you can assign a drive letter to your hard drives, so it’s a good idea to assign something well away from the start of the alphabet, like M for mobile. That way other drives that you might attach that will be lettered D, E, F etc. won’t displace your external drive’s letter.
Not Really a Cross Plastform Solution
I should also mention that this solution is not ideal if you switch between Windows and Mac regularly. The catalog can be taken from one operating system to the other and will open, but Windows and the Mac OS reference drives differently, so you’d need to tell the other OS where your files live each time you open the catalog on the other system.
Also the location of your presets and settings is not recognized, so I personally think it’s more trouble than it’s worth if you are switching between operating systems. It makes it easy to move from one system to the other, but not really great if you want to switching back and forth.
Wrap-up
OK, so I hope that has been useful for you. Having synched my Lightroom catalog around for the last few years, I’m finding it much easier now to just move my external hard drive around. It might not be for everyone, but I am really enjoying this workflow. As good workflows should, it just works, and that’s important to me.
Show Notes
Drobo Mini + 4 x 1TB 7200 rpm 2.5″ HDDs: https://mbp.ac/drobomini4tb
Crucial 250GB Internal SSD: https://mbp.ac/msata250gb
WD My Passport Ultra portable hard drive: https://mbp.ac/wd2tb
Subscribe in iTunes for Enhanced Podcasts delivered automatically to your computer.
Download this Podcast in MP3 format (Audio Only).
Download this Podcast in Enhanced Podcast M4A format. This requires Apple iTunes or Quicktime to view/listen.

Great Podcast! Thought I’d drop you a comment to let you know about a tool I use which exists on almost every OSX or Unix system out there.
rsync is a free utility that is command line driven so more suited to technically minded people however it’s a great tool and is probably what ChronoSync is built on top of. So for anyone that doesn’t want to have to pay for a sync tool I can highly recommend it. I use it for keeping my physical backup drive up to date along with syncing my working directory with my archive drive.
http://linux.die.net/man/1/rsync
Thanks,
Jason
I’m sure you’re right Jason. I would imagine ChronoSync uses RSync in the background. Thanks for stopping by and for the recommendation!
Great article Martin, very useful resource
Thanks Allister!
Hi Folks,
my cheep solution for keeping a second copy is a batch file with …. xcopy ‘s …. this copies only newer/changed files and does not delete anything.
Selected Important Lines.
@ set DRV05=E:
@ set DIR05=\
@ set DRV06=F:
@ set DIR06=\
@ set PARM2= /V /C /I /R /Y /H /f /S /D
REM /V Verify /C Continue /I Destination Directory… /R Overwrite Read /Y Suppresses prompting /H hidden /F full source /S subdirectories /D:m-d-y Specified Date.
@ set SUBDR=\Share_12
@ echo %DRV05%%DIR05%%SUBDR% %DRV06%%DIR06%%SUBDR%
xcopy %DRV05%%DIR05%%SUBDR% %DRV06%%DIR06%%SUBDR% %PARM2% >> %Log%
@ echo %DRV05%%DIR05%%SUBDR% to %DRV06%%DIR06%%SUBDR% >> %Log%
Cool! Thanks Michael!
Could you please just recheck the code you posted, to ensure that this should simply be copy and pasted for use? Sometimes comments can mess code like this up.
The code extracts left at 15:34h, 09 April are correct, but anyone wishing to use them, should have some basic batch file scripting experience. Experimenting in a Command window helps here.
Eg.
@ set Log=C:\Temp\XcopyLog.txt
xcopy /?
xcopy E:\Share_12 F:\Share_12 /V /C /I /R /Y /H /f /S /D
E:\Share_12\Picture5\2015\20150123\Z20150123_130151.CR2 -> F:\Share_12\Picture5\2015\20150123\Z20150123_130151.CR2
E:\Share_12\Picture5\2015\20150123\Z20150123_130151.JPG -> F:\Share_12\Picture5\2015\20150123\Z20150123_130151.JPG
E:\Share_12\Picture5\2015\20150123\Z20150123_130151.xmp -> F:\Share_12\Picture5\2015\20150123\Z20150123_130151.xmp
3 File(s) copied
Nice podcast @martin ! Always inspiring!
Thanks Lionel!
For Windows may I suggest SyncBack Free. It seems likely this will do everything that Chronosync does. Various backup schemes are supported, including synchronization to keep both file systems the same. And everything can be scheduled to run when you choose, or run manually whenever you like.
[This is not a paid endorsement and I don’t work for the company.] 😉
Thanks Vic! This does look like a great product. Here’s a link: http://www.2brightsparks.com/syncback/compare.html
Another +1 for Vic’s nomination of SyncBack.
Great endorsement Derek. Thanks!
Thanks for sharing Martin!
I’m into Windows and recommend FreeFileSync. It’s open source and very dynamic. I use it for five years now, I believe.
Thanks for the recommendation Leo!
I really like GoodSync, which is a cross platform bit of software. I use it a lot to backup my Photo Library to my NAS and an Offsite Server.
http://www.goodsync.com/
Looks Great Liam! Especially if working between Mac and Windows. Thanks very much for the recommendation!
Hi Guys, I use Bittorrent sync (www.getsync.com) for syncing my data between different machines on my net work, it very fast and is cross platform so will work on Mac/Linux and Windows.
Good recommendation Paul. I’ve used Bittorrent for synching between computers in the past too.
Can you sync between drives on the same computer with Bittorrent? I don’t remember.
Another +1 for SyncBack. I use Pro. I tested out several notable file syncing programs early last year to see which was fastest and most reliable on Windows 8.1 under a variety of scenarios (thumbdrives, SSDs, NAS, RAID, etc.). I’d been using 2nd Copy and TeraCopy. I tried out GoodSync, FastCopy, RichCopy, Robocopy, RSync, xcopy, EMCopy, and many others. In the end I settled with SyncBackPro because it was multi-threaded, it pre-allocated files properly for less fragmentation, and it had the most options for scheduling, two-way syncing, mirroring, backing up (preserving deletions), etc. And this isn’t a paid endorsement either, I’m just very pleased with the performance and reliability over the past 18 months or so.
Great topic and podcast Martin! I do things a little differently for my needs. I run my complete catalog on my striped SSD on my workstation, with the image files on a large internal RAID array. Everything gets backed up every so many hours to my Synology. When my main workstation goes down (hard drive crash, motherboard fried, whatever), I can copy the backed up catalog from the Synology to the SSD on my laptop and still access all my files over the LAN to my Synology. I just right click the top level folder and tell it where to find the photos and work off my NAS. It’s slow, but it works in a pinch. I also do this for workshops on the road where I might want to access an old file for reference or for a client when I’m gone for a few weeks. It’s hardly a mobile solution of course, as the Synology is large and requires AC power, but it works for teaching workshops in a classroom.
When shooting and editing on the road, I use a separate catalog file on my laptop that I import later to my main catalog back home on my workstation. I have an external USB 3.0 hard drive for this as several nights of timelapses won’t fit on my laptop’s SSD. I’ve been considering the Drobo Mini for this for more redundancy and speed. I still have two external USB 3.0 drives that I keep in sync though for redundancy/backup, or I back everything up to the larger Synology if it’s with me.
Hey Aaron, thanks for the detailed information!
That’s a great endorsement for SyncBack Pro. You did a lot of great testing there. Thanks for providing that list. It’s going to be very useful for anyone looking into this kind of think. Did you do a blog post about it? Drop a link in if you did. I’m sure others would also like to this this.
I know it’s only been a few months, but I’ve actually stopped using my Drobo Mini for this workflow. Having to plug it into the power started to become very tedious, and it’s just too big for travel, especially air travel. When I first looked around for a fast external and portable hard drive, there were really not many alternatives, but I recently found the WD My Passport Pro, which is a 4TB Thunderbolt (only) drive. I’ve ended up buying two, one as a backup of the first, and with 4TB I will be able to fit plenty of images in there while traveling.
It’s great to have this amount of storage, powered from the laptop, and actually slightly faster than the Drobo Mini. I guess because it’s Thunderbolt though, that kind of rules this out for Windows. I hope someone develops a board or some kind of hard wear bridge for Windows at some point.
I didn’t hang onto all of my speed tests and screenshots to write a good blog post about it. I wish I had.
I hear you about the Drobo Mini. I use a 1TB 2.5″ USB 3.0 powered drive for simple things on the road (no AC power), but I run out of space on it quick, and there’s no redundancy without cloning it to another.
So via Thunderbolt you can power the drive just like USB 3.0, no need for external power huh? At 4TB, it must be a desktop drive and not a notebook sized one? That must drain the laptop battery pretty quickly?
Windows supports Thunderbolt, but driver support by Intel hasn’t been real great yet. Windows 10 will probably change that with native support by Microsoft. It’s hard to find a decent laptop with a Thunderbolt port though (that is still a portable laptop and not a desktop replacement, LOL!). I’m hoping USB 3.1 changes all this soon.
Hi Aaron,
Yes, the redundancy is why I always buy these portable drives in pairs.
The WD My Passport Pro is not a desktop drive. It’s a 2.5″ side, with a bit more height, as it has two 2TB 2.5″ drives inside. It’s actually a stripe, and can also be configured as a 2TB mirrored drive, if redundancy in a single drive is important to you. See here: https://mbp.ac/wd4tb
It’s not a huge drain the laptop battery either.
That’s good that Thunderbolt is coming to Windows.
Cheers,
Martin.
Hi Martin,
I’m middle of massive backup system workflow.
I like simplicity of yours. I have seen soooo many complex ones that I’m a bit going crazy.
At the moment I have 4TB WD attached to main desktop. I also copy my cards first on my main 4TB HD and then I use LR to edit from it.
I have filled up that HD now and not sure what should be my main next move. First of all I need to back up my 4TB one as so far I back up only final selection for clients on separate drive. So I’m thinking to get one more 4TB drive to back it up.
Now I’m wondering if I should get some sort of drobo system instead of many desktop HD’s.
I don’t do that much traveling so that is not an issue for me.
My head spinning of what to back up and what not and what to use for each of these steps. Madness.
Need to get something in place.
Thank you and will read through this few more times 🙂
You definitely need to back up your 4TB drive. It will fail at some point, so unless you do not need all of the photos on there that are not your final selects, definitely keep this in mind as you consider your strategy.
A Drobo would be a good way to store your images, although they can be expensive. a Drobo 5D starting with say two 8TB WD Red drives would give you 8TB of redundant storage, so you could copy your current two 4TB drives to that and make the Drobo your main storage, and continue to use the two 4TB drives as a backup perhaps.
Then, as you need more space, you could add up to three more 8TB drives, to keep all of your images on one drive. Personally, I use a second Drobo 5D as a backup of my main one, but if necessary, multiple other external drives would work too.
Also consider Backblaze as an addition cloud backup service. It’s best to have something offsite as well as your local (home) backups.
Hi Martin,
Thank you for the reply. I have spent a day looking through various options and comparisons. Seems like many photographers go for Drobo and few other big brands, but I will be a bit short on my budget to get Drobo enclosure alone which costs £600 plus and drives one top of that.
What I was thinking for now is maybe to get like good WD internal drives (like the ones you use in Drobo) and buy them casing boxes. Then when I have extra cash, take them out of casings and put them in enclosure unit.
I understand importance of back up, but need to wait around 6 month to get all properly set. Just got new equipment upgrade.
Also one more questions.
See your drobos, are they linked to LR as well or not?
While I was researching I came across very interesting article on Fstopper where they were talking about having “editing” fast hard drive like 7200rmp or SSD, use that for LR catalog/editing and then have 2 back up systems for archival. The interesting part was that they initially use editing drive to get everything edited in LR and then export each job as catalog to back up archival drive. Then they delete entire job from editing hard drive. Making sure that edit HD doesn’t fill up. Have never exported jobs as catalogues, but this could be option maybe to avoid my main HD filling up? Is this how you do it too?
Thanks Martin.
Regards,
Armands
Hi Armands,
I actually no longer use Lightroom, having jumped ship to Capture One Pro, but I do reference all previous year archives directly from the Drobo. I reference the current year and my Finals from all years to date on an external SSD drive that I’ve started using recently, because I move this drive between my iMac and MacBook Pro constantly. If I only used one computer, the Drobo via Thunderbolt would be fast enough.
If the enclosures that you are thinking of are only USB 3.0 then it may not be fast enough for stress-free image editing. You’d need to keep your current year or at least recent shots on an internal hard drive. You don’t have to export images as catalogs. You can move them to your external drives and keep them in the same catalog as your internal drive images. Lightroom can reference images on many different drives, and because Lightroom works fine with very large image libraries, I would recommend not splitting up your images into multiple catalogs.
All you need to do is move your first batch of images manually, then when you see the question mark against the folders in Lightroom, right click the folder and relocate it. Then show the parent folder, and you could then just drag any other folders to the new hard drive inside Lightroom, and it will just keep track of everything for you.
I hope that helps!
Regards,
Martin.
Oh and one more question about Bacblaze. I just had a chat with them and since I’m a photographer they said the best would be B2 Cloud storage which costs around $150 per month. Do you have B2 or Business back up per computer for $50 per year?
I wasn’t sure what means per computer. Could it be per HD?
Thank you Martin.
Regards,
Armands
Hi Armands,
I’m sure they’d prefer you to do that, but their $50/year plans are unlimited storage, and there is nothing to stop you using them. I use a $50/year plan and do not need any of the features of their B2 plan, so I’ve no plans to upgrade.
No, per computer means all drives attached to your computer. I have 9TB of data on Backblaze saved from my Drobo 5D via my iMac.
Regards,
Martin.
Thank you Martin for reply. My head is spinning. If money would not be an issue I would know what to do, but here I need to play with it a bit. So I’m option out for similar set up as your.
I’m thinking to get 500GB solid state drive and put LR catalogue on it and run LR from it too. This would be externally attached. I have pretty old iMac 2009 and drive has failed already twice so I’m a bit worried to put anything on actually machine. I have run everything externally since.
On one side of machine have work station 2 x 2TB fast internal 3.5″ drives and I would load images on them from memory cards. I would set up mirror option with software you were recommending so I have a back up of that drive.
on other side of machine ( where you have drobos) I would have archive set up. I still don’t know how big these should be but I think for now I will get 2 x 4TB on mirror basis. Also external.
This is only for my new work as of 2017.
Not sure what to do with my current work. I have already 8TB of that. Should I just get few drives and copy work on them and put them in foam case. Half of that I pretty much don’t look at anyway.
Need to get this sorted. I saw someone selling Drobo mini for £100 and was thinking maybe to get that one as my workstation. it has 4 x 1TB drives.
What do you think Martin.
Sorry for all long winded story 🙁 scared of worse case scenario.
Thank you,
Regards,
Armands
I just realised that its no point for me to have usb3 it will still be usb2 as my mac has only USB connections. Bugger 🙁 so using external HDD will be still USB 2.
The only option is to change main internal HD then to SSD one. It is possible to do it, checked it.
I didn’t see that coming. So now it looks like I might need whole new desktop machine if I want efficiently back up. not good 🙁
Thanks for all of your help Martin.
Oh, I see. That does suck a little. I would imagine a new iMac would be the best way to start, but if you are running out of space, maybe just ensure that you buy something external that will give you the best speed once you’ve upgraded your iMac.
I’m now using a SanDisk Extreme 900 Portable SSD for my Capture One Catalogs, Finals and current year’s images. These are costly, but very, very fast. http://amzn.to/2idDqoh
What you’d need to do is ensure that you get something that is USB 3.1 Gen 2. Gen 2 is twice as fast as USB 3.1. It’s basically Thunderbolt 3, and will be used on all new Macs for a while, although these are currently not in the iMac. I’m sure they’ll be in the next generation.
My point is though, if you buy a fast external drive at this point, consider what will be available when you upgrade, and you’ll future-proof your purchase. Also, I’m plugging my Extreme 900 SSD into a USB 3 port on my iMac, and it’s still fast enough to run my Capture One Catalogs and images without stress. I only get the full speed on my new MacBook Pro with USB 3.1 Gen 2 ports.
I bought a SanDisk Extreme 900 1.92TB USB 3.1 Gen 2 SSD (what a mouth full!) for my new laptop. I can’t say enough good things about it! It’s very well built, doesn’t get hot, and runs well on USB 1.1 (slow of course), 2.0, 3.0, and especially 3.1 Gen 2. Some devices aren’t as backwards compatible, but that SanDisk works on everything I’ve plugged it into with no power issues. It has two mSATA SSDs striped as RAID 0 internally, but it still supports TRIM from the OS. There’s no access to the internal controller, you can’t change RAID levels or tune it, but the average consumer doesn’t need to. I’ve looked high and low for a dual slot PCIe NVMe to USB 3.1 Gen 2 adapter to build my own for even more speed, but I’ve only found a single Chinese manufacturer that makes one, and it’s so slow and unreliable that my old SATA to USB 3.0 enclosure is better. So, in the meantime, I’m very happy with the fast and reliable Extreme 900. SanDisk knocked it out of the park with this one!
I couldn’t agree more Aaron!
I got mine to go with the new MacBook Pro 13″ and my tests via USB 3.1 Gen 2 have given me amazing results.
As I mentioned in the above comment, I’ve also found it fast enough to run Capture One catalogs via USB 3 on my iMac, and that wasn’t possible on my WD 4TB Passport Pro via Thunderbolt 1.
Like you say, built, heat management, everything, it’s a huge thumbs up for this SSD.
All the best for 2017!
Regards,
Martin.