

Following on from last week’s episode on creating a portfolio, I made the time to select my Landscapes of Japan images but unlike my Wildlife portfolio, which felt fine with the images in chronological order, my landscape work needed sequencing, so today we’re going to dive into some of my considerations when deciding on the order of the images in a portfolio.
To give you just a little bit of background on the project before we move on, in last week’s post, I explained how I decided to split away the landscape work from my Nature of Japan portfolio and create a new Wildlife of Japan portfolio, and although I didn’t think I’d have time to do the Landscape portfolio before leaving for Namibia this week, I was reminded that I hadn’t touched on sequencing in the last episode, and although that was a conscious decision, because I decided to leave the portfolio in chronological order, I should have at least explained that.
I also did not really have time to go into sequencing in last week’s already long episode, so breaking them away into separate posts was probably a good idea anyway. I’d like to send out a huge thank you to Ulana Switucha for communicating with me on these posts, and for being at least partially responsible for me putting them together. Ulana is a wonderful photographer with a beautiful website, so do check that out when you have some time.
So, I decided to go through my entire collection of images for this landscape portfolio and ended up with a pretty hefty collection of 200 images to work with, but I whittled it down to just 50 using the processes that we discussed last week.
Starting the Sequencing Process
Looking at my 50 images, I now need to start and put them into some sort of order, that will make sense when viewed in series during a slideshow, and I also want to ensure that the page of thumbnails looks nice too. I started with my set sorted by date, from oldest to newest, as you can see in this screenshot.

Most asset management applications will automatically switch to some form of custom order once you start to drag your images around, so to get started, I’m literally just going to start dragging my images around, and seeing how they look. I’ll go over the sort of things that I think about as I do this now. It’s not uncommon to decide that certain images just don’t match, or that we need to go and fetch something else to make a cohesive link between two photos, so we’ll see how that goes. I am hoping to not take the set to more than 50, but I don’t mind removing a few more if necessary.
Toning
One of the first things you’ll notice is that there are very few color images. I did include a lot more of my fall color work in my initial selection, but it really doesn’t seem to fit, and even now, I’m not sure that the four brightly colored images have a place in this portfolio, but we’ll see how we get on with that too. For now, I have to decide on my strategy for placing these color images amongst the black and white work.
In the past I have tried various things, such as interspersing the color work alternating between color and black and white, and also adding the work in pairs, two
Also, notice that my selection currently only contains two portrait orientation images, and the rest are landscape orientation. I’m going to try using the two portrait orientation images as bookends either side of the color work. I also have one shot of the cranes in the river that is a color image, but only a slightly warm tone, in an image that is close to black and white, so I’ve put that before the first bookend. This is basically saying to the viewer, here comes a bit of color!
Tentatively, for now, I’ve put
In fact, I also feel that the red in the Shinto Gate shot with a splash of orange in the sky is perhaps also not color enough to keep that between the bookends, so I’m going to put that before my winter persimmon fruit tree as well.
What I also like to do is use a color wheel to check the relationships between my colors after I’ve put my images into an order that looks pleasing to me. This isn’t necessarily a science, but the relationship and flow or movement of the color
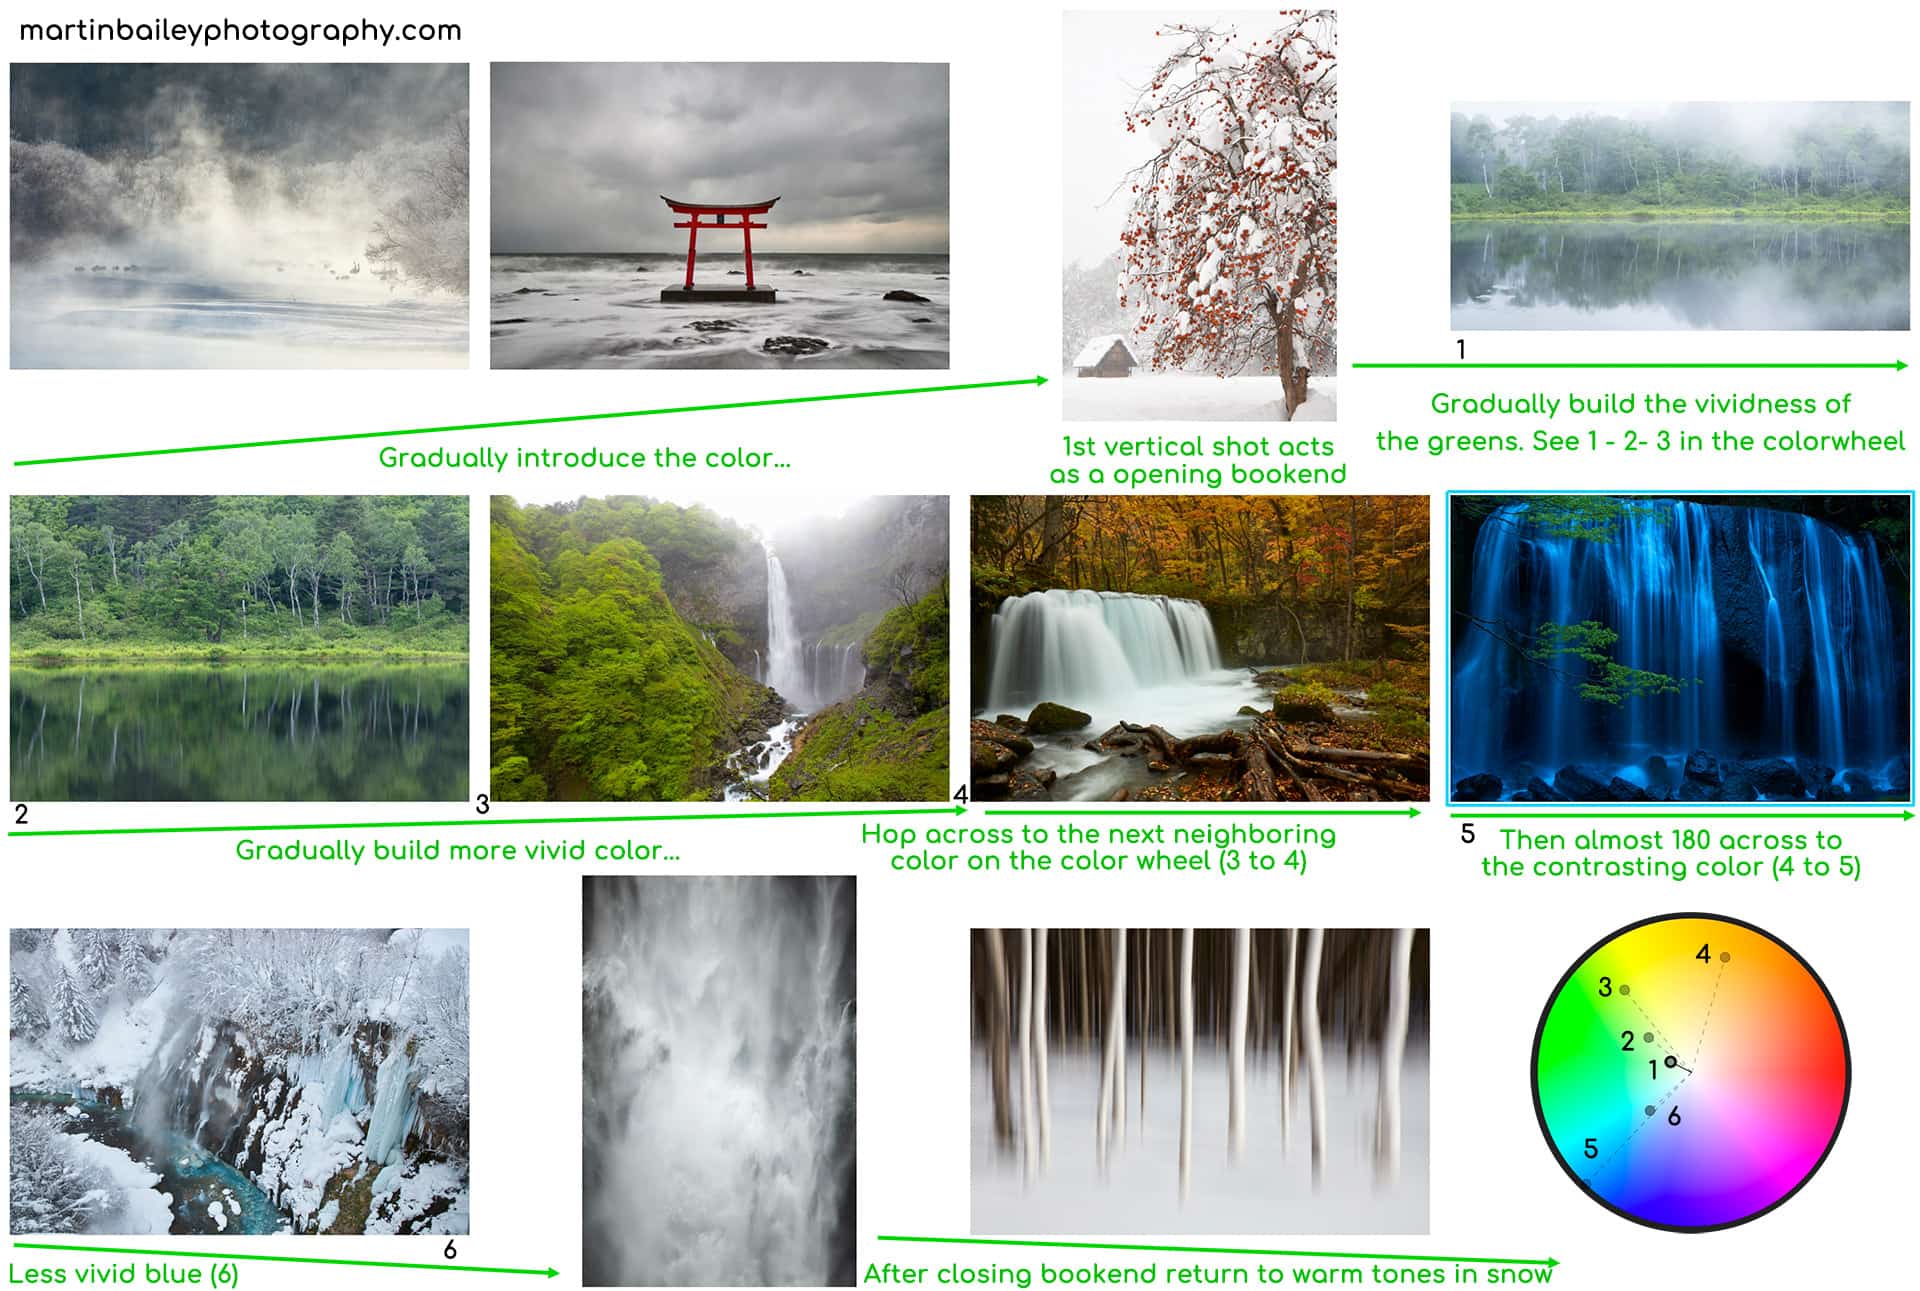
I’ll walk you through my mark-up though, starting with the gradual introduction of color before the opening bookend vertical image. I ordered my three green images in order of vividness, and we can confirm that
The most jarring jump is from the orange fall foliage to the shocking blue waterfall, but if you look at the colors numbered 4 and 5 from these two images, we can see that they are close to being opposite each other on the color
Many of you will recall the blue waterfall shot as the image I used for the podcast artwork for a number of years in the early days. Some people think it’s falsely too blue, but I assure you, that was the color of the falls in the shaded gorge where the falls reside, literally moments before the day completely gave way to the night. If I run auto-white balance on this shot, which usually neutralizes any false adjustments, the color of the falls does not change.
After the blue water
Opening and Closing Shots
The next thing I did was decide on my opening and closing shots. For my opening image, I really want to use something strong, and an indication to the viewer of what sort of images they’re going to see. It has to be something that almost represents my work, which is mostly winter landscapes. For now, I think I’m going to select the photo of what I conceitedly call Martin’s Tree, as it’s my favorite tree in Hokkaido but is one of the few large trees up there that doesn’t actually have a name.
As a closing shot, I’m going to use my photo of the wooden jetty at the end of the day, partly because it was the end of the day and would, therefore, help to signify the end of the portfolio, but also because it’s literally a dead end, as in if you were to walk off the end of it, all that is waiting is a deep dark cold lake. Let’s just stop right here, if you know what I mean.
Identify Groups within Groups
Next, I’m going to start and look for groups of images, and maybe also groups within those groups. For example, although they were taken in different years, I have three photos of the tetrapods at one of the fishing ports that we visit on my Hokkaido Winter Landscape photography tour, so for now, I’m going to put them together.
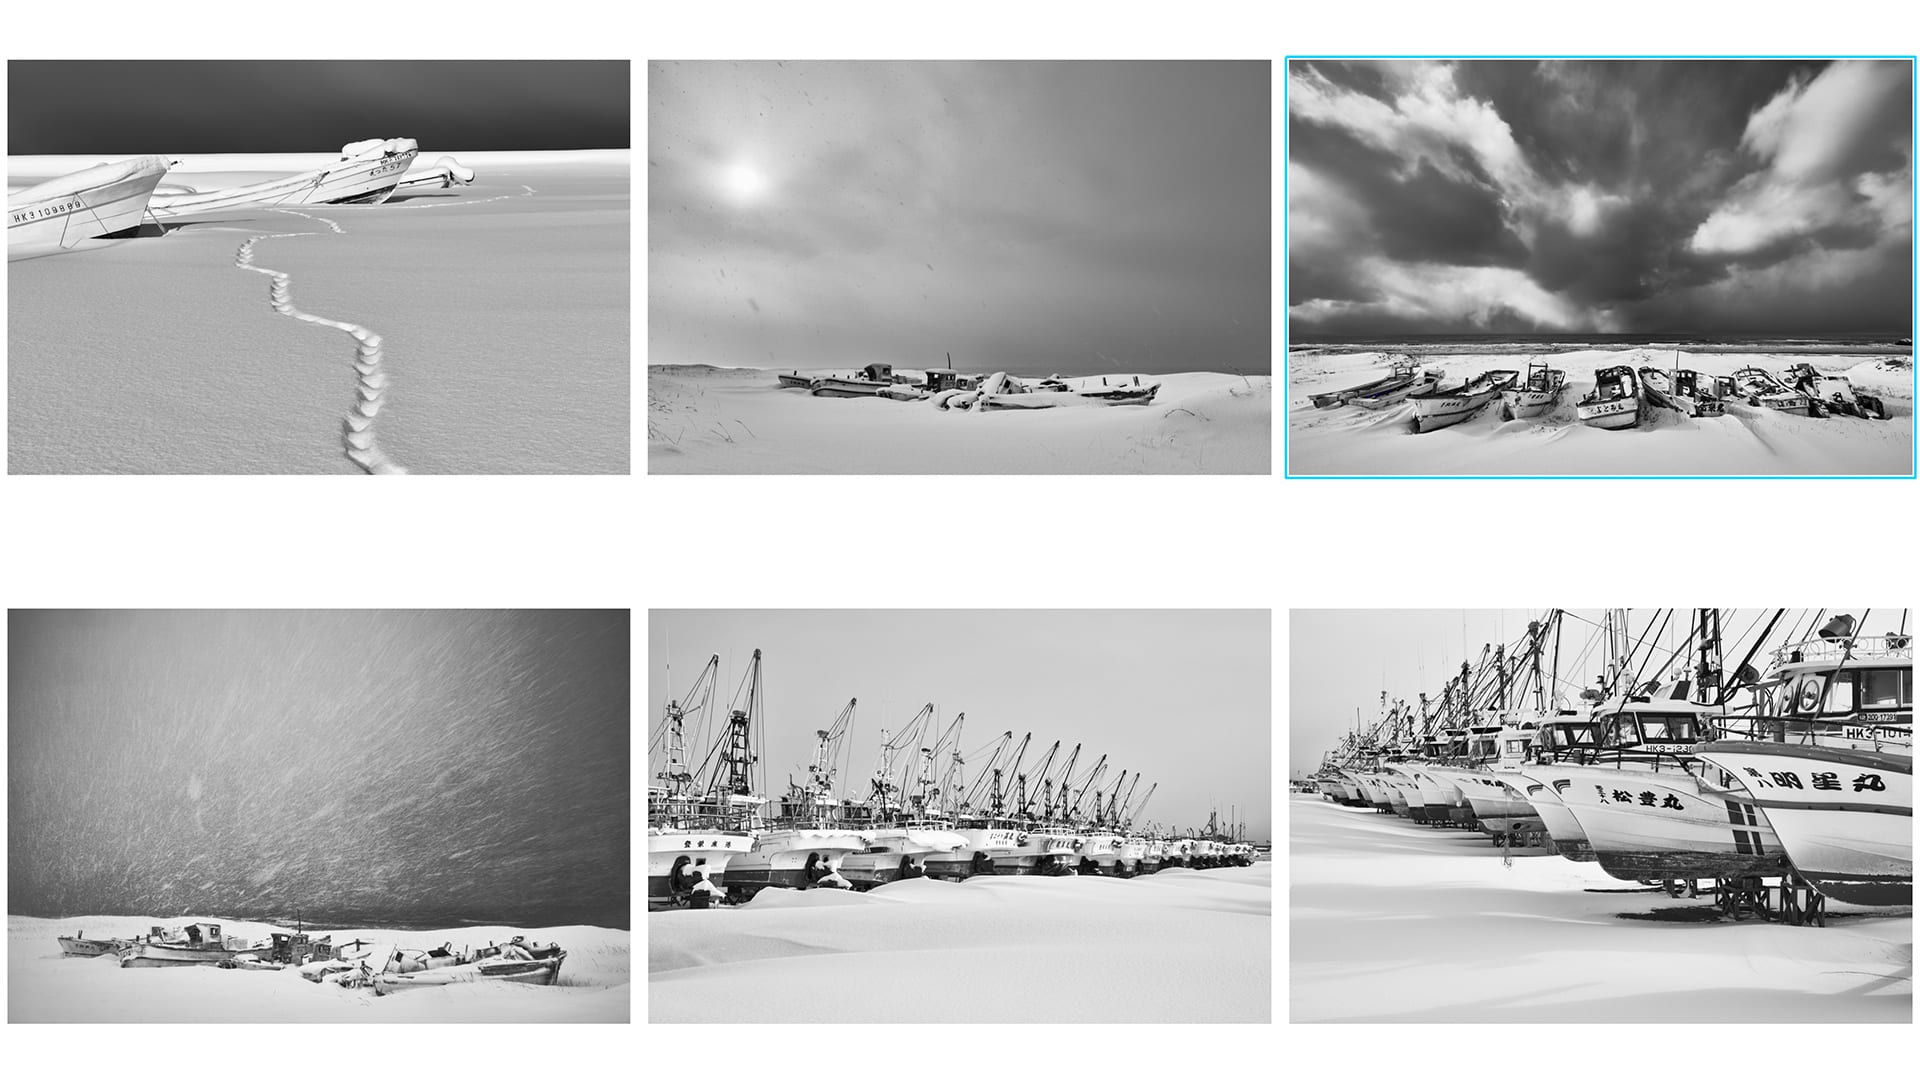
It’s often difficult to know what to do with these sorts of groups, as in, do we break them up and drop a fishing boat shot in here and there, or do we do what we did with the color images, and group them together? Also, I could use the shot of the front of the line of boats to signify the start, and line of boats from the back to signify the end. Or, I could use the boat graveyard shots to finish, because it’s literally the end of the road, or sea in this case, for these boats.
As with all of what I’m talking about here, these are the thought process that I work through, and none of it is set in stone. By walking you through what I think about as I do this, I am just hoping it will help you to make better decisions or confirm that you are making similar decisions when you work on your own portfolio sequencing. I like the idea of the footprints leading towards the small boats in the snow as a leading shot for this group, and I have purposefully placed the big sky view of the boat graveyard between the two side-on shots.
I think I’m going to switch the stormy shot for the sunny shot, as I prefer the story that things get better after the storm, and I’ll then switch the two lines of boats around. For me, I want to keep them in this order because that’s the actual position of these lines in reality, but story-wise, I think the back of the boats makes a better finishing shot.
Direction of Elements
The next thing I’ll do is look at the direction of the elements in my shots, and try to position them within the group based on this. For example, the starting image has the tree on the left and it’s leading to the right. To counter that, I’m going to put my shot of the
I have a lot of tree on hill
Change Your Mind
Keep in mind too that it is absolutely fine to change your mind. Try not to change it so often that you feel like a dog chasing its tail, but don’t think that anything is set in stone. Even after you’ve posted a gallery online or printed out your portfolio, as long as it’s loose leaf, you can change it at any time. If you are going to print a bound book I’d recommend running your selected sequence past a number of people before you place your order, but otherwise, stay flexible with this.
I’ve already just changed my mind on something I said just a few moments ago.
I’ve decided to put the three lone tree shots every three images from the start of the set, so that means I need to add a second image between the first two, so I’m choosing a straight on shot of the line of trees. I feel that the flow is still good, almost like passing a baton from the first lone tree to the copse which has it’s back to the second lone tree.
Zoom In or Out
I then have two images of the same tree at Mount Asahi, taken three years apart, with the first being a close-up shot from this year, and the second showing the viewer the wider scene. I’m essentially zooming out with the second image, but you could zoom in, showing the wider scene first, then the close-up. For this pair, I like zooming out.
Even with different subjects, I think it can work to lead the viewer into more intimate close-up scenes, then try to lead them back out to wider scenes.
For example, after my third lone tree, I used another left to right shot of snow covered trees and woods, a middle shot that is more intimate, then a wider shot that leads right to left, once again pausing the eye, before starting again with a copse of trees on the left, then another front-on line of trees, then a copse of trees on the right.
Change Gears
That actually completes all of my images of trees and woods in the snow, except for one close-up of a tree that has actually now been cut down because it got sick around eight years ago now. This is a much closer view of a tree than all the others, and it’s a very graphical, dynamic shape, so I’m using this to almost say, OK, that’s that, and we’re moving on to something else now. This tree is also leading the viewer from left to right, so I follow with something different, but it also now for the first time has some man-made elements. I’m basically saying, here’s nature, handing over to a bit of human intervention, with the avalanche barriers on the side of the hill in the northern-most city of Japan.
I then placed another shot of man-made objects, the fish drying frames in the snow. This is a one-point perspective shot, leading the viewer’s eye directly to the back of the shot, and for the attentive, you’ll notice a small patch of
I will drop in another screenshot at this point though, so you can see where we are at after all that. Having hinted at the nautical and fishing theme with the glimpse of the sea behind the fish drying frames, we then start the series of fishing boats that we ordered earlier.
Create a Storyline
I’ve also now added two more finishing shots. With the Ezo Deer running across the snow as the sun drops closer to the horizon causing sun beams to break through the clouds, and a Northern Red Fox climbs a snow-covered hill close to dusk. These things may not be obvious to a viewer of a slideshow for example, when each image is only on-screen for four or five seconds, but I think they help to make the presentation feel more natural.
At this point, I now need to find a home for around five more photographs. The stone jetty leading out to sea, the third image from the left on the middle row above, is kind of OK where it is, I guess. We could think of that as leading us back to the water, before the water in the next few images. I like that shot, but I’m close to removing it because I can’t find a really convincing home for it in this set.
Rework Images If Necessary
The image after that, of the snow pillows in the river, is one of three images that was processed in Silver Efex Pro and I have not yet reworked. If I’m going to leave that in, I will go and grab my original raw file and process that in Capture One Pro for two reasons. Firstly, the toning of the current version is bluer than the rest of my work, which is a slightly warmer tone by comparison, but the reality is that the rest of my work is completely neutral. I have already reworked around ten of the other images, that are older than 2016, which is when I jumped ship to Capture One Pro. I just feel that the image quality is better, and therefore I use opportunities like this to gradually update my archive.
Cut Yourself Some Slack, Or Not
The two images of grasses poking out of the snow are in my mind a pair, that I want to keep together, and I was thinking that I would zoom in to them from the base of the trees as you saw them in the earlier screenshot, but they don’t really work there. I’m not completely happy with this, but I’m going to move them between the copse on the right side and the old tree that was cut down. Tonally they work well there, so I’m not going to worry about that anymore at this point. It’s completely up to you if you want to cut yourself some slack on these decisions. The alternative for me at this point is to remove them from the set, but I like them too much to do that.
Also, without a good home for the intimate shot of the top of the frozen Oshin Koshin Falls, I recalled that that image was actually still in color, with some faint blue in the ice, so I used the Advanced Color Editor in Capture One Pro to select that blue, and increased the saturation slightly, so that a viewer would be able to detect the color as we come out of the color image group in the middle of the set. That also keeps all six of my waterfall images together, which I like. Once again, the strategy of having groups within groups.
The vertical lines of the intentional camera movement shot of the birch trees also, to a degree, mirrors the vertical posts in the snow in the image that I have put next to that, and we are then led into my fishing port tetrapod shots, then I placed my two other tetrapod shots, making that a group of five, and I put the black rocks with the crashing wave shot from Okinawa after that. It was a scorching hot day when I shot that, but you can’t really tell from the photos, so it feels fine there.
Home Stretch
I then have the wind farm shot with the stormy sky, and a sunbeam shot which is also quite dramatic, leading to the final sunbeam shot with the deer heading home then the fox heading home, then the evening jetty to finish. Phew! I think we’ve finally done it! To check, I sit back, grab a coffee, and watch the set through in slideshow mode, but the flow feels good to me. Here’s one last screenshot of the set.
In this final sequence, you’ll notice that all of the lighter shots are at the start of the set, then the images get gradually darker leading to the color work, then gradually darker again towards the end. That also feels very natural to me. Now all that’s left to do is to ensure that I have titles on all of the images, and I’ll upload them to my website and create my portfolio gallery. Note that when I export my images the order will not be kept, unless I append a two digital sequential number to all of the image filenames during the export. I actually won’t do that, instead opting to just reorder them in the NextGEN Gallery as I create the portfolio. It takes a bit of extra time but I prefer to keep my original filenames.
Old Versus New
Another thing that I’d like to touch on is the dilemma of whether or not to replace old images with new ones. It’s really easy to want our latest work to be our best, and I’ve mentioned a number of times, that I believe in general that it should be. However, when looking at images for a portfolio, I really recommend that you select images based on the merit of each individual image.
The only time I do not do this is if I’m looking for images that are to be printed very large. Although I found recently that my 30-megapixel EOS R images can be printed as large as my 50-megapixel images and actually look better, but there are limits. There are also restrictions placed upon us sometimes. I have had to find higher resolutions for clients when the images were going to be printed 5 meters wide for example, because the originally selected images were just not high enough resolution.
Although I didn’t check this until now, I see that the oldest image in this set was made with a 22-megapixel camera, and that is still plenty for most print uses, so there is nothing to worry about there. I would much rather select images that I feel are worthy of the portfolio over more recent ones that maybe aren’t as good. The danger, of course, is that if the memory of creating your latest work is still fresh, you will likely favor that over older work even though it might not be as good. Because of this, it’s also a good idea to try and make this kind of change at least six months or so after you shot the images, although you can learn to remove these emotions much earlier, as long as you are aware that they are coming into play.
Give It Time
Keep in mind that if you want to do a good job of your sequencing, make sure you give it the time it requires. Sequencing is not an afterthought or something you can do in ten minutes before you throw your images online. You can do it in your web gallery if you want, but I find it much easier to do this in my image editing software, as we’ve walked through together today. In terms of time though, this probably took me at least an hour of deliberation. Be prepared to give this a lot of thought.
Also, just to reiterate that if you are going to be committing the order of your images in something like a printed and bound book, then, by all means, go through it with people that you trust and get a feel for their reaction. I’m pretty confident with my final flow here, but if when you view the gallery at a later time you find the images rearranged, it will be because I had a change of heart. Of course, over time I will add new images and remove others, so this may only be current until the fall of 2019 or sometime in 2020.
Adapt and Ask Questions
Finally, if you are sitting there wondering, what about portrait work, or sports portfolios
Photographers have to be problem solvers in so many aspects of what we do. It’s our ability to identify and solve problems that
Of course, it’s absolutely fine to confer with others and get advice — we don’t have to work in a vacuum — but the more you can solve yourself the more satisfying the process is, but if you still come up dry, by all means, drop a comment into this post below. I’ll be more than happy to help you if what I’ve provided isn’t enough.
OK, so we’ll wrap it up for now. You can check out my new Landscapes of Japan Portfolio
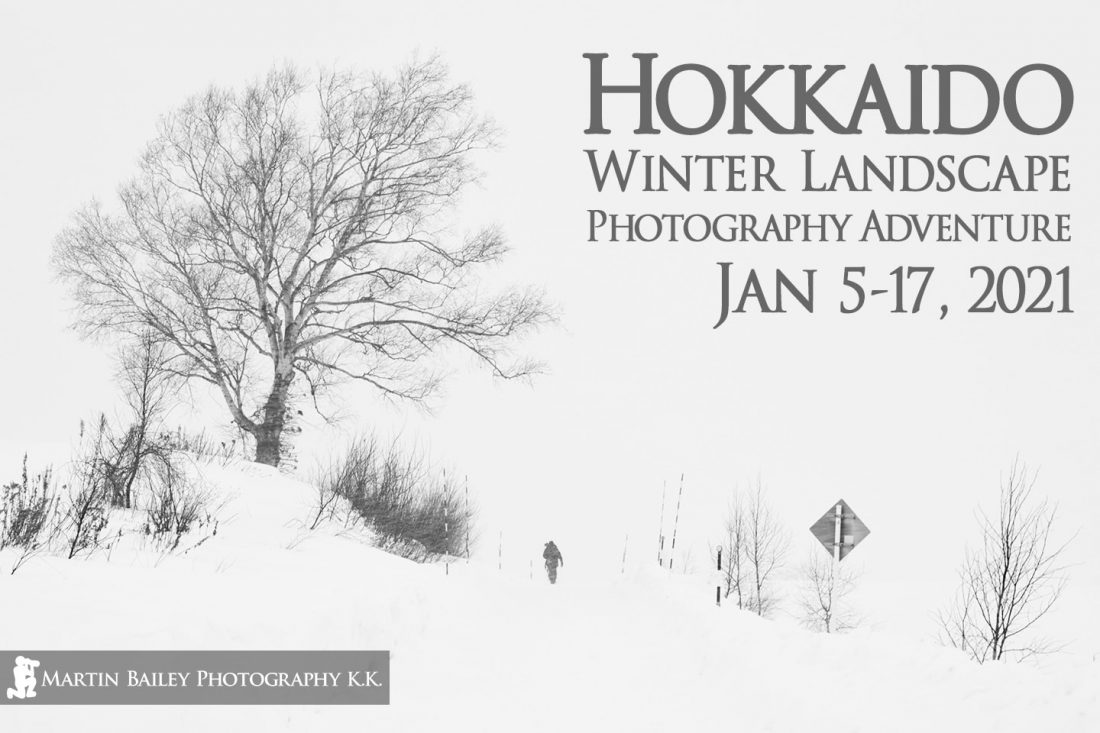
Join Me for the Hokkaido Landscape Tour
If you think you might like to join me on my Hokkaido Winter Landscape Photography Tour & Workshop on which I shot a lot of these images, check out the tour page here. Right now we have places for the 2021
Finally, please note that I will be releasing this as I leave for this year’s Namibia tour, but I have only had time to prepare one additional episode for release while I’m away. Next week though, I’ll release a great conversation with my friend Don Komarechka about his amazing Macro work, and just a general geeky chinwag, so please keep your eye out for that. After that though, I will, unfortunately, have to skip a week until I get back from Namibia, but I will be back, with some new work to share. See you on the flip side!
Show Notes
Check out Ulana Switucha’s Work Here: https://www.ulanaswitucha.com/
Take a look at my Hokkaido Winter Landscape Photography Adventure Tour & Workshop: https://mbp.ac/hlpa
Also if you are interested, you can see my Landscapes of Japan portfolio here: https://mbp.ac/lojportfolio
Audio
Subscribe in iTunes to get Podcasts delivered automatically to your computer.
Download this Podcast as an MP3 with Chapters.
Visit this page for help on how to view the images in MP3 files.

)
)
)
)
)
)
)
)
)
0 Comments