

0:0019:34 | Visit Library for MBP Pro eBooks |
I’ve been tinkering again, and adding new tools to my Mac and Website, so I thought I’d update you as these things may be useful for some of you, or lead you to find similar solutions for your own environment if you don’t use a Mac or WordPress.
Bartender
First up is a tip about an application for Mac that I heard about from my friend Brian Matiash when we traveled together on this year’s Hokkaido Winter Landscape Photography Adventure. Brian told me about a wonderful little inexpensive piece of software that does what its name implies; it tends to the toolbar at the top of the Mac desktop.
Over the years, I’ve accumulated lots of applications that add a handy little icon to the toolbar of my Mac, some of which are really important for quick access to tools and services. I’ve also got a few applications, like iStat Menus from Bjango that add lots of useful statistic about my system to the toolbar. But these aren’t always necessary to have visible, and on laptops where the toolbar can be cramped when other applications are launched, adding their own menus, I often find that I have to minimize my applications and get back to the desktop before I can see and click an icon in the toolbar.
Well, Bartender helps me to overcome these issues smartly, and quickly. For around $15 Bartender for Mac is probably one of the smartest gadgets you can get. This sounds like a sponsored message, but believe me it isn’t. I paid for my license and everything I am saying is coming from me, because I love this little app!
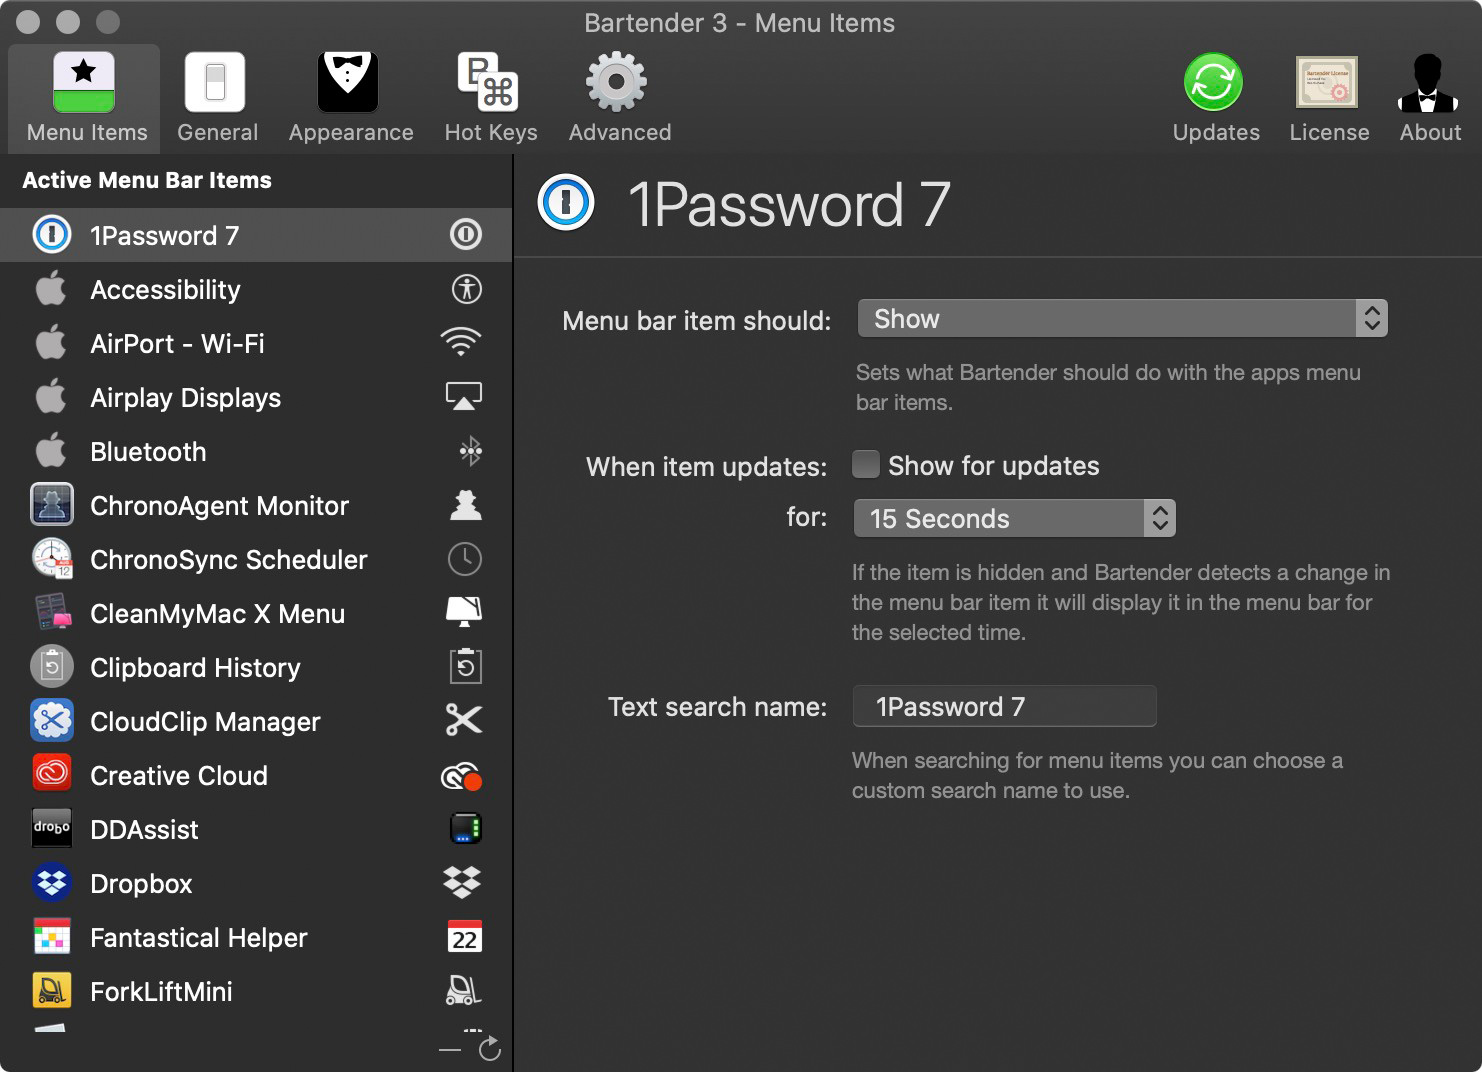
When you install it, you are walked through a small number of screens to select a few settings, and Bartender gets to work straight away. The first settings screen is where you select which icons you want to display. You can select to Show or Hide the icons, as well as Always Show and Always Hide, which are extensions of the regular show and hide modes.
Because I have a lot of icons, I just selected all of them from the menu on the left and selected Hide for everything, then went through and selected Show for the things that I needed to be visible. I selected Always Hide for some icons that I never need to see and Always Show for those that I want to have in the toolbar at all times.

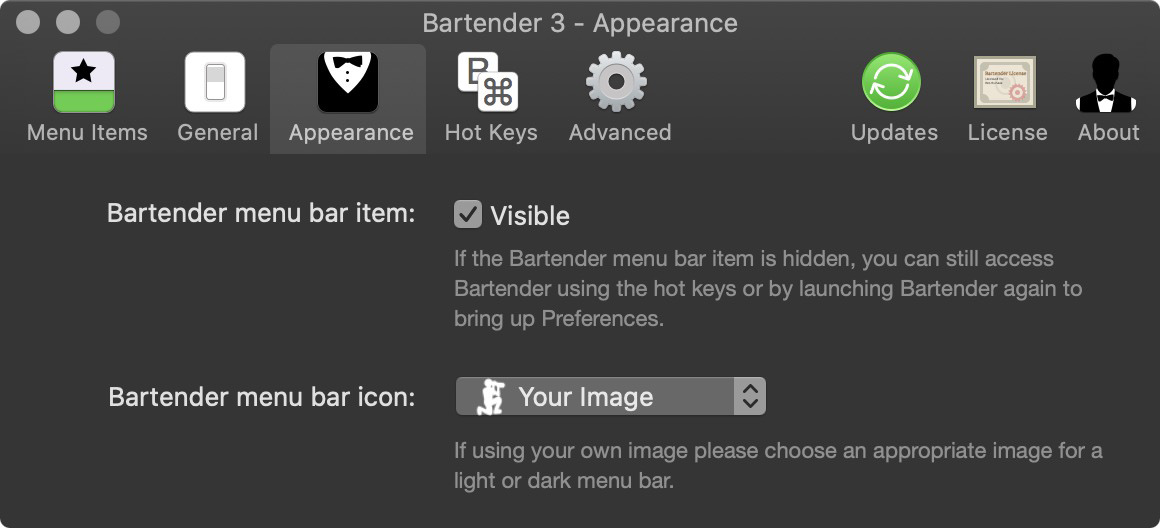
Under the Appearance menu I left the Bartender menu bar item visible, so that I can open up my hidden items with a mouse click, and I selected a small white copy of my company logo for the icon to be used in the menu bar. There are some options built-in, and if I didn’t use my own, I’d probably just go with the default ellipses.
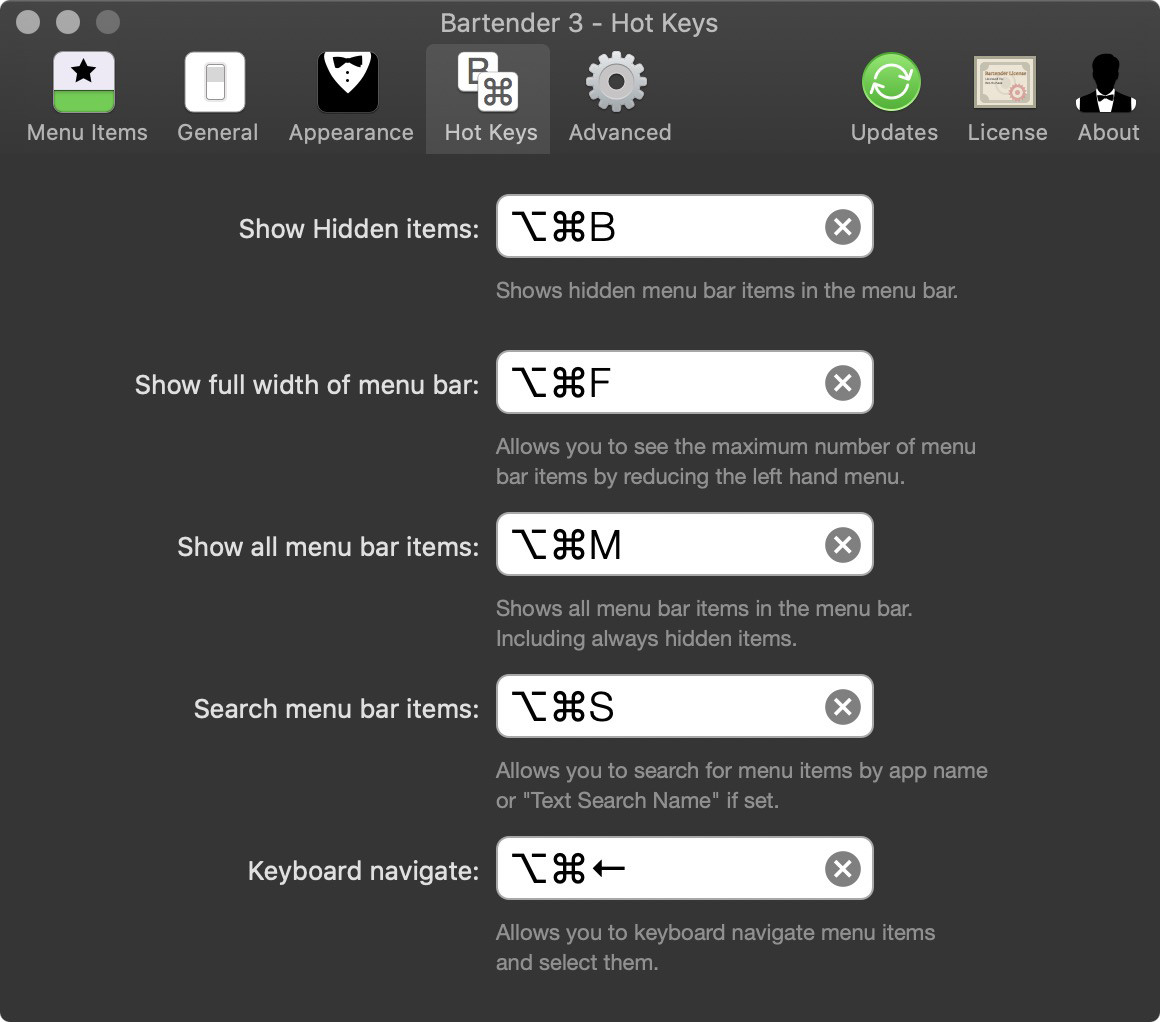
I also defined a bunch of shortcuts on the Hot Keys settings screen, so that I can show the Hidden items by hitting Option + Command + B on my keyboard, which is sometimes easier than reaching for the mouse. Option + Command + F hides all of the other menu items in the menu bar, regardless of what application I’m running. The third option shows all menu bar items, including those that I’ve chosen to Always Hide, and the fourth option is to set up a shortcut to search the menu bar for any item by typing. I don’t see me using this option much, but the search text is also configurable, so it could be used for quick keyboard access to something specific. The bottom option is to set up a shortcut to navigate your menu items with the keyboard arrow keys, which can be useful if you really don’t want to reach for the mouse.
The other settings screens just provide a few more options like starting Bartender at login and downloading beta versions etc. They’re worth checking out but I’ll skip them here. The result of Bartenders toil is that this slightly cut down selection of icons is what I see when I am showing my icons, which is everything that is marked as Show or Hide, but does not include the Always Hide icons.

Then, when I click on my icon in the top right, or select another application Bartender automatically reduces that to this smaller subset. I’ve not quite figured out how the Always Show feature works, but I imagine it’s related to the Show for Updates option with the 15 second pulldown that we saw in the first screenshot, but it’s not obvious what that’s actually doing at this point. I’m sure it will become clear as I use the product more.

In addition to just cleaning things up and enabling me to get to the options that matter more quickly, I really like this app is because it helps to clean things up for screen casting, creating videos or doing presentations. You don’t always want everything to be on display, and closing things down when you record the screen is a bit of a pain too. Even just in everyday use of my computers though, it’s great to get things cleaned up like this.
Desktop Stacks
Another thing that I do that is an often overlooked option, is to select the Use Stacks option on my Mac OS desktop. I’m a relatively well organized computer user, and although when I’m in the middle of a project, I sometimes allow my desktop to become a little cluttered, I generally don’t like to have a lot of things hanging around, and so clear things up when I get a few moments of downtime. There are sometimes things that really have to remain on the desktop as a reminder to do something, or, for example, I have to install it on another computer. Because I also use Apple’s iCloud Desktop and Documents folder synchronization, when I save something on the Desktop of my iMac Pro, it automatically appears on my MacBook Pro Desktop a few minutes later.
One other quick tips related to that while I think about it, is that sometimes the Desktop and Documents sync pauses and does not seem to want to restart, even after rebooting your computer. I’ve found that the way to kickstart the synching is to simply delete or change a file. If you don’t have something that you want to delete, make a copy of something or just create a text file, and you can delete it again after the sync has run.
Anyway, back to the Desktop, even though I’m relatively organized, I like to keep things as tidy as possible, so I right click my Desktop and select Use Stacks from the shortcut menu that appears, as you can see in this screenshot of my MacBook Pro desktop. This is with Use Stacks turned off.
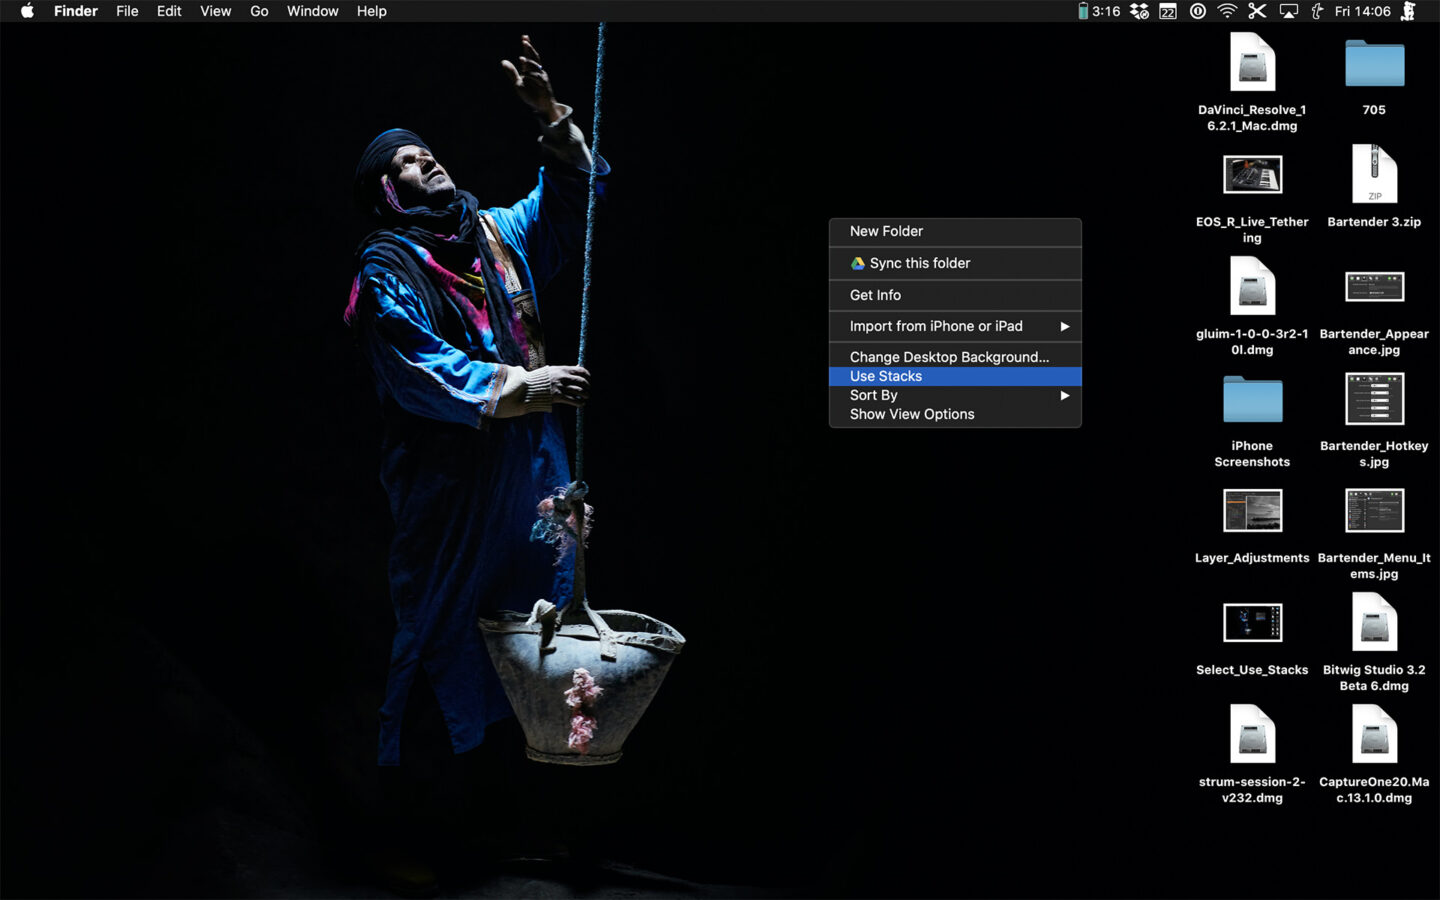
You can see that there are multiple JPG files, some DMG installers, some PNG files and the Bartender installer zip file, as well as a few folders on my Desktop. This is actually after cleaning up a few things, so I cheated a little here. Once you select Use Stacks on the desktop though, the Mac OS will automatically stack similar files into groups, as you can see in this next screenshot.
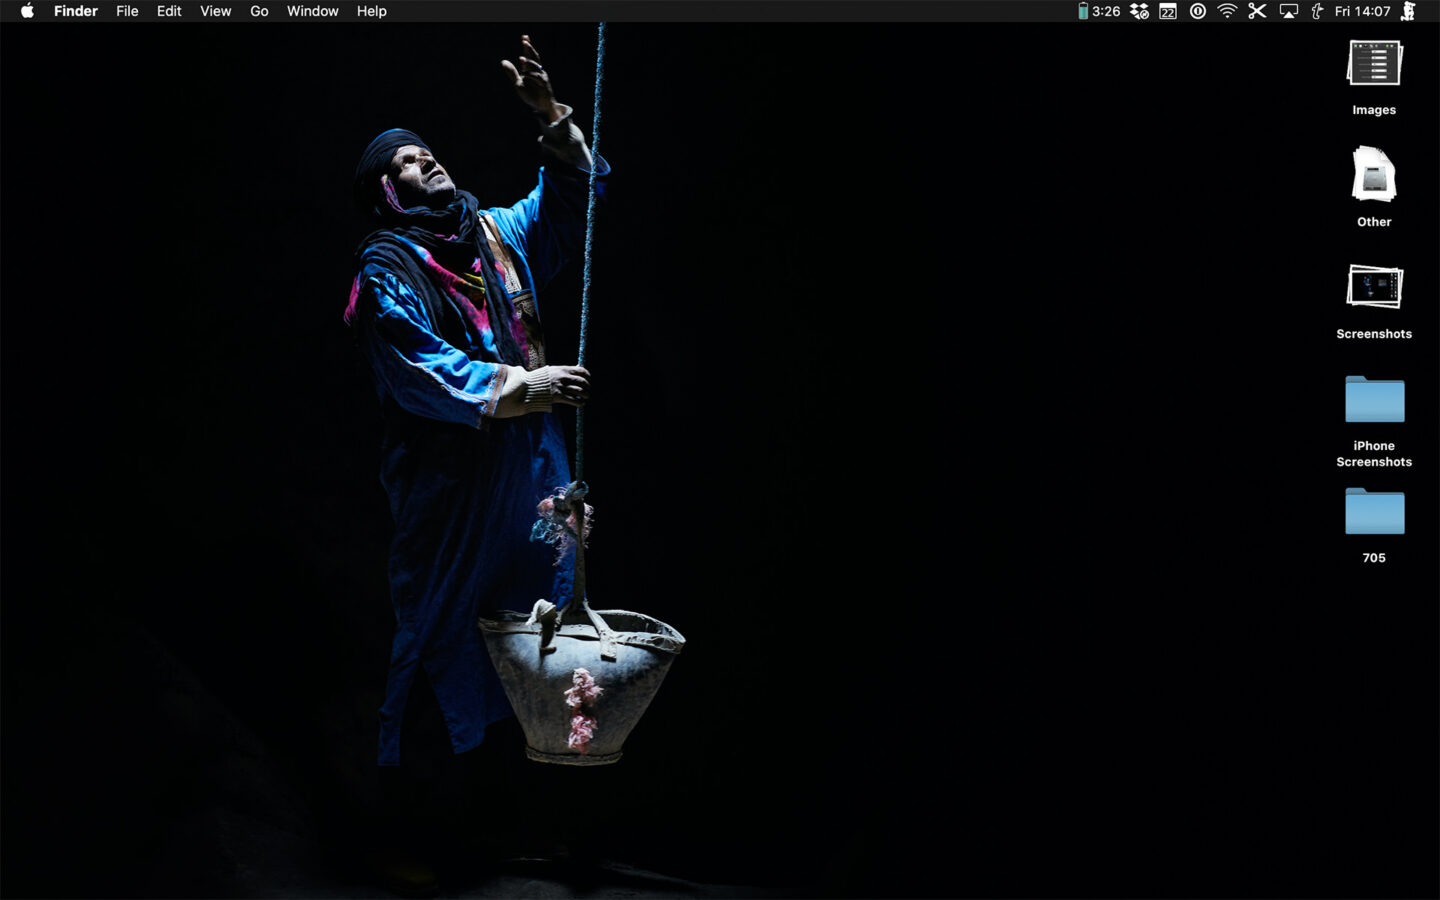
You can see that now the 14 icons that I had on my desktop have been reduced to just five. The folders don’t get stacked, but all of the files have been reduced to stacks of Images, Screenshots, and an Others stacks, that contains various zip and dmg files. To open just the one stack, you just click on it, or hit the down arrow on your keyboard while holding the Command key. The up arrow with Command key reduces the stack again, and that works with any file in the stack selected.
Downgrading JetPack (WordPress Plugin)
So, they are a few tips for working smarter and tidier on the Mac OS, but I also thought I’d take a moment to update you on the sleek new search feature I’ve implement here on the MBP website, and we’ll start with the reason for my decision to stop using the Jetpack Search feature, as this is also very relevant during these difficult times.
I’ve had to postpone this year’s Complete Namibia Tour due to the corona virus pandemic, and at this point, we still aren’t sure if next winters Japan tours are even going to be possible, so whenever a yearly subscription renewal is due, I’m reviewing my requirements and cancelling or sometimes downgrading subscriptions to help me save money where I can.
The search feature that has been used on the MBP Website for the last year or so came from the Jetpack service, which comes via a paid subscription from Automattic. JetPack is great, and to a degree, a must have WordPress plugin, and last year I upgraded to their Professional Plan as it included some cool features like Jetpack Search, which seamlessly replaces the search functionality on a WordPress website with a more feature-rich search experience.
Then, shortly before my yearly subscription renewal was due, I found that the Search feature was missing. My site had reverted to the regular WordPress search, without me even noticing or being alerted. When I checked a few weeks ago, it looked like the Search feature was part of their Professional plan, but when I checked today, it seems that Search is now a completely separate add-on feature. That’s fine if all you want is there search, but they stripped that out of a plan that I’d paid for without me even knowing, although that is hindsight at this point, and so wasn’t a factor in my decision to switch.
At around $350 per year it was a candidate for helping me to save some money, so I looked at the other features, and found that as they’ve jiggled their products around, if I found a better search replacement elsewhere, I could downgrade to the Jetpack Personal plan, which is said to be for hobbyists. I considered going to their free plan, but automated daily backups and Spam Protection are necessities, so I’m in for $45 per year, which is a nice saving of $300, and I can handle being a hobbyist in this respect.
Ajax Search Pro
And enter Ajax Search Pro, a live WordPress search and filter plugin from WP Dreams. This plugin can also take over WordPress search, which is part of what I’ve done, because that enables me to continue to use the magnifying glass search icon in the toolbar at the top right of all pages, but then once on the search page, this is a custom page template that I created as part of my Bridge child theme, and embedded the results components from Ajax Search Pro into that template.
Note: Although I like Ajax Search Pro, I decided to remove this plugin when cutting the overall costs associated with running this website.
That part took me a few minutes, but I have to warn you, that it took me probably around 10 hours to configure Ajax Search Pro to work the way I wanted it to, and at times, it would break completely, providing no results, so if you are looking for a replacement WordPress search plugin, I can strongly recommend Ajax Search Pro, but with a warning that it will suck a big chunk of your time away to get it running. Ten hours is probably too long, but I have a complicated site and I’m a bit of a perfectionist, but you will be looking at a few hours for sure.
I’m not going to go into the details of setting this up though, it’s way too complicated to cover as part of this post, but I did want to briefly walk you through some of the key points of the front end search feature, as this will help you to find things here if you are looking for something specific out of the 700+ posts and multitude of pages that I have published here, as of May 2020.
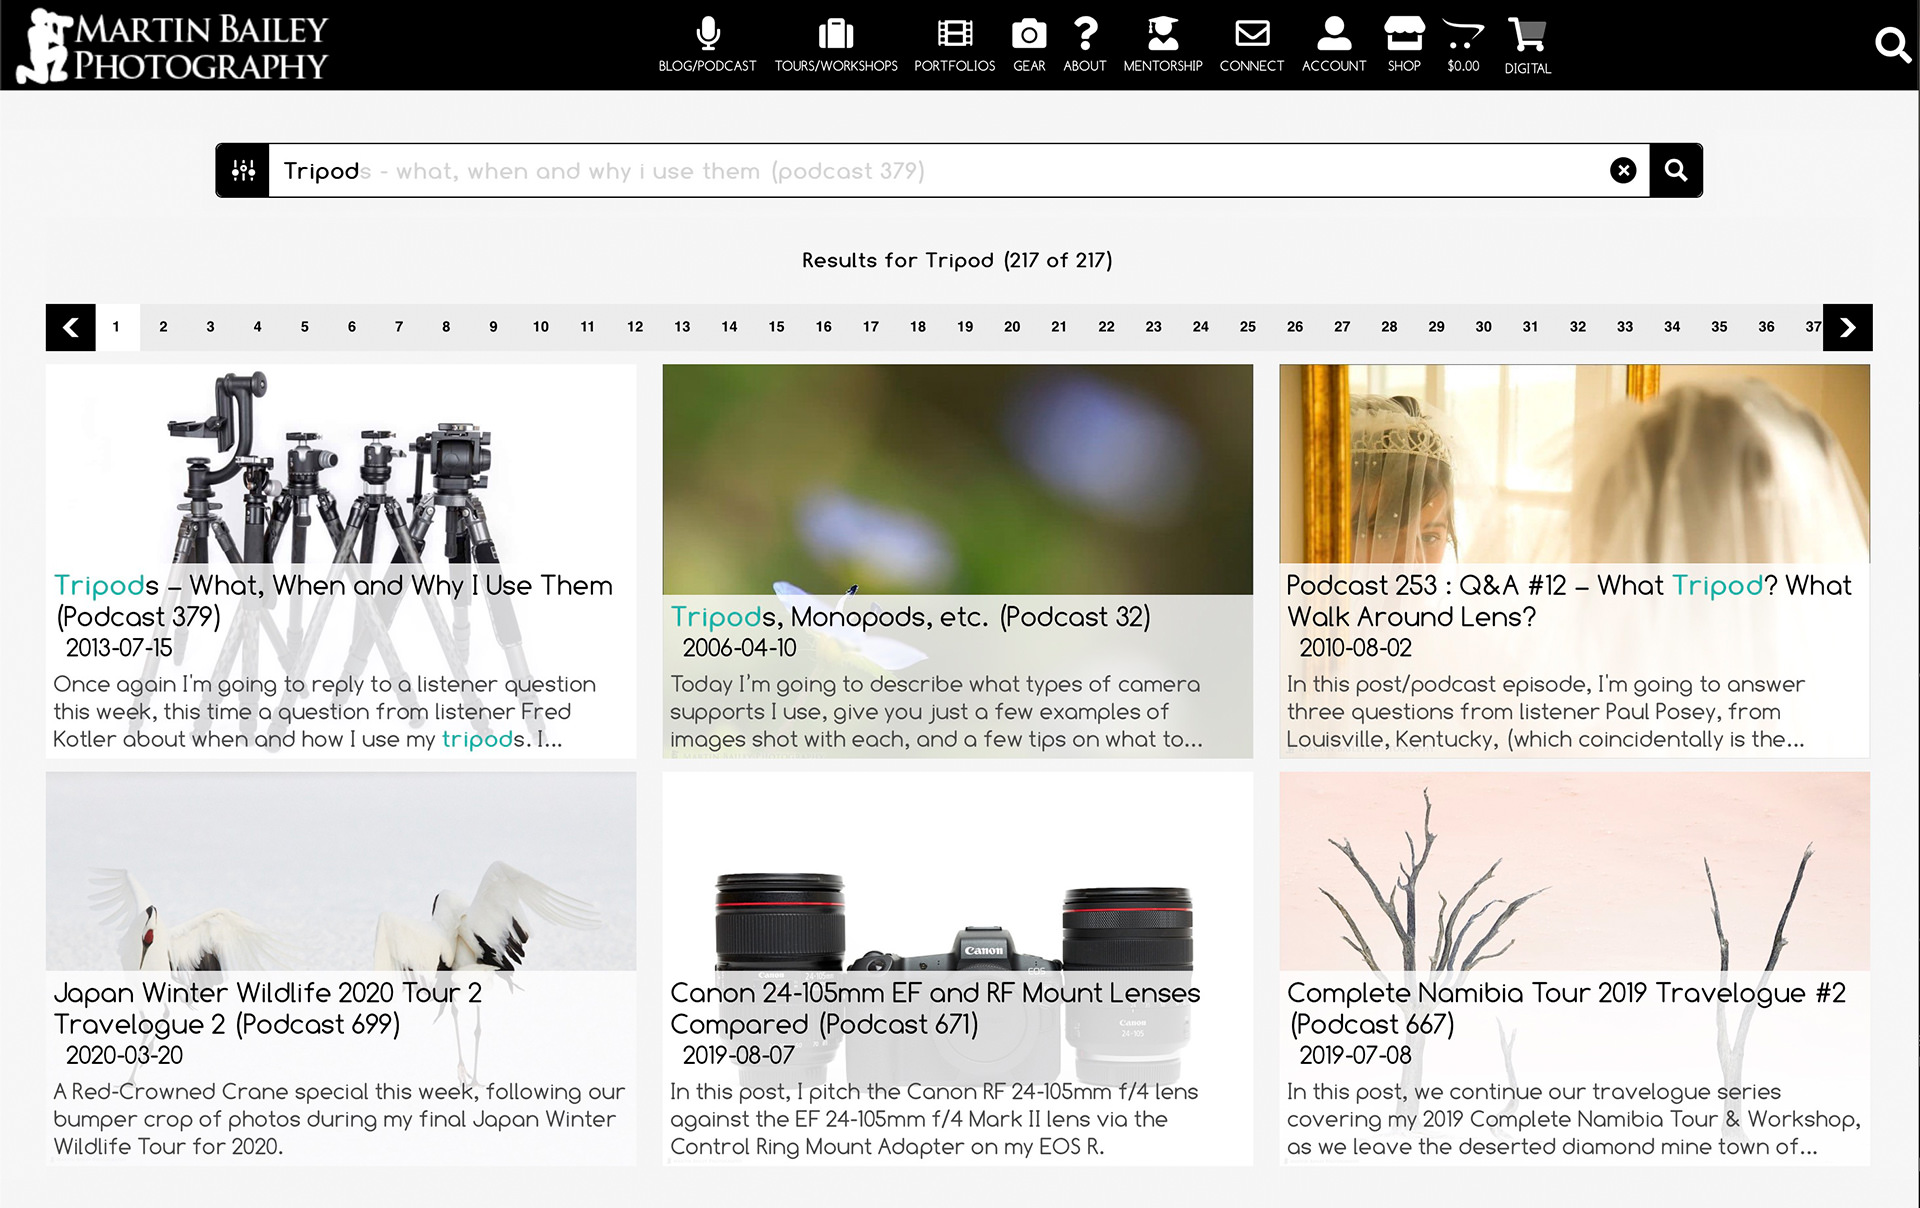
The main point is that to start a search, just click on the magnifying glass at the top right of all pages on the website. This will open up a search field right there in the top toolbar to get you started. After typing your keyword or phrase, hit enter, and you will be transported to the search page with your search terms in tact. So, for example, if you search for Tripod anywhere on the site, you’ll end up with a page like the following screenshot, with Tripod in the search field.

Also notice in search field, there are some greyed out characters showing the suggested result which is the first post of the six in this first page of results. I’ve tweaked the relevance settings so that keywords in post titles get highest priority, and then after that we start to search in the Excerpt, which I enter for each post explaining what it’s about, then the tags and keywords that I enter, and then we start to give results based on searching the body of the post. You’ll get up to 500 results, with some fuzzy logic providing close guesses for the latter pages, but generally, the most relevant posts should be in the first few pages of results, and older, less relevant posts further down.
Drilling Down
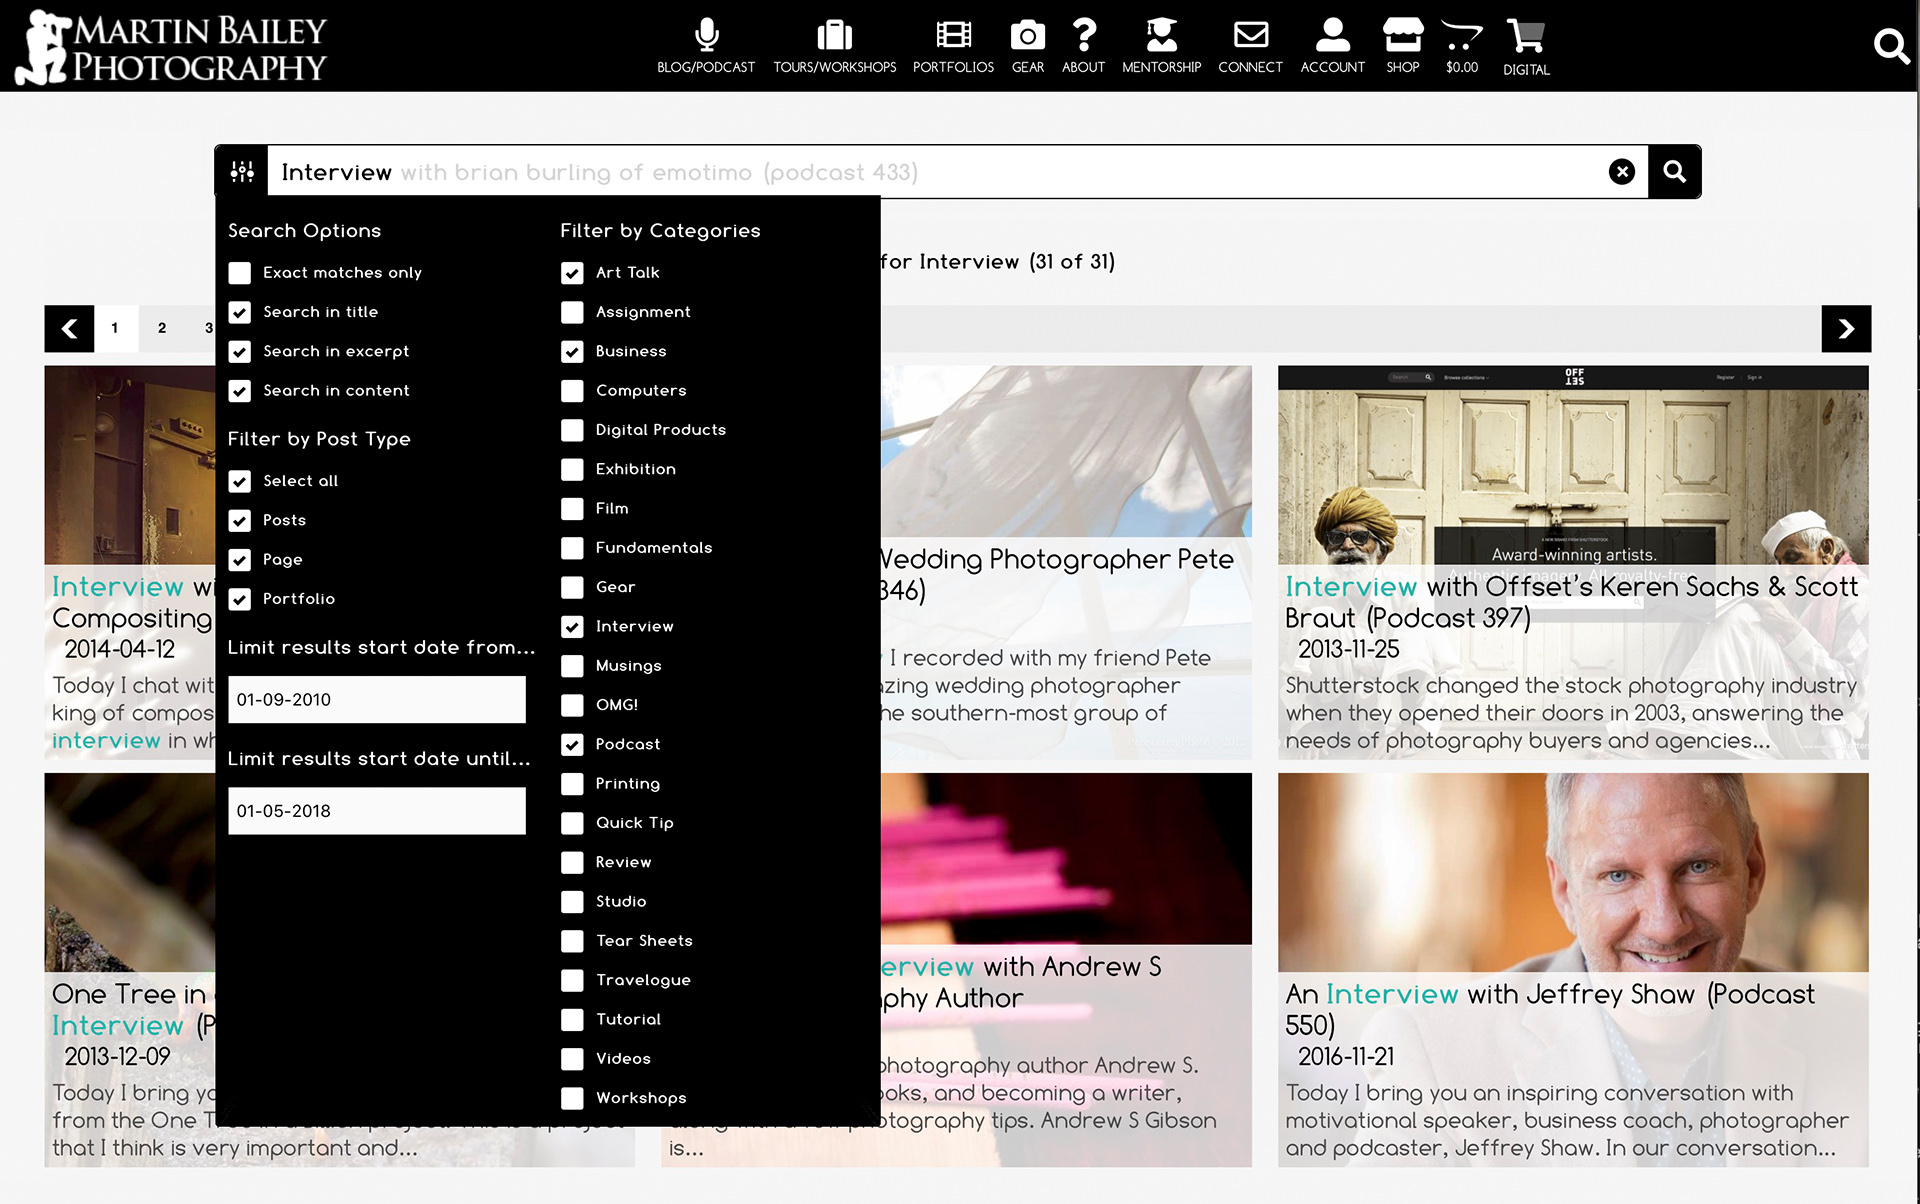
If you have problems finding what you are looking for, you can also fine-tune your results by clicking on the settings button to the left of the search field, and that will open up a drop-down with various filters that you can apply. For example, here I’ve limited the posts to those released between September 2010 and May 2018 and deselected most of the categories leaving Art Talk, Business, Interviews and Podcast. That reduces the results from 101 pages to just 31. If you are searching for a phrase, you can also try turning on the Exact Matches Only checkbox to ensure that your phrase is searched for as is, rather than using the fuzzy logic etc.

I have tried a number of different solutions over the years, and found some to be better than others, of course, but I am incredibly happy with Ajax Search Pro and so pleased that I found it recently. It cost me $36 and I’ll continue to pay for support, but I had $300 in the kitty from dropping my JetPack subscription so that’s not a big deal, and actually worth much more in my opinion, so I’m happy to pay this.
The only thing that I do wish they’d add, apart from quicker initial setup, is a button to uncheck all filters with one click. To get to the state that I showed above, I had to manually uncheck 18 checkboxes. If I could click something to uncheck them all, it would be great! I think I’ll drop the developer a line to see if we can get that added.
Anyway, I realize that this is some specialist advice, as not everyone is building their own website, but WordPress is a popular enough platform that I hope this is useful for at least some of you. And I hope the earlier stuff is useful to at least some of you too. I’ve been working 18 hours a day for the last few weeks trying to complete some development work, and I literally just came up for air today having overcome a block that been holding me back, so that allowed me to work on this post, but it was also the reason that my schedule is a bit of a mess, and for that, I apologize. There is a very cool update for my Photographer’s Friend app for iOS that is just around the corner though, so hopefully it will be worth the disruption.
Show Notes
Find Jetpack here: https://jetpack.com/
Bjango iStat Menus: https://bjango.com
Bartender 3: https://www.macbartender.com/
Ajax Search Pro is at: https://codecanyon.net/item/ajax-search-pro-for-wordpress-live-search-plugin/3357410
Audio
Subscribe in iTunes to get Podcasts delivered automatically to your computer.
Download this Podcast as an MP3 with Chapters.
Visit this page for help on how to view the images in MP3 files.

)
)
)
)
)
)
)
)
)
)
)
)


0 Comments