
Visit Library for MBP Pro eBooks |
This week I’ve been busy again adding a few small new features to the Photographer’s Friend extension for Apple Watch, and this also led me to make a change to the logic behind the iOS version of our Neutral Density Filter Calculator, so I thought I’d share some details about that for the geekier listeners and readers among you. I’ve mentioned before that at school, back in England in the seventies and eighties, I was a terrible student. I was more interested in messing around with my friends than learning anything, and I never really felt like I could achieve anything academically until I went back to college here in Japan in the mid-nineties. I learned from that experience that being interested in what you are learning and being taught by enthusiastic teachers makes a world of difference.
Since then, I’ve been able to research and learn some pretty complicated math, at least to me, which is behind some of the more complicated features of my Photographer’s Friend application, such as the Pixel Peeper mode in my Depth of Field Calculator, and the Neutral Density Filter Calculator. I shared some of the theory behind the Pixel Peeper mode when we talked about Circle of Confusion, the Airy Disk, and Diffraction back in episode 594, and we talked about calculating Neutral Density back in episode 391 entitled All About Neutral Density Filters. I’ve come to a few slightly new conclusions over the last few days though, so I’m going to share that with you today, and tell you a little bit about these two new features that are available in the Photographer’s Friend version released on the App Store today.
Basic Calculations
First let’s take a look at some of the background behind the original Neutral Density filter calculations in Photographer’s Friend, which I added as a second calculator when I took over the development myself around five years ago. My calculations so far have been based purely on the multiplication factor that is marked on all neutral density filters we can buy. An ND8 for example multiplies your shutter speed by eight, so quite simply, say your base shutter speed without any ND filtration was 1/50 of a second, you can take a regular calculator and tap in 1 divided by 50 multiplied by 8 which gives us 0.16, which converts to the nearest shutter speed of 1/6 of a second.
Pretty simple stuff, and you can use this calculation for any ND filter multiplication factor, such as the ND400. 1 divided by 50 multiplied by 400 is 8, so your new exposure is literally 8 seconds. If you stack filters, you just continue to multiply, so if you add the ND8 to the ND400 we multiply our 8 seconds by the ND8 multiplication factor of 8, for the result of 64 seconds. All good fun and simple maths, and to be honest, this method of calculation is perfectly fine, and accurate, if you run with the multiplication advertised by the Neutral Density filter manufacturers.
When I developed the Neutral Density filter as part of the Photographer’s Friend Apple Watch extension, because of the limitations associated with the screen size, I decided to go with one neutral density filter dial, so that users can simply add the total density when stacking filters, and rather than using the multiplication factor, I went with exposure stops, which is also provided when you buy a neutral density filter. We know for example that an ND8 is three-stop, and an ND400 is 8.6 stops. That’s what it says on the box and can also be used to calculate our new shutter speeds, so I set about figuring out how to do that.
I came to the conclusion based on reversing some of my original math that we can find the new exposure time by multiplying the base shutter speed by 2 to the power of the number of stops provided by the neutral density filter. Here’s the calculation with the words initially.

If we add some example numbers to that, the calculation looks like this. So, again, using the 1/50 of a second exposure and the ND400’s 8.6 stops as an example, but the result is 7.76 seconds, not 8 seconds, even though, as we saw earlier, simply multiplying by 400 gives us 8 as a whole number, not a nearby fraction.

So, I started to look into why that might be the case and found that 2 to the power of 8.6 is 388, not 400, so assuming that 8.6 is actually 8 and a third, I tried using 8.666 instead and found that this gives me 406. So, one is 12 under and the other 6 over. I’ve not been able to find any white papers on the actual variance in the marked values and actual optical performance of neutral density filters, but it’s safe to assume, anyway, that there is some variance.

I decided to use thirds rather than the .6 or .3 fraction in my calculations and moved ahead basing the new calculations on stops, rather than the multiplication factor and as the seconds are always rounded, for relatively short exposure times, the difference is not even apparent on the front end. 7.76 and 8.12 will always display as eight seconds anyway.

Getting to this point was not time wasted though. It was important for me to understand this stuff because I really needed to be able to work with stops rather than the multiplication factor, and I wanted to either maintain the accuracy that I’ve had to date, or, if possible, increase it, so I continued to dig. In my recent update to enable the synchronization of the total number of stops of neutral density applied in the Neutral Density Filter Calculator in the Apple Watch Extension for Photographer’s Friend, I had to convert the multiplication factor back to stops, which is what the Apple Watch Extension was using for its calculation, and this led me to discover an import part of the larger puzzle.

I found that I could reverse the calculation with the log base 2 of the multiplication factor, which equals 8.666, the stops of the original neutral density filter, and this is what I’ve used for the last few weeks as I released the first attempt at synchronization. It works well, but there were a few things left that were bugging me, and so I set further time aside this week to get it all cleaned up and to the point that I could finally walk away from this development work for a while, and get to some other important tasks that I’ve been putting off for a little too long now.
Decimals for Apple Watch ND Filter Calculator
As I mentioned, I’d originally gone with just the one dial for whole stops of neutral density filter for the Apple Watch extension, but as we’ve noted, some filters, such as the ND400 and a few others actually have decimal fractions rather than just being whole numbers. I’d figured that we could live without them, but that had been playing on my mind, and now that I was adding a synching mechanism, with the initial functionality I was going to have to throw out the decimals, and as I worked on the update, seeing the calculated times being different between the Watch extension and the iPhone based calculator really annoyed me.
The difference between the available times was a little bit to large to ignore. For example, if you stack the ND8 and ND400, you’ll get an exposure of 1 minute and 5 seconds when basing the calculation off of the stops using thirds. We need to be able to select 11.6 to get the correct exposure, but just 11 stops gives us a 40-second exposure, and 12 stops is 1 minute and 21 seconds. Both are a significant amount of time away from 1 minute 5 seconds, and could not realistically be simply ignored.
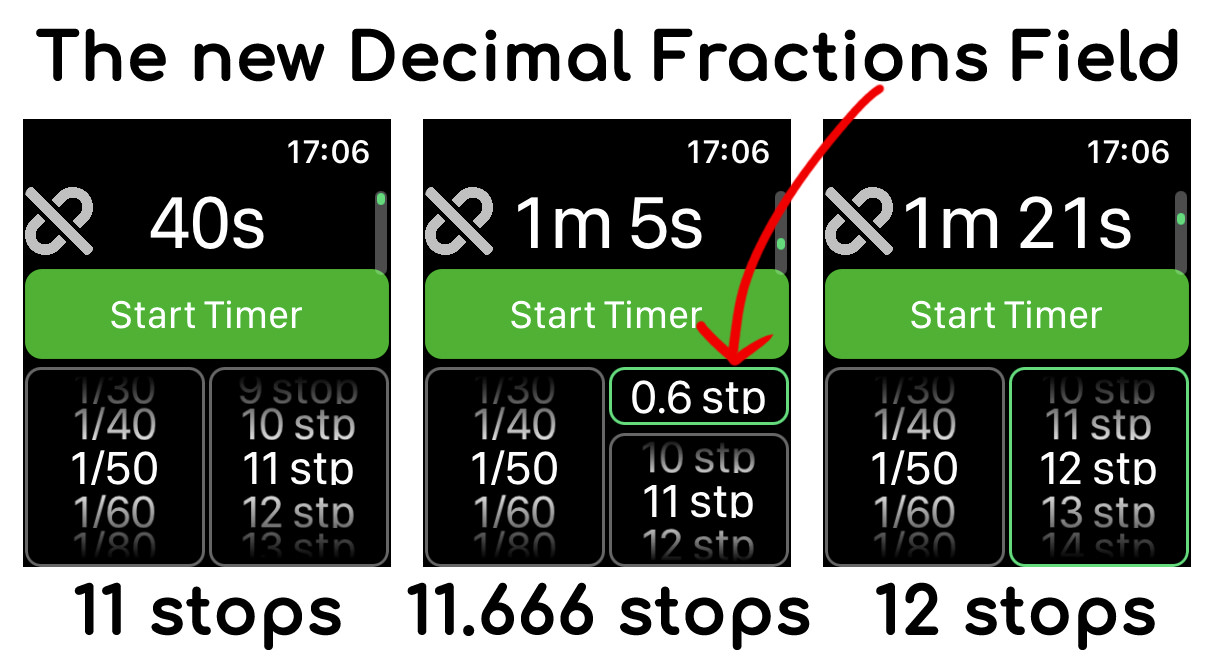
While trying to maintain the simple usability of the Extension I decided to add a Decimal Fractions field that would essentially only take up space when it was necessary. To realize this, firstly, although it’s a dial, you only see one value at a time, and that’s the selected value. I also added an Auto-hide switch to the settings, to have the Decimal Fractions field disappear automatically when it’s at zero. The result is that now if you have filters selected on the iPhone that include a decimal fraction, when you synchronize the settings to the Watch extension, the extra field will appear, and when it’s a whole number, the field will disappear.
Because the Watch extension can be used as a standalone calculator though, you can either swipe upwards on the ND Filter Calculator screen to show the Decimal Fractions field and select an option, or if you use Decimal Fractions a lot, you can simply turn off the Auto-hide option, and the field will stay on the screen even if it’s set to zero. The other thing to note is that I’ve left the dial at single-digit fractions, but behind the scenes, 0.6 is actually 0.666666 and 0.3 is 0.333333. 0.8 is also 0.833333. The result is that now, pretty much every combination of practically usable filters results in the same time on both the iPhone and the Apple Watch Extension, and because I’m using adjusted stops, the calculated times are more accurate than when using single-digit fractions. I’m really happy with how this turned out and think the usability is relatively slick as well.
Active Timer for Apple Watch ND Calculator
The other update that I wanted to quickly mention before we wrap this up for this episode, is the Active Timer, also for the Neutral Density Filter Calculator for Apple Watch. I’m putting together a video to explain these features visually which I’ll embed into this post once it’s done, but basically, there was another thing that had been annoying me about the original functionality that I’d built into version 3.5 of Photographer’s Friend’s Apple Watch extensions.
The whole idea behind the extensions is to enable the user to calculate the time required for a long exposure when using Neutral Density filters. Getting the iPhone out is fine, but I’ve found that I can sometimes fumble with the phone, so I developed the extensions to enable quick reference from a device that is essentially more accessible than the iPhone, because it’s already attached to our wrists. Granted, if you have a timer built into your camera, you’re likely just going to set that, but I’ve found that having the timer running on my Watch also helps me to get on with other things while a long exposure is running. Also, once the screen has gone dark on my camera, the only way to see if the exposure is still running is to go over to the camera and check for the memory card write indicator to flash red. With the timer running on my wrist I can reference it much more easily.
But, with the limitation of the Apple Watch being what they are, once I lower my wrist, allowing the watch to turn off its face and background the Photographer’s Friend extension, any kind of audible or haptic feedback that I could provide to the user as the timer counted down would also stop, until, that is, I figured out how to develop what I’ve called the Active Timer. For exposures of up to one hour, with Active Timer and what I’ve called the Audible Tap enabled, you will now get an audible ding and a haptic tap on the wrist every ten seconds during the countdown when the timer is over three minutes. Between three minutes and one minute, the taps are five seconds apart, then from 60 seconds to 10 seconds the taps are 3 seconds apart. From ten to four seconds they are every two seconds and then every second for the last three seconds before the alarm starts with double dings to let you know that it’s time to stop your exposure.
If you don’t want the audible ding as the Active Timer counts down, but you do want the heavier haptic taps, just turn on the Audible Tap option and mute the sound on your Watch. If you want a less obvious light tap, turn the Audible Tap option off, which will provide a much lighter tap on the wrist at the same frequencies that I just mentioned. I put a lot of thought into the tapping frequency and feel that it provides a good indication of where you are in the exposure. You can essentially allow the exposure to run down to the last second without looking at your Watch but know approximately how many seconds are left, and when to stop the exposure.
Although it’s highly unlikely that people will be doing exposures of over one hour, if the time is set for longer than one hour with Active Timer enabled, there will be a message to tell you that it’s running as a Passive Timer for the time being, and then when the timer reaches one our, it will automatically switch to an Active Timer. I’ve tested this with an eight hour timer when I went to bed, and seven hours into the timer I started to get the taps on my wrist as the Active Timer kicked in, so it’s pretty solid.
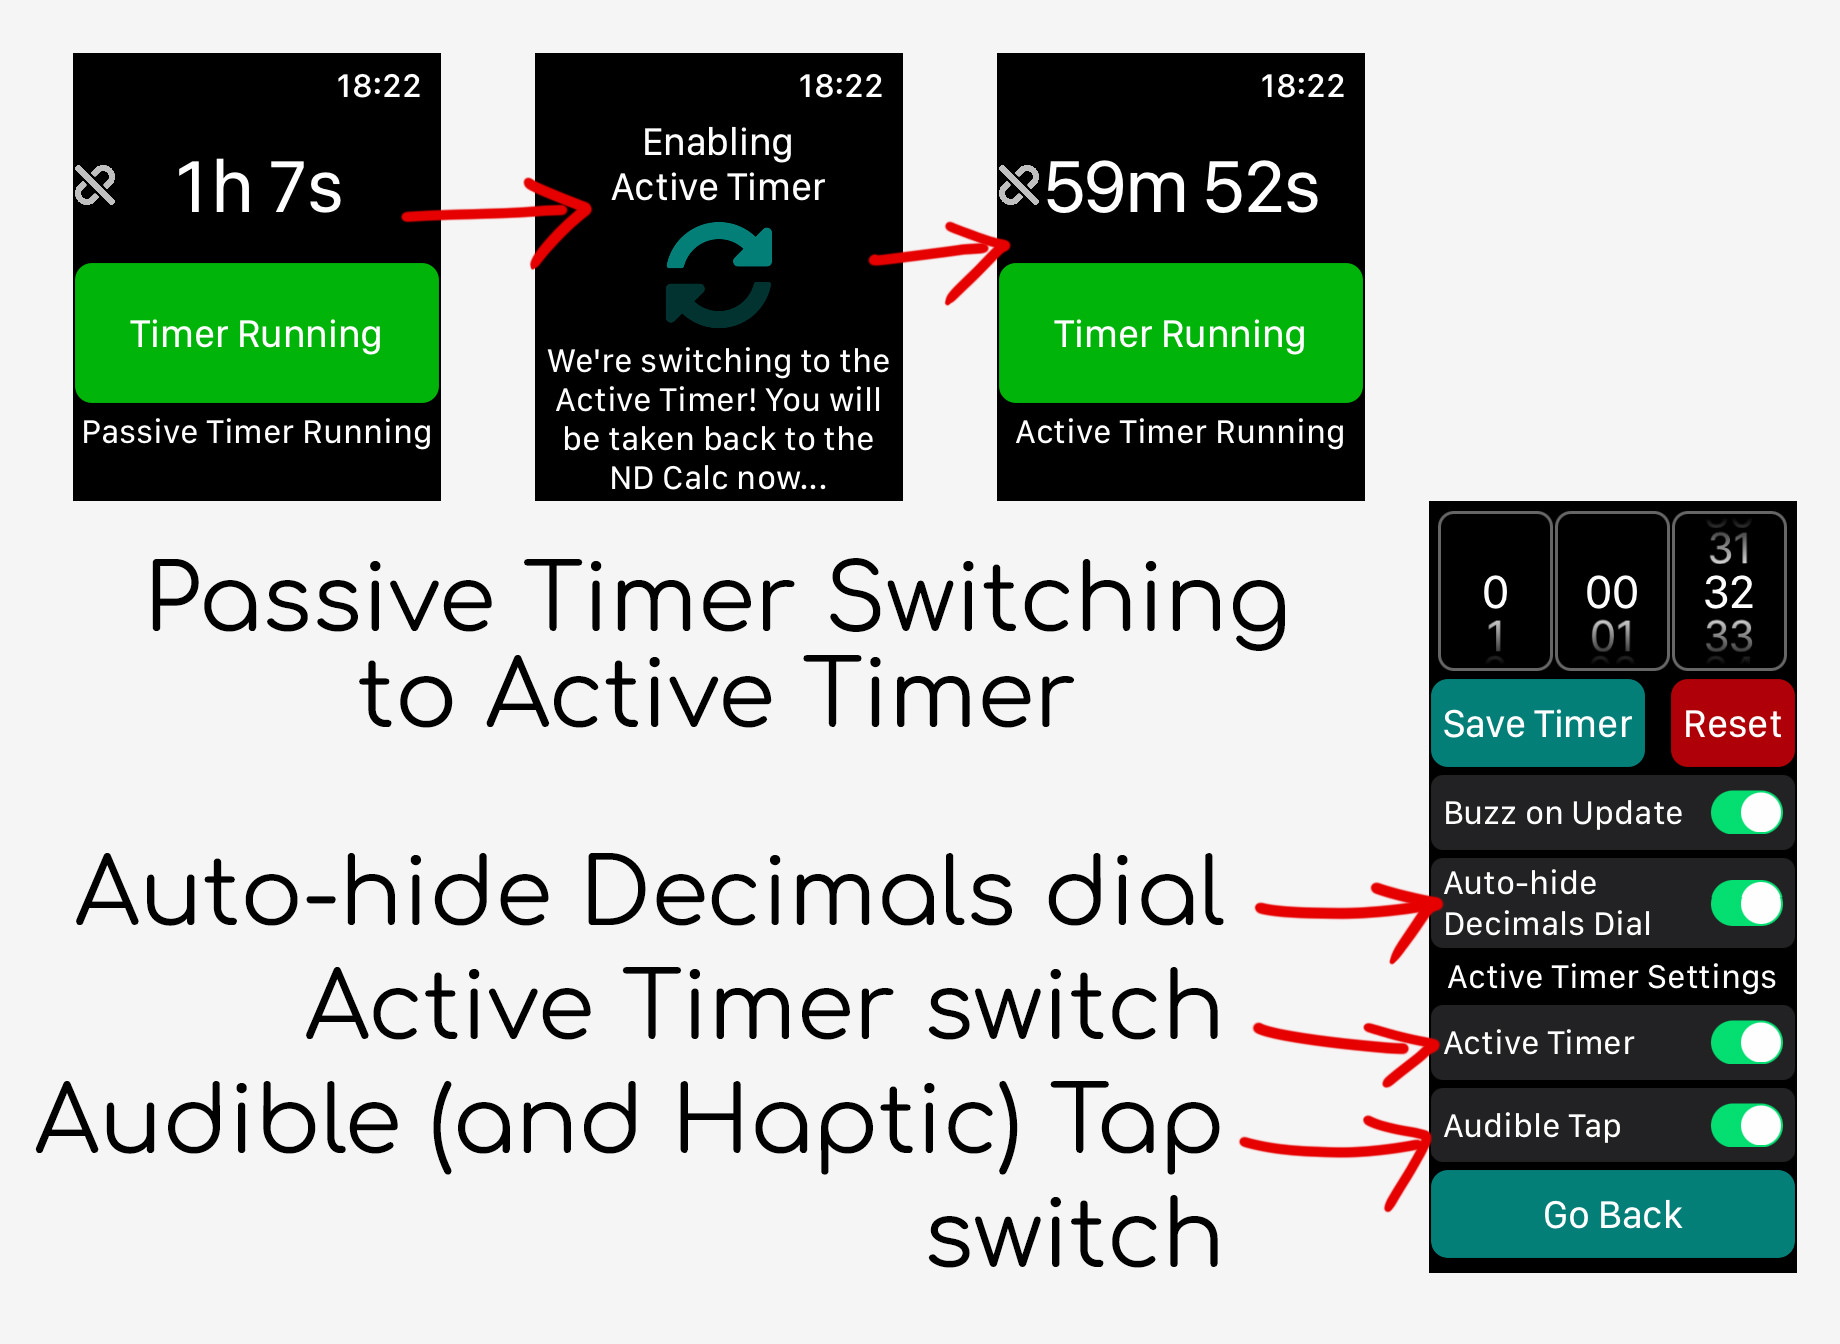
One other thing that I’ve added to keep this all running as solidly as possible is that you can now completely close Photographer’s Friend on the watch, and even reboot your watch, and when you reopen Photographer’s Friend and navigate back to the ND Filter Calculator, the Active Timer will continue to run working towards the originally set end time. This goes for the iOS version as well. In fact, you can have the two timers linked, and close both devices, and they’ll still be running when you restart either or both of them. I should also note that you do have to have the Extension running and the ND Filter Calculator screen displaying for the Active Timer feedback, but if you should close it and leave it closed, whether you are using the Active Timer or not, you will get a Notification, assuming you have given Photographer’s Friend permission to send you notifications that is. This is also the same for the iOS version as well.
OK, so as I say, I’ll embed the tutorial here once I’ve completed it so that I can walk you through this stuff visually as well, but if you are already using the Apple Watch Extensions for Photographer’s Friend, I hope you found this useful. And if you don’t use Photographer’s Friend, I hope you at least found the geeky talk about the calculations interesting. If you have just heard about Photographer’s Friend for the first time and would like to grab a copy, you can find more details on our product page at https://mbp.ac/app or on the Apple App Store at https://mbp.ac/pf. Note that the Apple Watch extensions cost a few more dollars as an in-app purchase. I didn’t want to include this in the base price because not everyone has an Apple Watch or necessarily want to use the extensions.
")
Show Notes
Get Photographer’s Friend in the Apple App Store at https://mbp.ac/pf
Audio
Subscribe in iTunes to get Podcasts delivered automatically to your computer.
Download this Podcast as an MP3 with Chapters.
Visit this page for help on how to view the images in MP3 files.

0 Comments