

Free Yourself with Back Button Focus 0:0015:52 | Visit Library for MBP Pro eBooks |
I was reminded of this today’s topic in the new MBP Community for our Patreon contributors this week, so I figured I’d spend a little time today talking about why I use Back Button Focus, how I set it up on my Canon Cameras, and I’ll also explain how using the back AF button can help you to switch between various focussing modes without actually changing the camera or lens settings.
First of all, let’s back up a little and talk about how I got started using the back AF button on my cameras. It must be around 15 years or so ago now, when the original MBP Forum was full of great enthusiastic photographers sharing thoughts on a daily basis, and a number of people were talking about back button focus, so I decided to give it a try. I set my camera up so that the shutter button no longer activated the camera’s autofocus, and went out shooting at the Ueno Zoo here in Tokyo.
The first morning using back button focus was frustrating to say the least. My muscle-memory up to that point was all about half-pressing the shutter button to activate the focus and exposure metering and I often forgot that the shutter button was no longer activating the autofocus, and wondered why the lens wasn’t focusing, then a moment later I’d recall what I’d done and hit the back AF button. By the afternoon, I’d started to get it drilled into me what was happening, and although still frustrated, the benefits had started to become obvious to the point that I knew I had to stick with it. In the coming weeks I’d forget to focus a number of times, and had to reshoot a few of my landscape shots, either because I’d forgotten to focus, or I couldn’t remember if I’d focused or not, so paranoia set in, and the screens on the cameras back then weren’t really good enough to to reliably check critical focus, so I reshot some images.
The reason I was hooked on back button focusing is because it enables you to completely separate the act of focusing from the exposure and actually releasing the shutter. If you are currently half-pressing your shutter button and reframing to take your photo, there may be times when that becomes a little bit tiresome. Of course, these days, we can much more easily move the focus point around and with mirrorless cameras now we can often move that focus point to pretty much anywhere in the frame, so there really isn’t any reason not to do that, but it can sometimes be more efficient to simply focus with the center focus point and then reframe when you want to make your exposure, and if you don’t have your shutter button assigned to active your focusing, you don’t have to hold the shutter button down while reframing. You can simply focus by placing your focus point over what you want to focus on, press the back AF button with your thumb and then take your thumb off the AF button, and reframe.
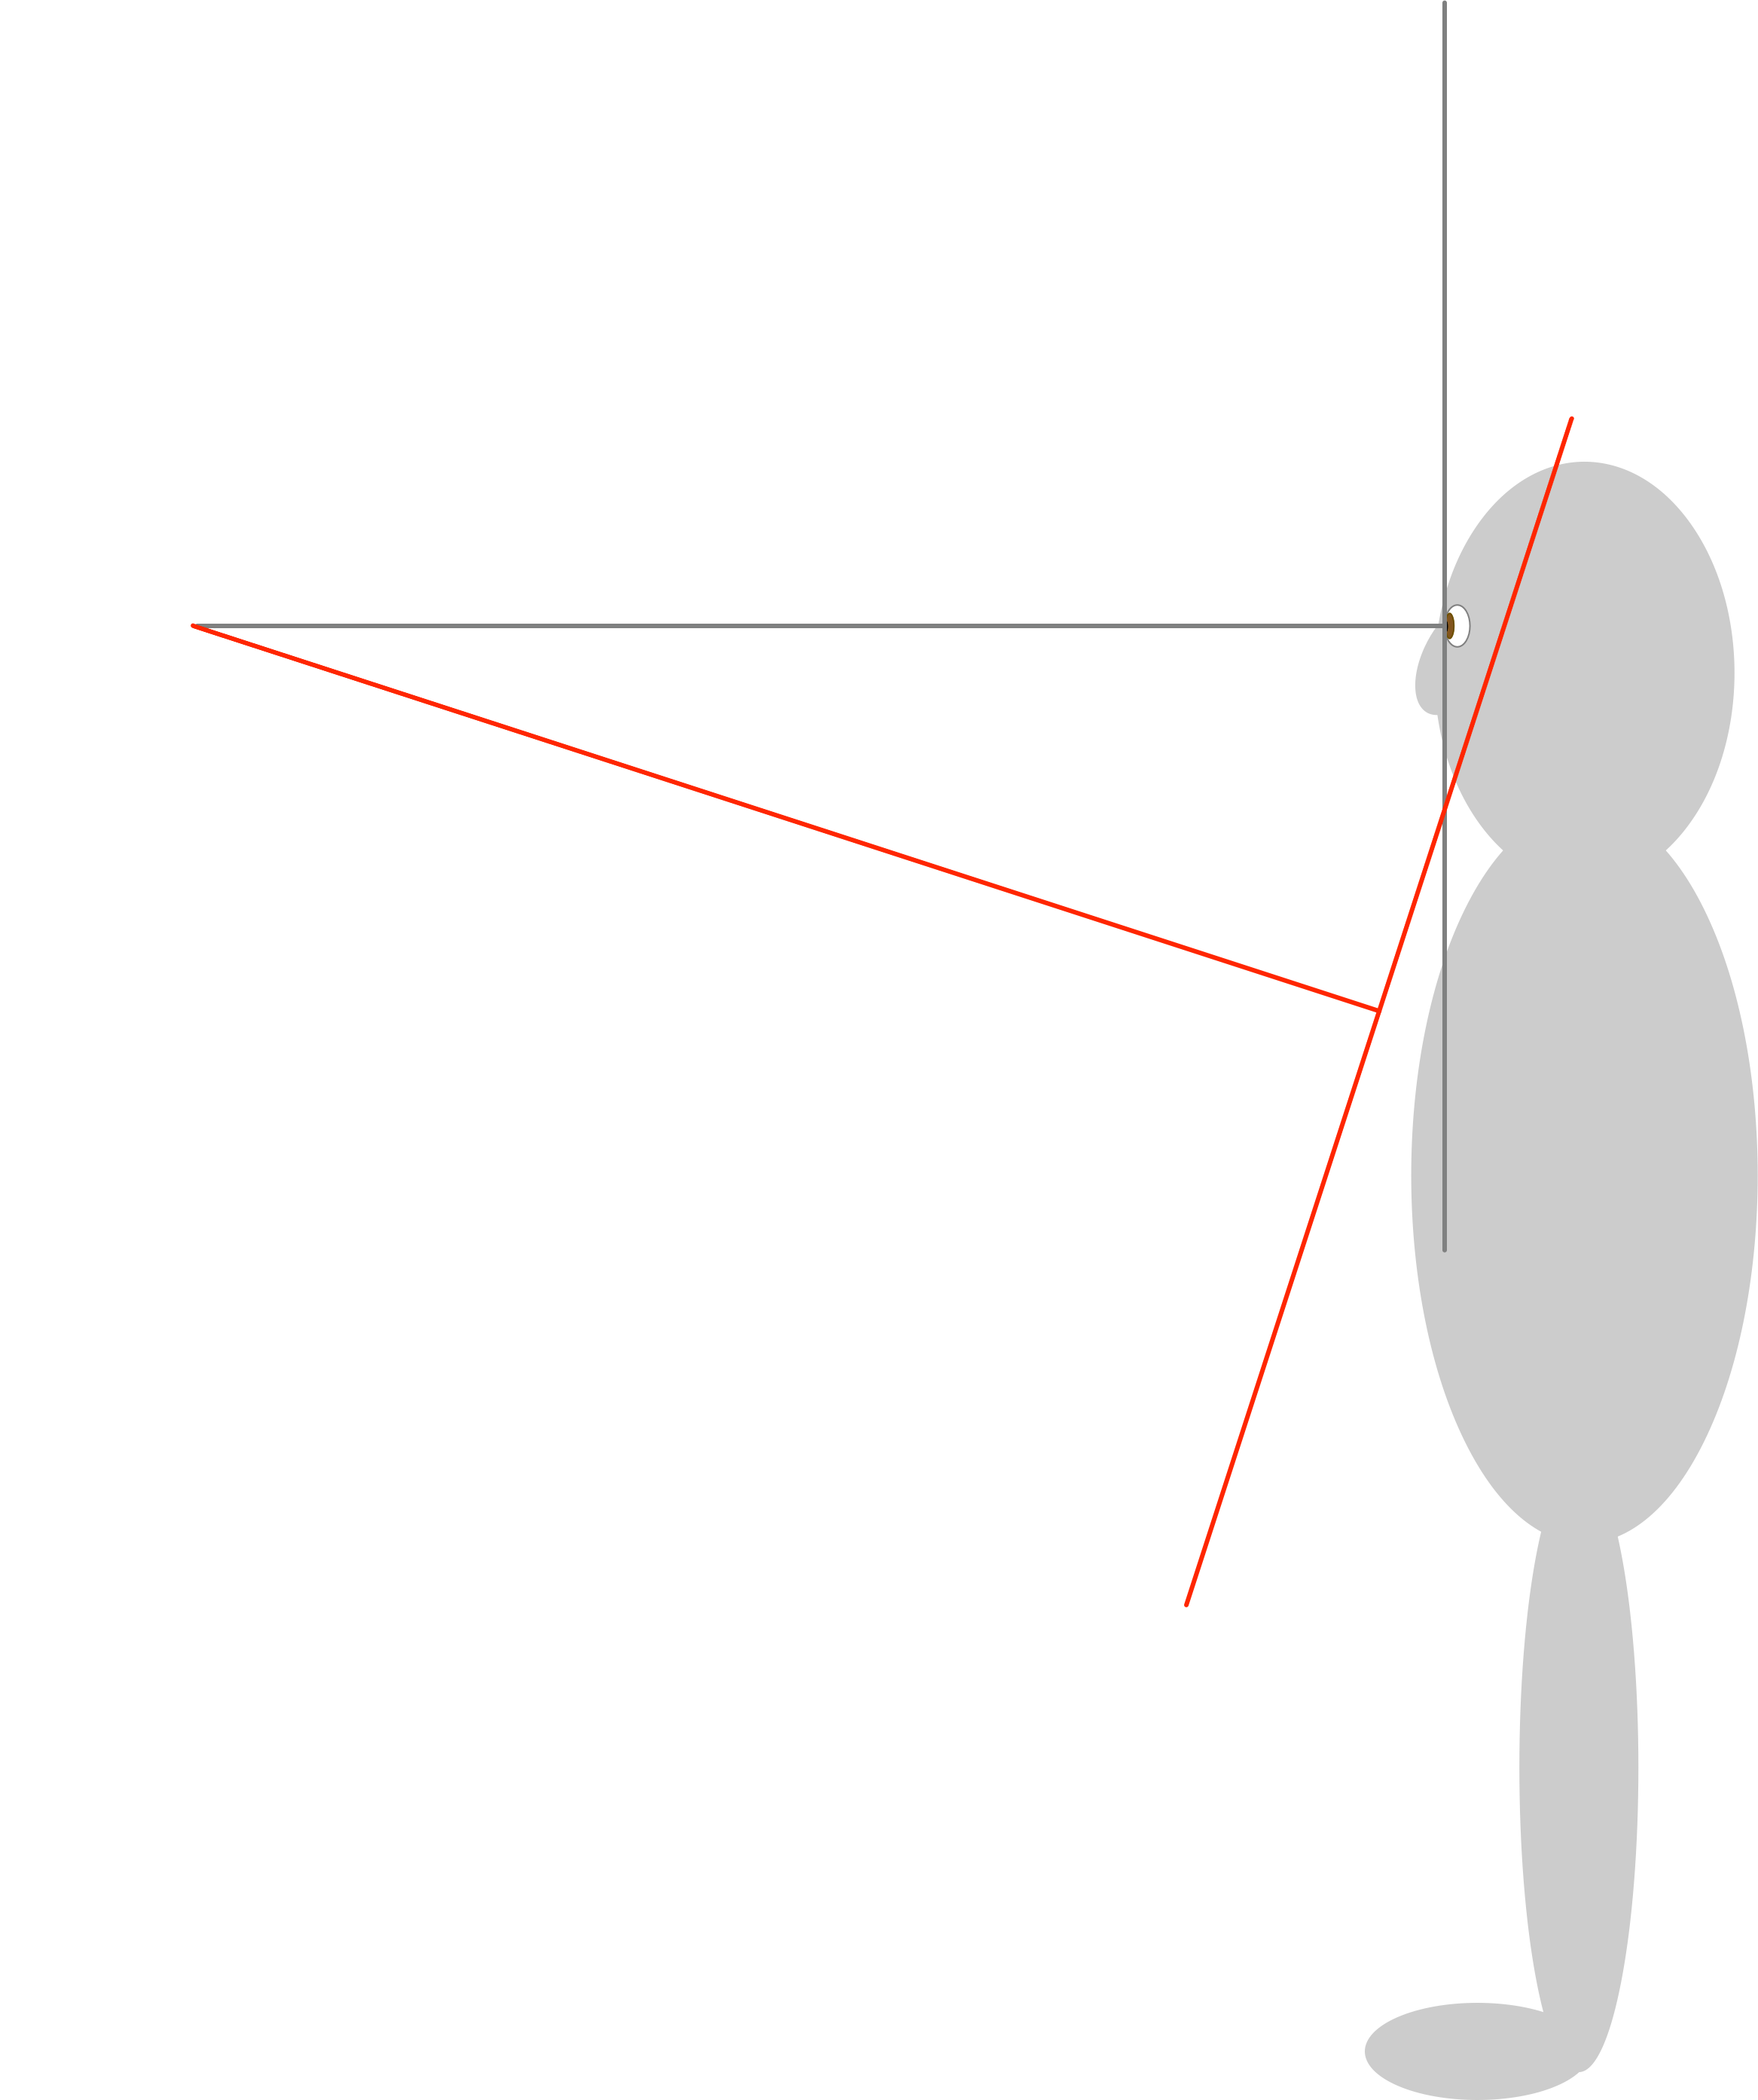
As an aside, if you are using a very wide aperture with extremely shallow depth of field, you still need to be careful when reframing, because the plane of focus moves if you change the angle of the camera when reframing. Here’s a quick diagram to illustrate what I mean. Imagine you are doing a portrait of someone, and you focus on their eyes, because it’s important to get the eyes sharp, but with the center focus point, which is represented by the black lines. Then you realize that there’s a lot of space over the subjects head, and that looks amateurish, so you keep your finger half pressed on the shutter button to maintain your focus, then tilt your camera down to reduce the space over their head. This reframing and the plane of focus shift is shown by the red lines.
See how the plane of focus is now quite a way behind the subjects eyes? If you are using a wide aperture with shallow depth of field, you’d lose the critical focus on the subjects eyes. Even with a relatively small aperture, you may still be able to tell that you did not focus on the eyes, and that will ruin your portrait unless you intended the subject to not have sharp eyes.
To make things worse, when you reframe, more often than not you actually rock forward a little, moving the camera further forward still, moving the focus plane back even more.
Because of these things, it’s really just so much better when shooting portraits to get into the habit of moving your focus point to sit over the subject’s eyes. If the subject is not looking straight at you, generally focus on the closer of the two eyes, again, unless you have a reason to do otherwise.
Anyway, a bit of a digression there, but to get back to the point, say for example, I was shooting from a distance away, and reframing isn’t something I need to worry about, then it’s easier to do this with the auto focus on the shutter button disabled, by placing my focus point over what I want to focus on, pressing the back AF button, then taking my thumb off of the AF button to stop focusing, and then reframe, and I don’t have to worry about focusing again, because it’s already done.
If you don’t disable auto-focus on the shutter button, when you press the shutter button to make your exposure, it would start focusing again and you’d be in a mess, so it’s important to turn that off. On all cameras I know of you can do this by going into the custom functions. On my Canon EOS R5 I go to the Custom Functions menu 3 and select Customize Buttons, then ensure that the Shutter button half-press option is changed from Metering and AF start to just Metering start. While you are in that menu, open the AF-ON Button option and ensure that it’s set to the default which is Metering and AF start. These settings ensure that you can use the AF button on the back of the camera to focus, and stop the shutter button from focusing. Here’s a video of my camera menus to help if you get stuck.
OK, so now we have our camera set up to not focus when we press the shutter button. Let’s explore the other benefits of using your camera in this way.
Instant Manual Focus
Perhaps one of the biggest benefits is being able to go into Manual Focus without touching a switch or going into any menus. Simply stop pressing the AF button on the back of the camera, and rotate your lenses focus ring, and you should be able to manually focus. You do have to make sure that your lenses support full time manual focus, because some lenses will try to fight it if you rotate the focus ring while they think they are in Autofocus mode, but if you feel no resistance when you try to adjust your focus with the lenses focus ring, you should be fine to use this method.
This is handy for those times when you just need to quickly tweak the focus, and I really like to avoid switching the lens into manual focus with the AF/MF switch on the barrel of the lens, because it’s so easy to forget that you’ve done that, and then especially with wide angle lenses that have deep depth of field even when wide open, it can sometimes be difficult to notice that they are not actually focusing when you think they are.
One Shot to AI Servo Toggle
Another thing that I like to do, especially when I’m doing a lot of wildlife shooting, is to leave the camera in AI Servo or Continuous Focus mode, and then, I can keep my thumb on the AF-ON button when I want to continuously focus on my subject, but then if I want to use a kind of pseudo One Shot, or Single Shot mode, I can just press the back button quickly to get focus, but then take my thumb off the AF button again. Because this works so well, with the camera in AI Servo focusing mode, we are actually able to use three focusing modes without opening a menu or switching any switches.
We tap the AF button and release for One Shot focus, keep our thumb on the AF button for Continuous AI Servo focus, and keep our thumb off the AF button for Manual focus. Especially for birds in flight and many other types of wildlife photography, being able to stop focussing while shooting can sometimes be a life saver. For example, if you are photographing an animal in long grass the camera can focus on the grass in front of the animal, which is not going to give great results.
I was in this situation when we spotted this lion lying in long grass at a reserve just outside of the Etosha National Park in Namibia. He had his head down low for most of the time, but a lion sitting in long grass at the end of the day doesn’t go too long before yawning, so I focussed on his head roughly where his eyes would be when he lifted his head up, then took my finger off the back AF button and waited.
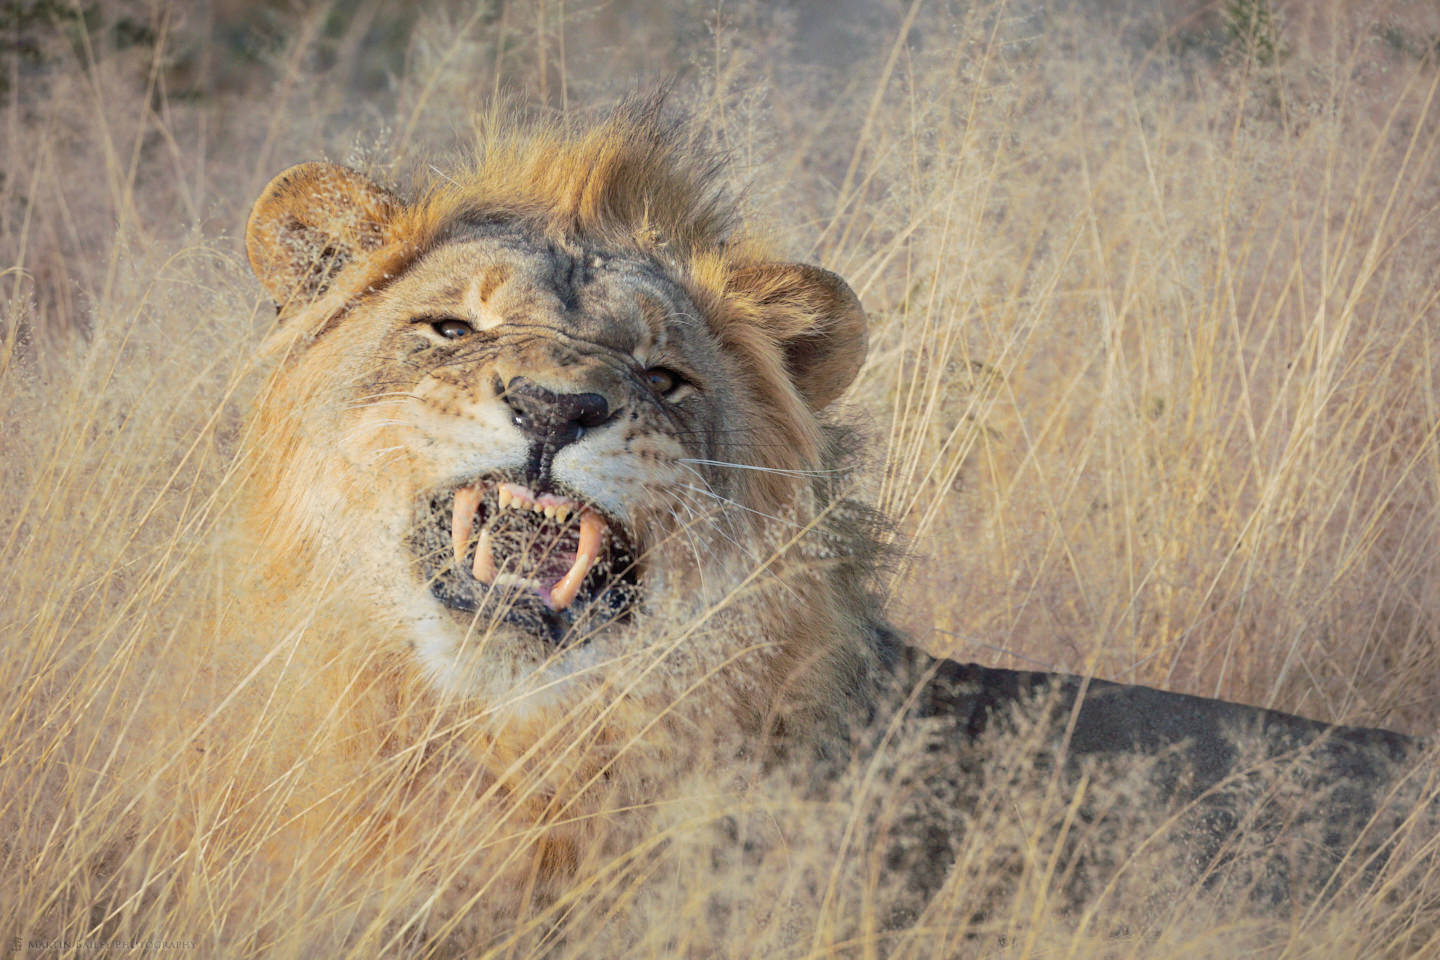
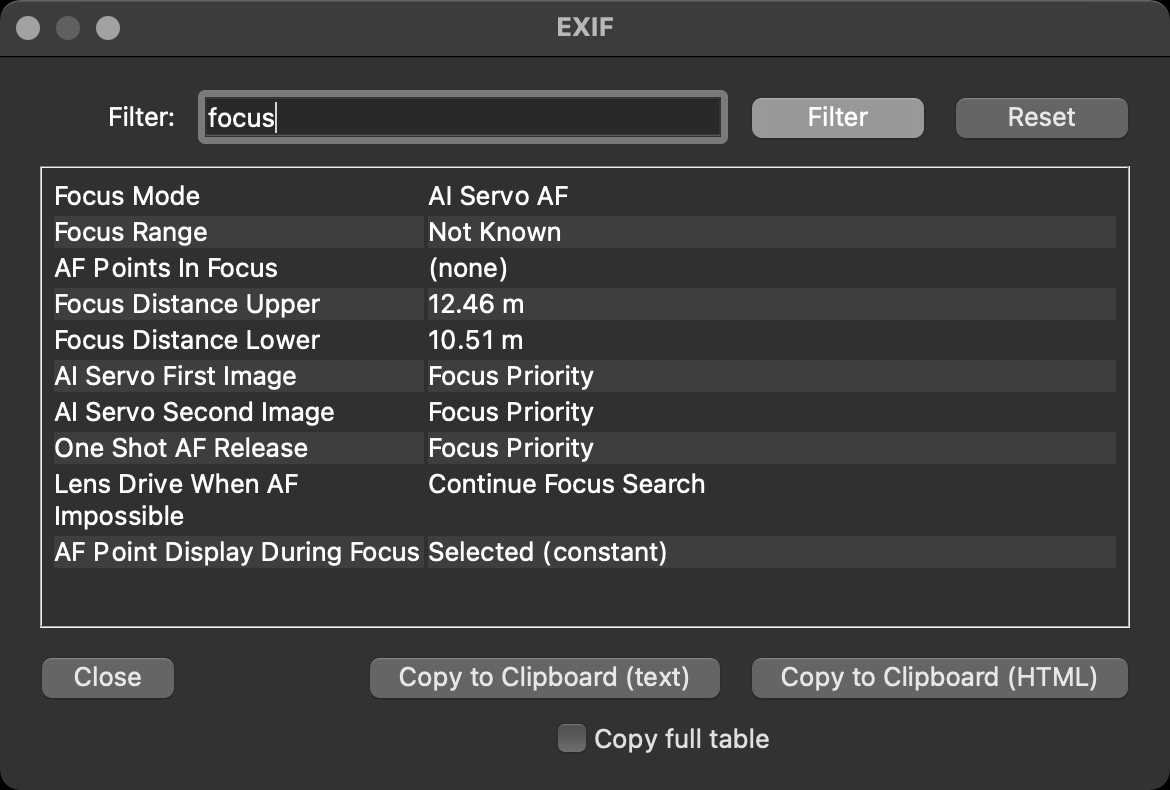
When he eventually lifted his head up to start yawning, I got a few frames, including his yawn, and like this one, as he lowered his head again after the yawn, looking like he’s scowling. I opened up the series of images in Raw Digger and filtered out the Focus related information, and can see that there are no AF Points in Focus. This tells me that as I recall, I had released my thumb from the AF button during the burst to capture these photos.
If I had been using the shutter button to focus I could still have gotten this image, but I would have been relying on focusing as the lion started to yawn, and the danger there is that still could have focussed on the foreground grasses, or even if I waited for the head to be higher than the grass, I may have focussed on the front of his mouth. That would have been fine for the teeth shot, but that would be too near to get the eyes sharp in my favorite shot of the burst shown above.
I have to admit though, that when I am not doing wildlife or fast paced shooting that requires AI Servo or Continuous focussing mode, I generally put my camera back in One Shot or Single Shot focusing mode, as I like to get that little little visual flash when my camera achieves focus, and the little beep is reassuring as well, although I know some people really don’t like that beep.
So, just a quick one this week. We’ll wrap it up there for today. I hope you found this useful, and if you haven’t tried back button focusing yet, give it a try, but not on an important shoot! I remember talking about this on my very first Hokkaido Tour & Workshop and although I warned the group about changing their cameras during the trip, someone did and then spent a frantic hour on the Bihoro Pass at dawn thinking that their camera had frozen up, until he recalled that he’d changed to back button focus. Anyway, have fun with this.
Before we finish I’d like to say a huge thank you to our new Patreon contributors Chris, Alin, Dipak, John, Mike and Nick. Your support along with the rest of the contributors is very much appreciated!
Show Notes
You can get Raw Digger here: https://www.rawdigger.com
Subscribe in iTunes to get Podcasts delivered automatically to your computer.
Download this Podcast as an MP3 with Chapters.
Visit this page for help on how to view the images in MP3 files.

)
)
)
)
)
)

0 Comments