Visit Library for MBP Pro eBooks |
I recently spent four days in Northern Japan, starting with a family event, then a little photography in some of my favorite places to shoot. The day before we left, I took delivery of my new iPhone 14 Pro Max, which I’d ordered as soon as the new iPhone went on sale, and it’s taken until now to arrive. My previous iPhone was four years old at this point, so I was ready for an upgrade, and I am enjoying the slightly larger form factor and I’m enjoying the three cameras, and the Macro mode, which is new to me with this iPhone.
I had heard that the new iPhone had a 48-megapixel camera, and I thought I’d enabled it as I selected to shoot raw images which is required to get the 48-megapixel images, but I didn’t find out until I got home that only the main 1X camera is 48 megapixels, and you have to enable Raw in the settings and hit the Raw button in the camera to shoot raw images. You can change the camera settings so that it remembers to stay in Raw mode, but when shooting raw images, the camera automatically disables the Live Photo setting. I personally enjoy playing with Live Photos more than I value the ability to shoot raw images with the iPhone camera, so I’ll probably not be switching to raw very often. I definitely enjoyed having such a great additional photography tool with me during this trip, and I’ll share a few of my iPhone photos alongside my Canon EOS R5 photos as we work through this travelogue.
Ultimately, when I want to shoot a raw 48-megapixel image with my iPhone, I have the button displayed ready to switch, but despite looking forward to the higher resolution, not being able to get that resolution with pretty much all modes that I use the iPhone camera in is a bit of a downer.
We weren’t sure how much time we’d have left to go out shooting, as the family event and meeting some old friends was the highest priority for this trip, but we managed to get everything we needed to do done in the first two days, so on the third day, we drove around to the Five Color Lakes that I’ve talked about in the past. We got slightly better fall color this year, but still, it was probably around 5 days to a week early so the colors weren’t great.
Thankfully, the natural colors in some of the Five Color Lakes themselves were nice and found themselves in some of my shots, like this one of a patch of the Blue Pond, with a little bit of fall color creeping in on the trees to the right. I placed that grey-colored bare tree along the right side of the frame and was careful to find a nice spot as that green tree on the left faded into the darkness to end the left edge of the frame.
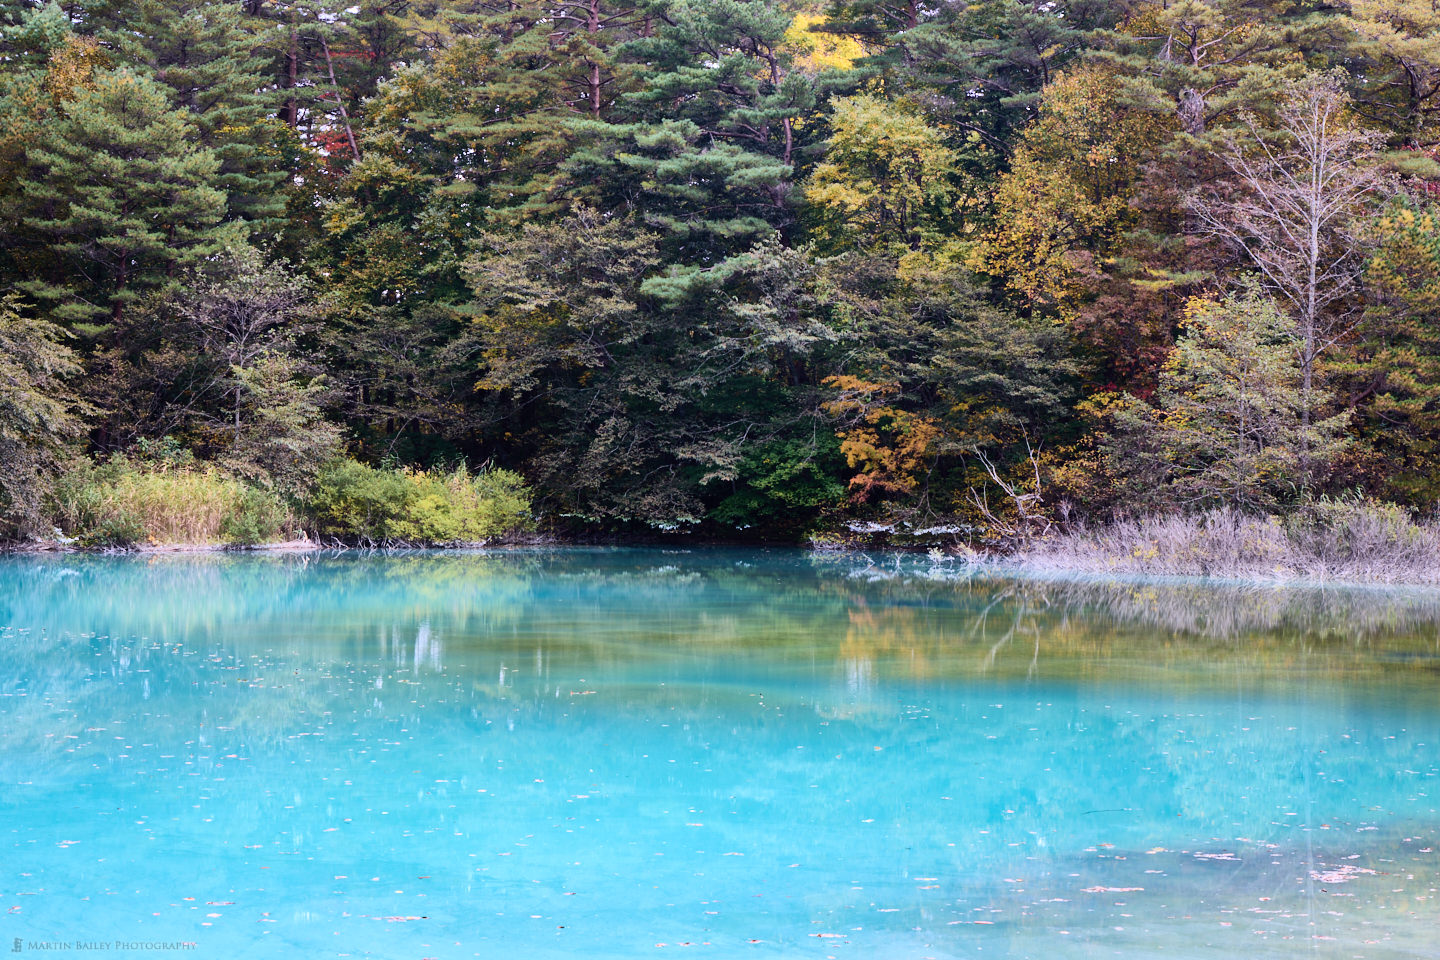
You can see the shooting information by clicking on the images, but the main settings for this were ƒ/16 at ISO 100 for 0.3 seconds. It was overcast when I shot this, but the longer-than-usual exposure helped me to still bring out the beautiful colors, especially the blues in the water, which are caused by minerals.
This next image is the same lake from around 90 degrees to the right of the previous shot and slightly more elevated. This was actually as we came back from our walk along the track through the lakes, but I don’t have anything to share from the other lakes using my Canon EOS R5, so I figured we’d keep these together.
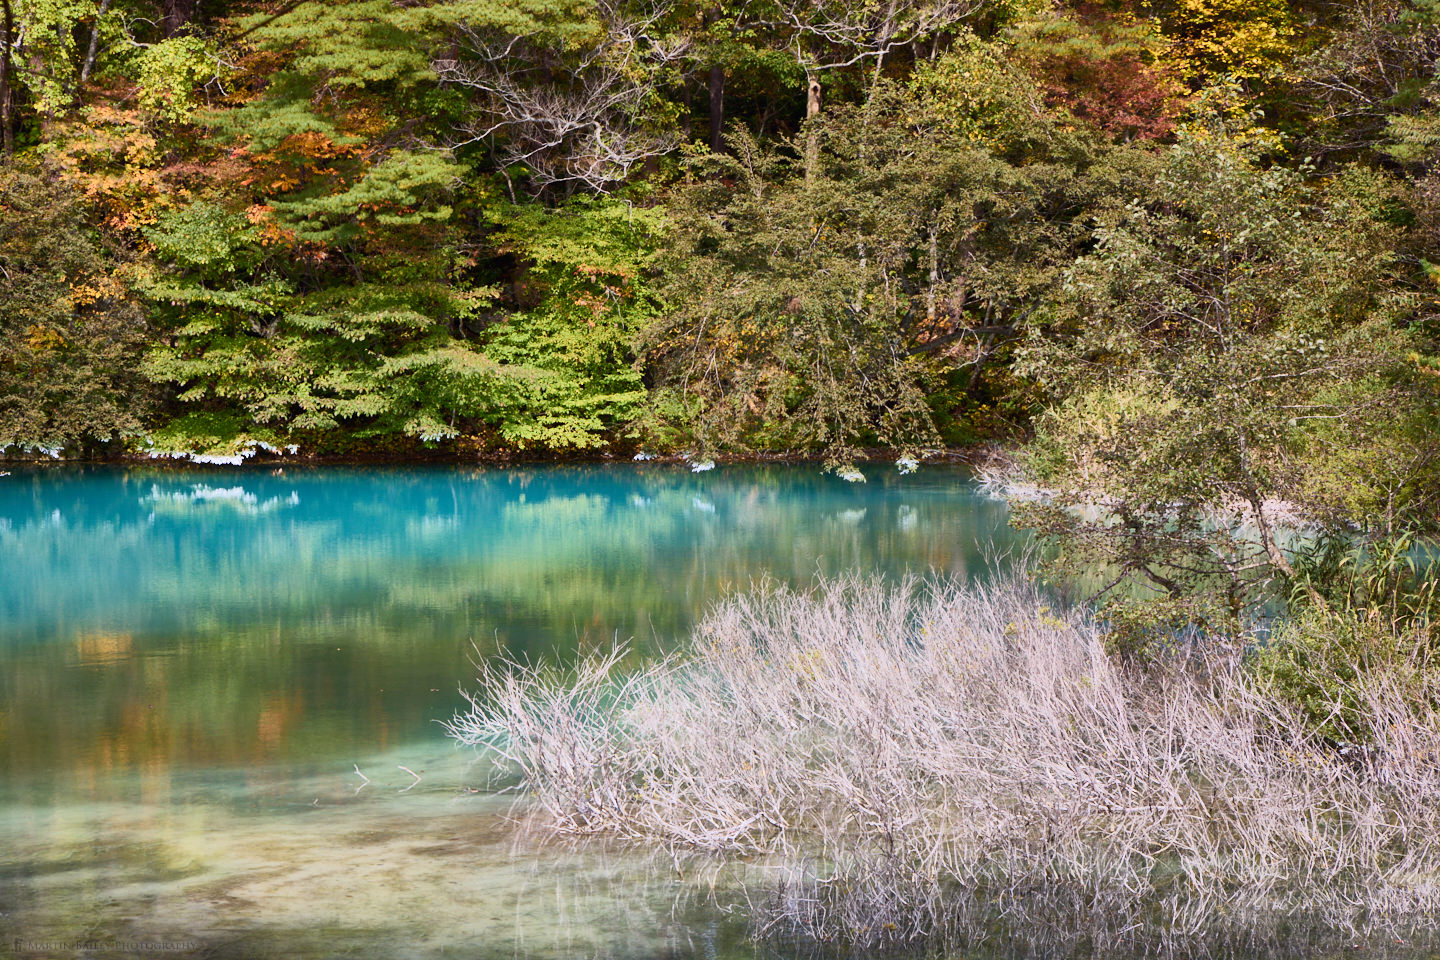
I like this one because of the more pronounced reflections on the trees in the blue water and because we can see some nice detail in the pond bed in the bottom left corner. I hand-held this shot because I had to get down low to shoot through some trees, and my wife was starting to get a little bit impatient as she was ready for lunch, so I didn’t spend the time necessary to lower my tripod legs. I did increase my ISO to 200 though so that I could get a shutter speed of 1/80 of a second, which was going to be better for hand-holding my 105mm focal length.
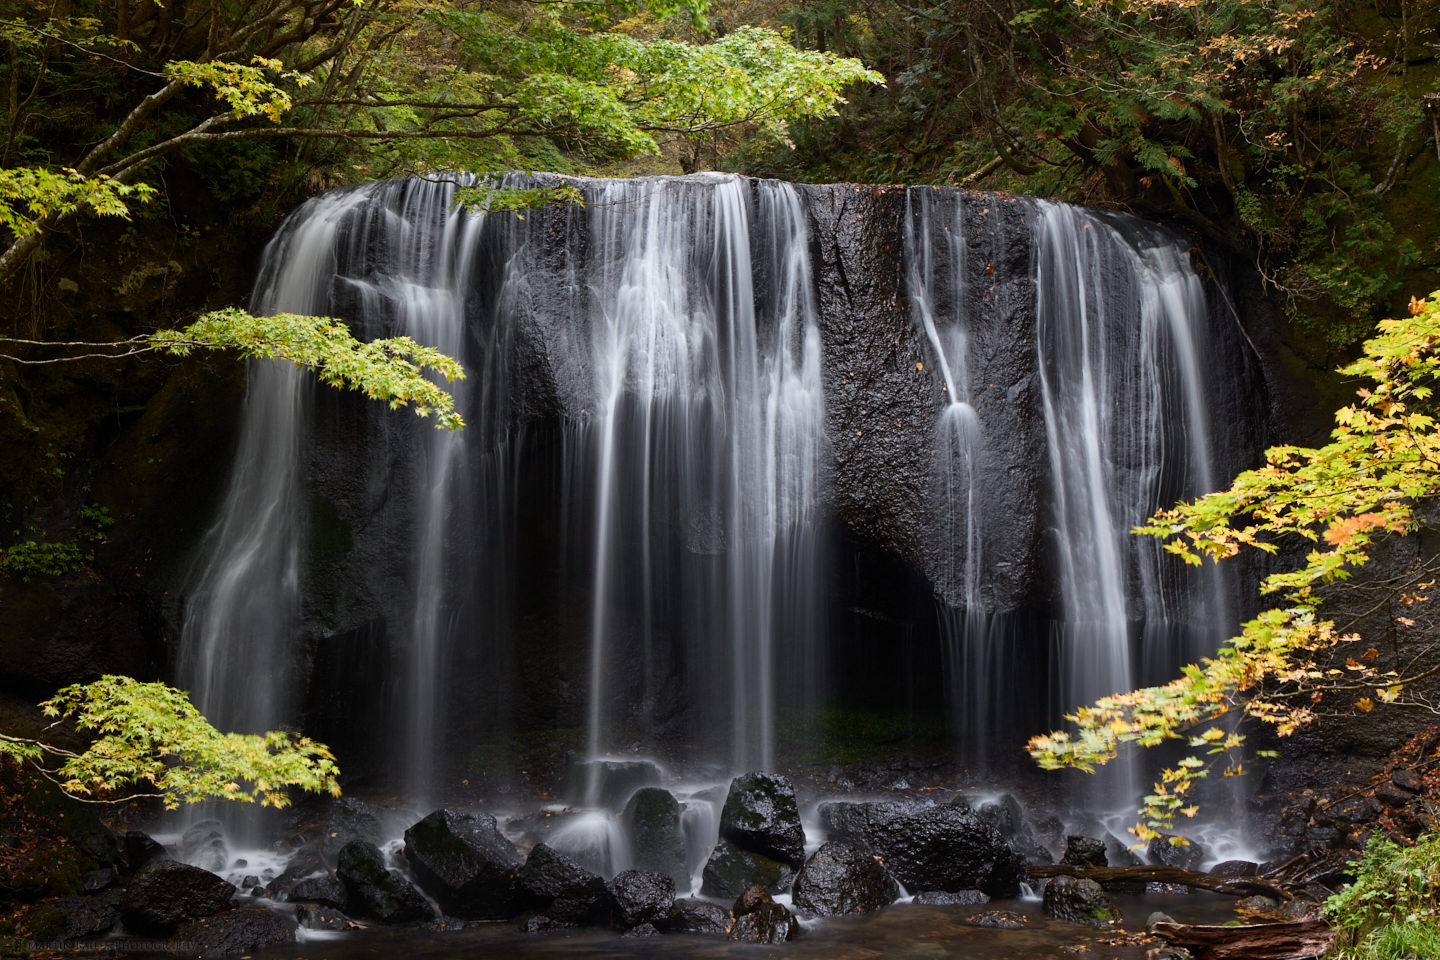
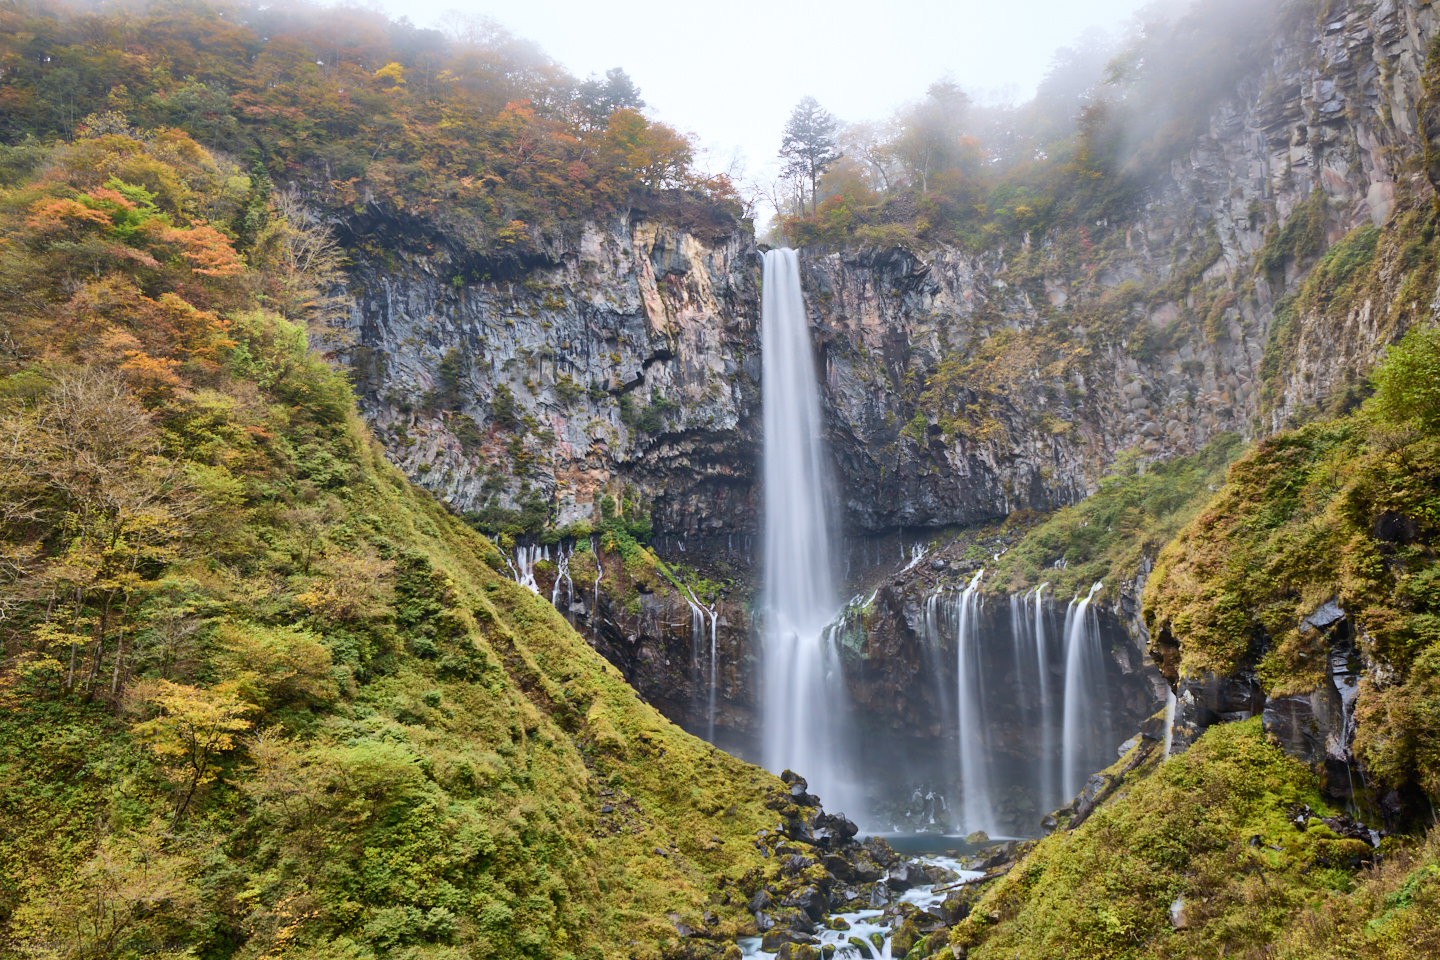
After lunch, we swung by my favorite waterfall in Japan, which I also visited last October and many times before. In this next image, you see the Tatsusawa Fudodaki. This waterfall is incredibly soothing to visit and photograph, although the fall color managed to elude us again this year. There is a little yellow creeping in, but it’s not quite there.
Looping a Live Photo
Here is a video that I shared of a live photo, which I set to loop here on the website, so it looks like the water is continuously rippling. Note that to make this work you have to use the code that you’ll find when selecting the Embed option on Vimeo rather than just pasting a link to the video into WordPress. Also, to force the video to autoplay and loop include the options “autoplay=1&loop=1&background=0&autopause=0” in the embed code.
The first loop is very subtle and probably hard to miss, but here is a second live photo of the Kegon Falls from the following day, also shot with my iPhone 14 Pro Max, and shared to Vimeo, then set to loop. With more obvious movement, this looks much more effective as a loop.
For many years now, I’ve been a huge fan of what I call Moving Stills, which are scenes that I would generally shoot as a still photograph, but since we got video in our cameras, I started to switch to video and record 15 to 30 seconds of video so that the slight changes in the scene are recorded. Creating a loop with the Live Photo options is a great way to do this with the iPhone, which is generally a more casual way to shoot. I’ll be exploring this more as I get into my Japan winter tours which will be going ahead in January and February next year. Due to a little churn in the booking situation, we currently have one open space on all three tours next winter, so check out the tours page if that may interest you. I’ve also published the 2024 dates if you are planning a little further out.
Long Exposures from Live Photos
Another thing that I found recently, as I played with the iPhone 14 Live Photos, is that you can also select the Long Exposure option in addition to Loop and Live Photo, and this takes the information you have in your image and creates a long exposure, as you can see here, from the same image that I shared as a loop above.
For comparison, here is a similar long exposure shot with a 3-stop neutral density filter using my Canon EOS R5 camera. With almost four times the resolution, the EOS R5 image definitely provides more freedom to print large etc., but the quality of the image for everyday use and sharing with friends is really not a lot better than the iPhone image. Of course, I’m not saying that I can now do away with my Canon gear. There is still so much that I cannot do, but this really comes down to resolution, longer focal lengths, and faster frame rates at this point. With the computational photography that the iPhone uses, we can even get a nice shallow depth of field in Portrait mode, and the Macro capabilities of the iPhone are now incredible too.
Although not in Macro mode, here is a video that I shot of a frog sitting near to a mountain stream during my visit to the Five Color Lakes. This is a 20-second or so Slow Motion video, so the water is very nice in this, but also you can see that the frog was captured very well too, at probably around 15 to 20 centimeters.
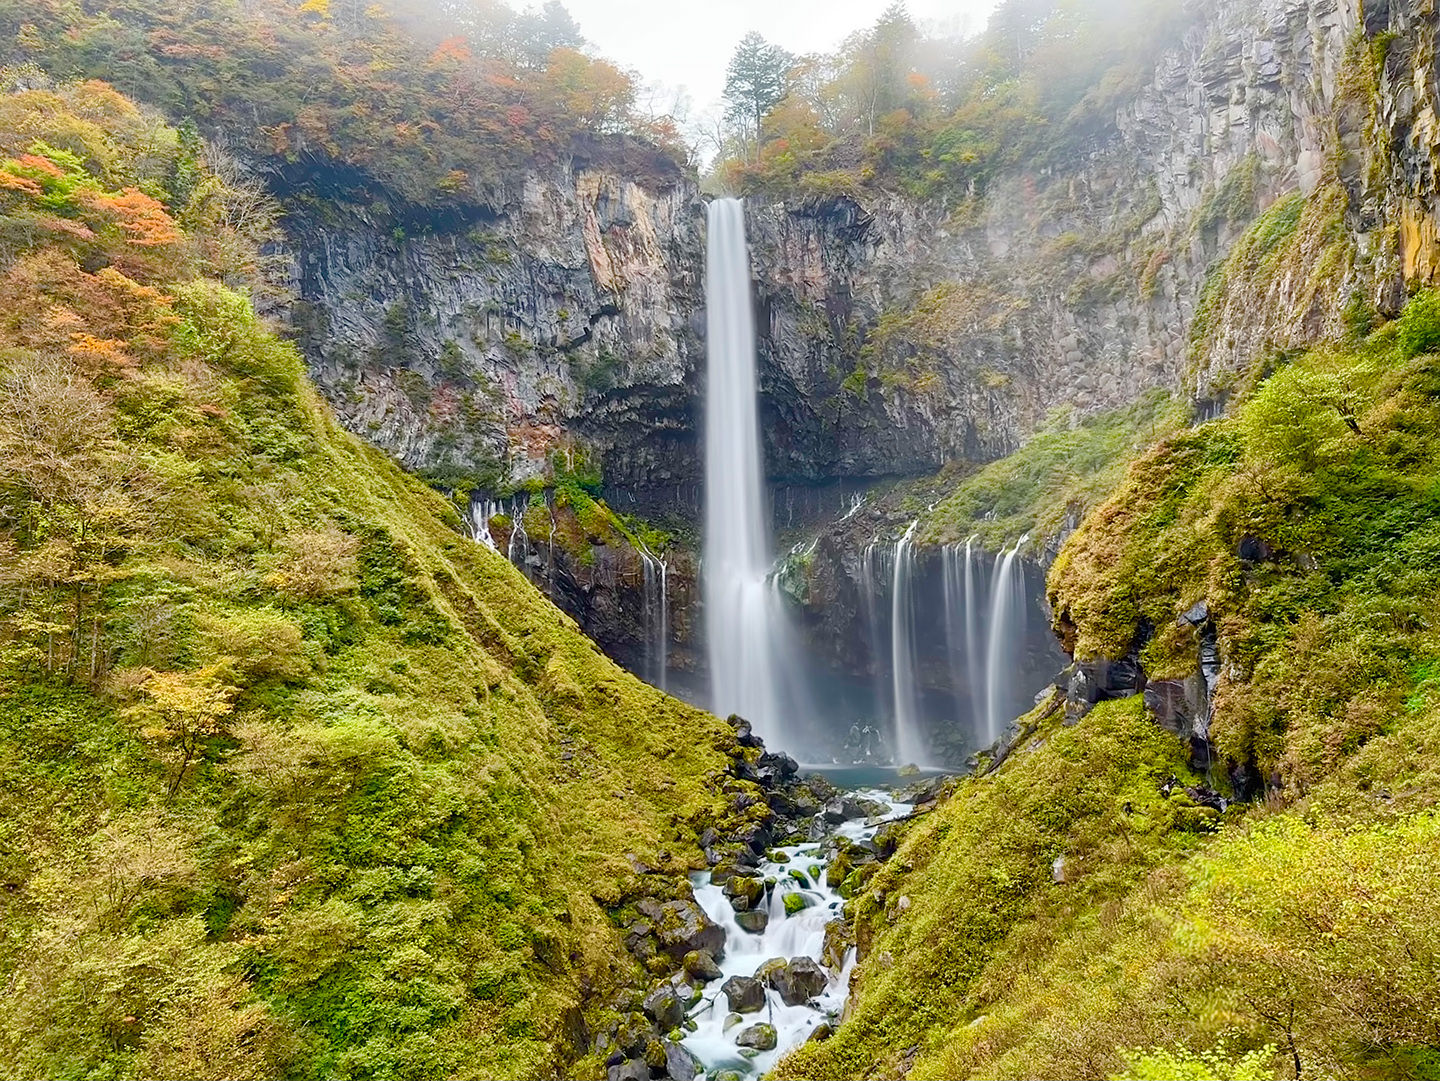
OK, so back to the second photography day from my recent trip, as I wanted to share one last photo before we finish. I’ve been doing this for many years too, but one of the things that I love to do with long-drop waterfalls, is to pan vertically with a longish exposure, to capture the movement of the water as it tumbles through the air. Here is my favorite photograph of the Kegon Falls in Okunikko shot using this technique.
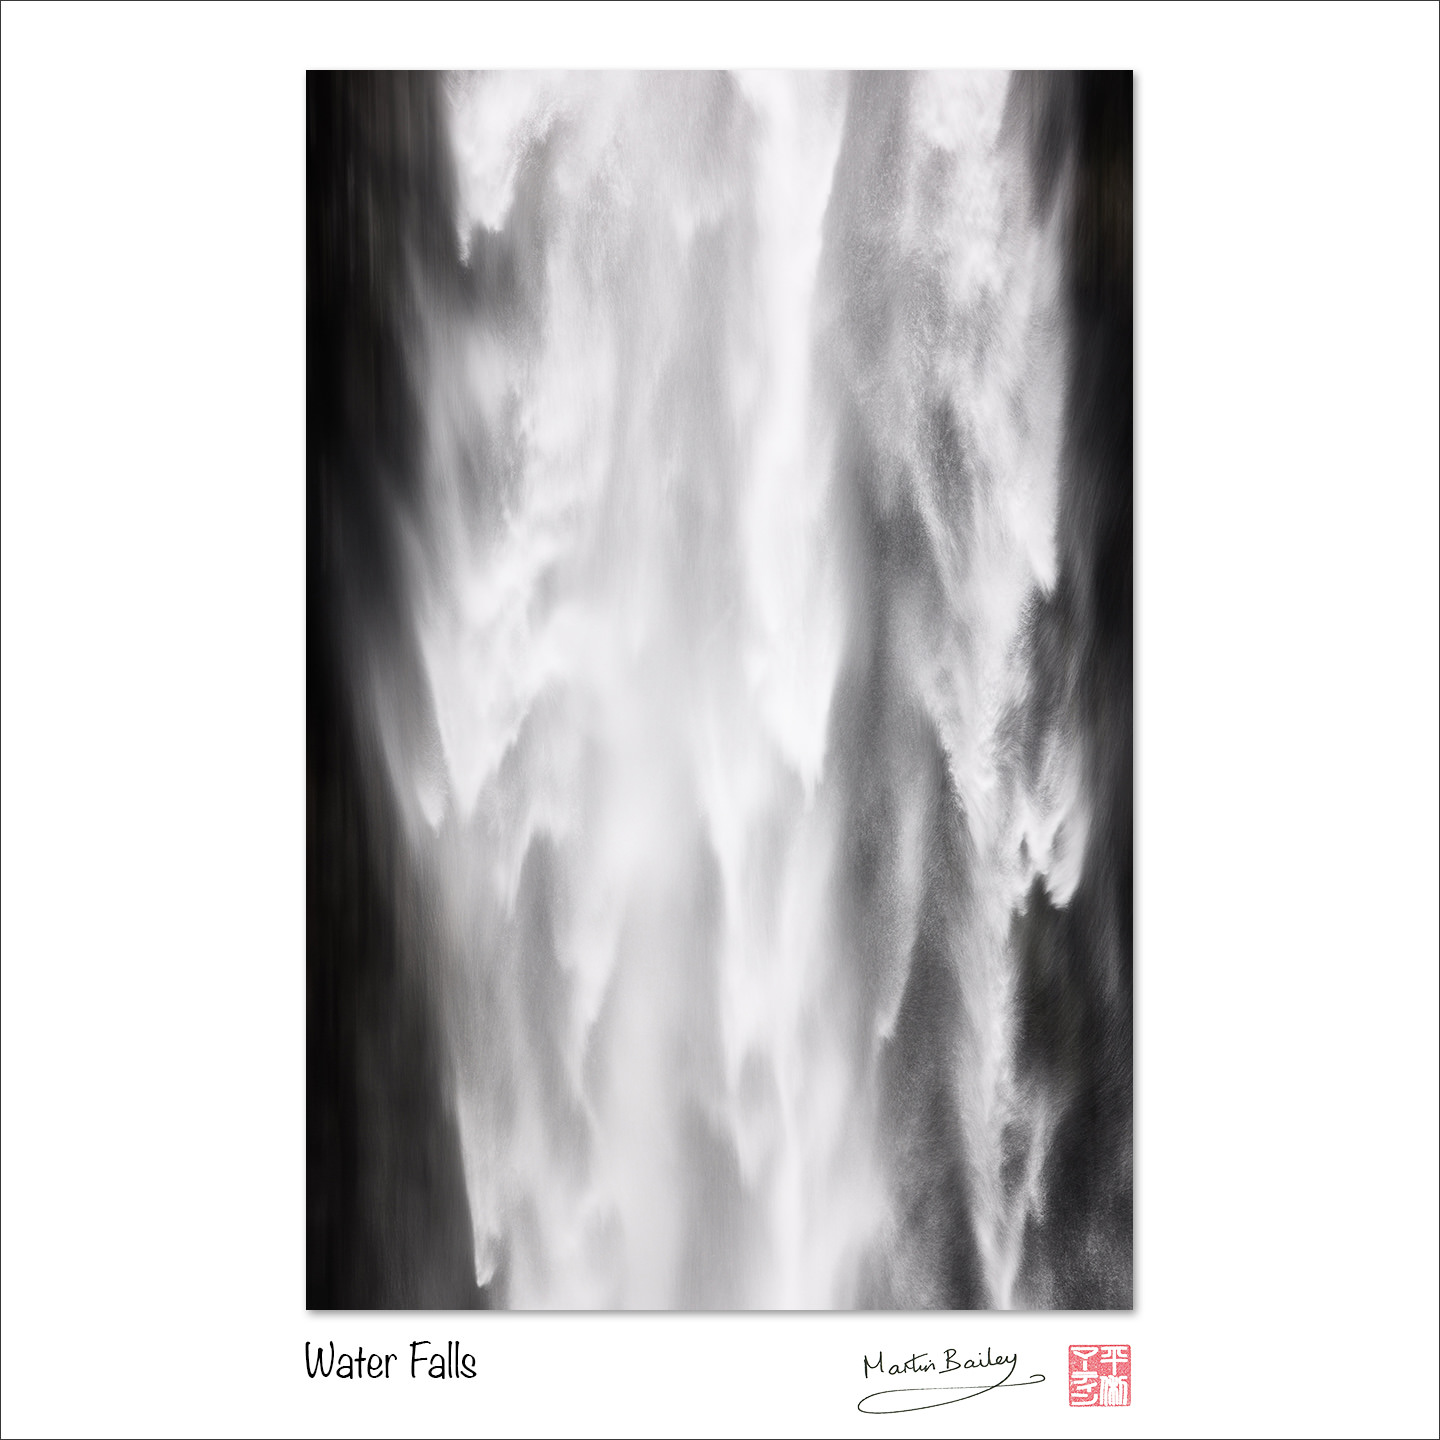
The shutter speed for this image was 1/10 of a second, and as with any panning technique, it’s a little hit-and-miss. You might get some shots that you don’t pan perfectly vertically with, and it takes a bit of practice before you can pan with the water. Luckily, the way the Canon EOS R5 electronic viewfinder works gives a stroboscopic view of the scene you are shooting as you release the shutter in a burst, so you can see that you are staying with the water when you get it right.
I also converted this to black and white and increased the contrast using a Luma Curve in Capture One Pro to remove the distracting brown rock from the sides of the image. I’ve often thought of creating a Japanese-style scroll or Kakejiku of this kind of photo, but the kits available to make them are a bit cheesy, so I’ve never put this plan into action, although I think they would look good in that format.
Anyway, we’ll start to wrap it up there for this week. I had a lot of fun, both just getting out into the mountains with my wife and with my new iPhone 14 Pro Max. I’ve used the iPhone camera for video and slow motion, as well as for Timelapse photography over the years, but now having the three cameras following my upgrade, I am enjoying the additional creative options for still photography, as well as playing with the various Live Photo options, as I’ve shared today. I doubt very much that these will be the last iPhone photos that you see from my travels, and I hope that you find what I do interesting.
Show Notes
Check out our tours and workshops here: https://mpb.ac/tours
Subscribe in iTunes to get Podcasts delivered automatically to your computer.
Download this Podcast as an MP3 with Chapters.
Visit this page for help on how to view the images in MP3 files.

0 Comments