FAB Tools User Manual
Summary
Thank you for using the MBP Fine Art Border Tools plugin for Adobe Photoshop! This page will help you to get the most of out FAB Tools, as they are affectionately known.
With this set of tools, you will be able to easily frame, resize and watermark your artwork in style. A key goal of FAB Tools in addition to resizing and framing your art is to shift your image up within its frame to provide visual balance as well as create space to add text-based and graphical Watermarks with ultimate positioning freedom.
Autopilot enables fully automated image processing and round-robin from most content management applications for one-click framing for Web or Print, now with 30 media sizes and ten customizable format slots. Automatic Text can be used to get shooting information or Descriptions embedded in your images to dynamically create boilerplates specific to each image, even during Autopilot processing. All settings can also be saved in Presets and recalled per module at any time, saving you from having to keep detailed notes on settings used for various projects.
Video Tutorials
If you prefer to watch, we have a series of videos to walk you through some of the basic operations and introduce new features as they have been added. Use the menu in the top left of the video below to navigate between tutorials.
Dependencies
This plugin requires a full version of Adobe Photoshop 2021 or newer. If you have any problems with FAB Tools please update Photoshop if there is an update available. We generally try to optimize FAB Tools for the latest version of Photoshop. FAB Tools does not work with Photoshop Essentials or Lightroom.
Purchasing FAB Tools
If you do not yet own a copy of MBP Fine Art Border Tools you can find them on the Adobe Marketplace here.
Installation
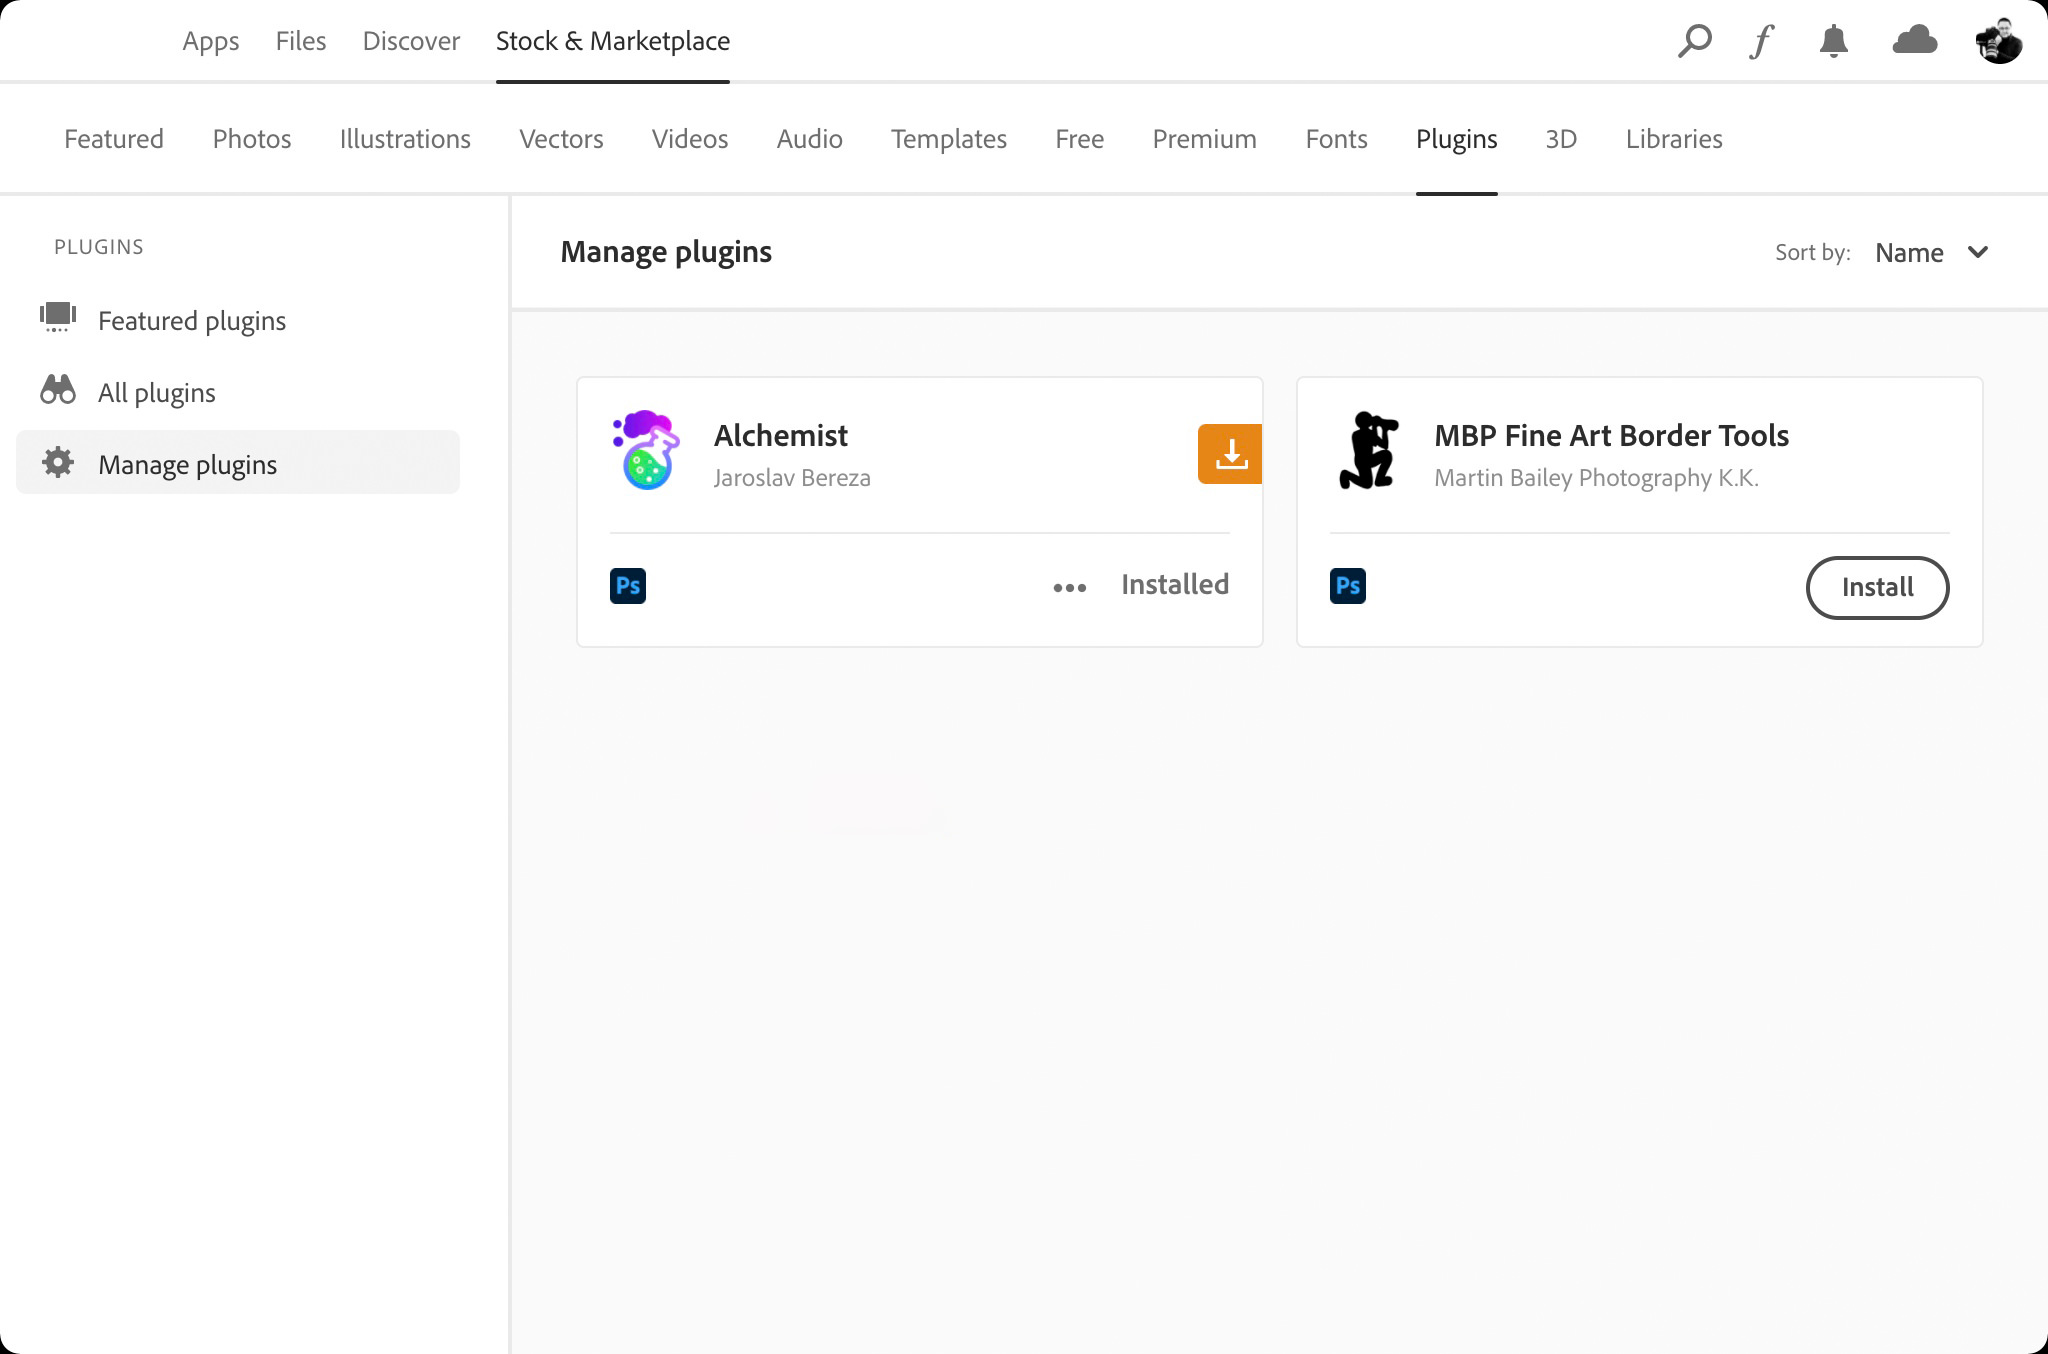
Installation is automatically performed after purchase from the Adobe Creative Cloud Marketplace. If your new FAB Tools are not automatically installed, in Photoshop open Plugins > Manage Plugins and you should see the MBP Fine Art Border Tools plugin with an Install button. If you bought FAB Tools on a different computer, you may have to wait a while before the plugin appears in the Stock & Marketplace > Manage plugins section as below.
Updates
When an update is available, there will be an Update button displayed instead of an Install button when you select Manage Plugins from the Plugins menu in Adobe Photoshop.
Uninstallation
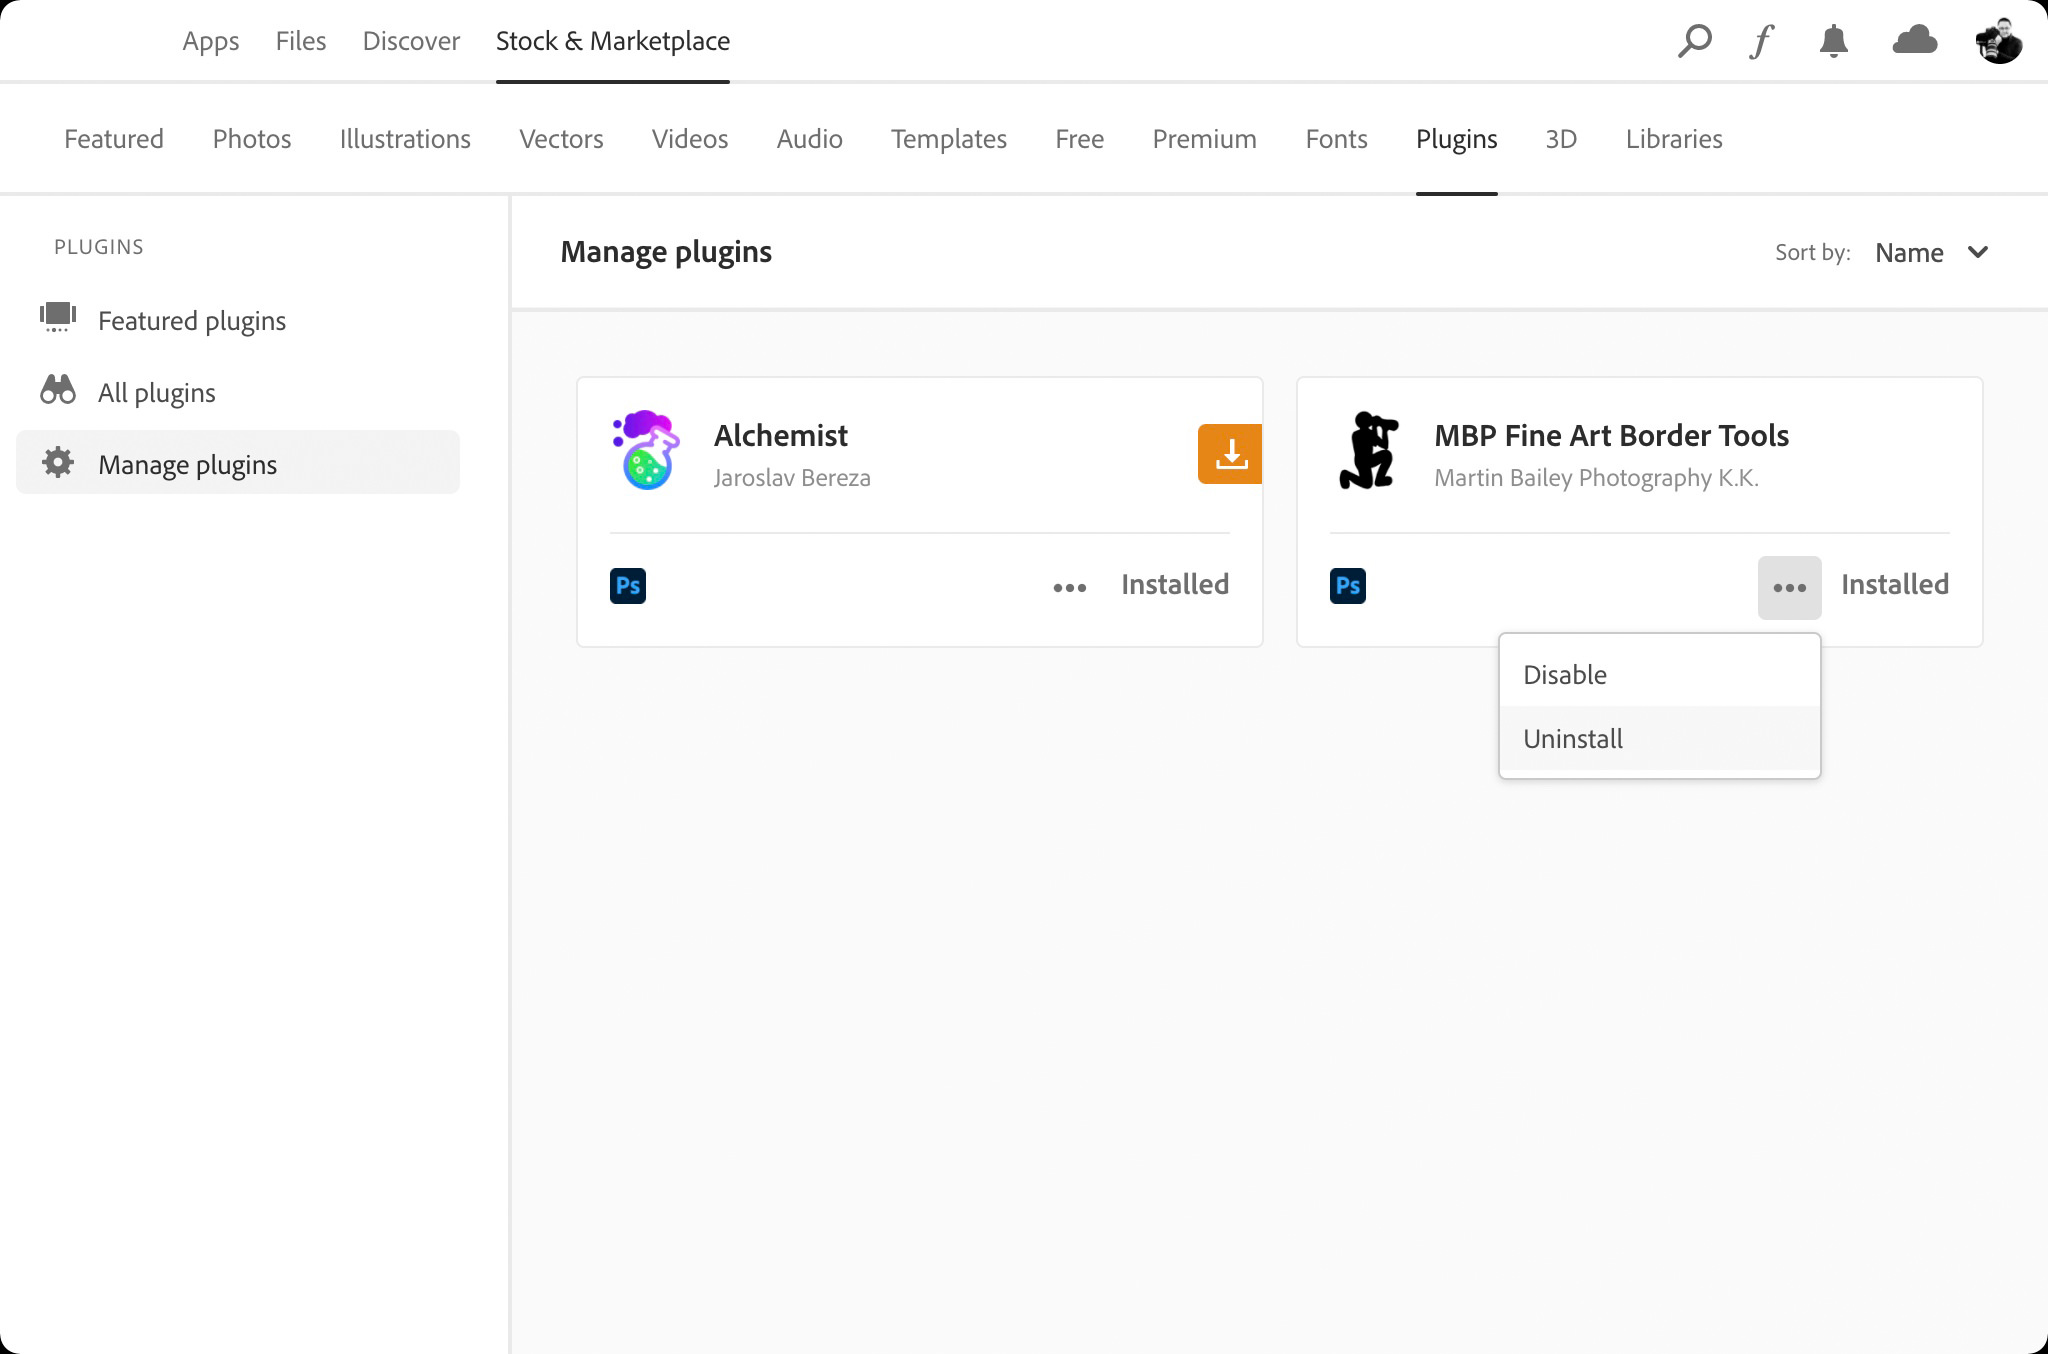
Should you need to Uninstall or Disable the plugin for any reason, select Manage Plugins under the Plugin menu in Adobe Photoshop, then click the ellipses to the left of the Installed text and select Uninstall or Disable. You can re-enable or re-install the plugin at any time.
Launching in Photoshop
If you don’t see the plugin panel, select MBP Fine Art Border Tools under the Plugin menu in Adobe Photoshop. The panel can be free-floating, or docked in a side panel, or added as an icon in a narrow toolbar.
Docking FAB Tools
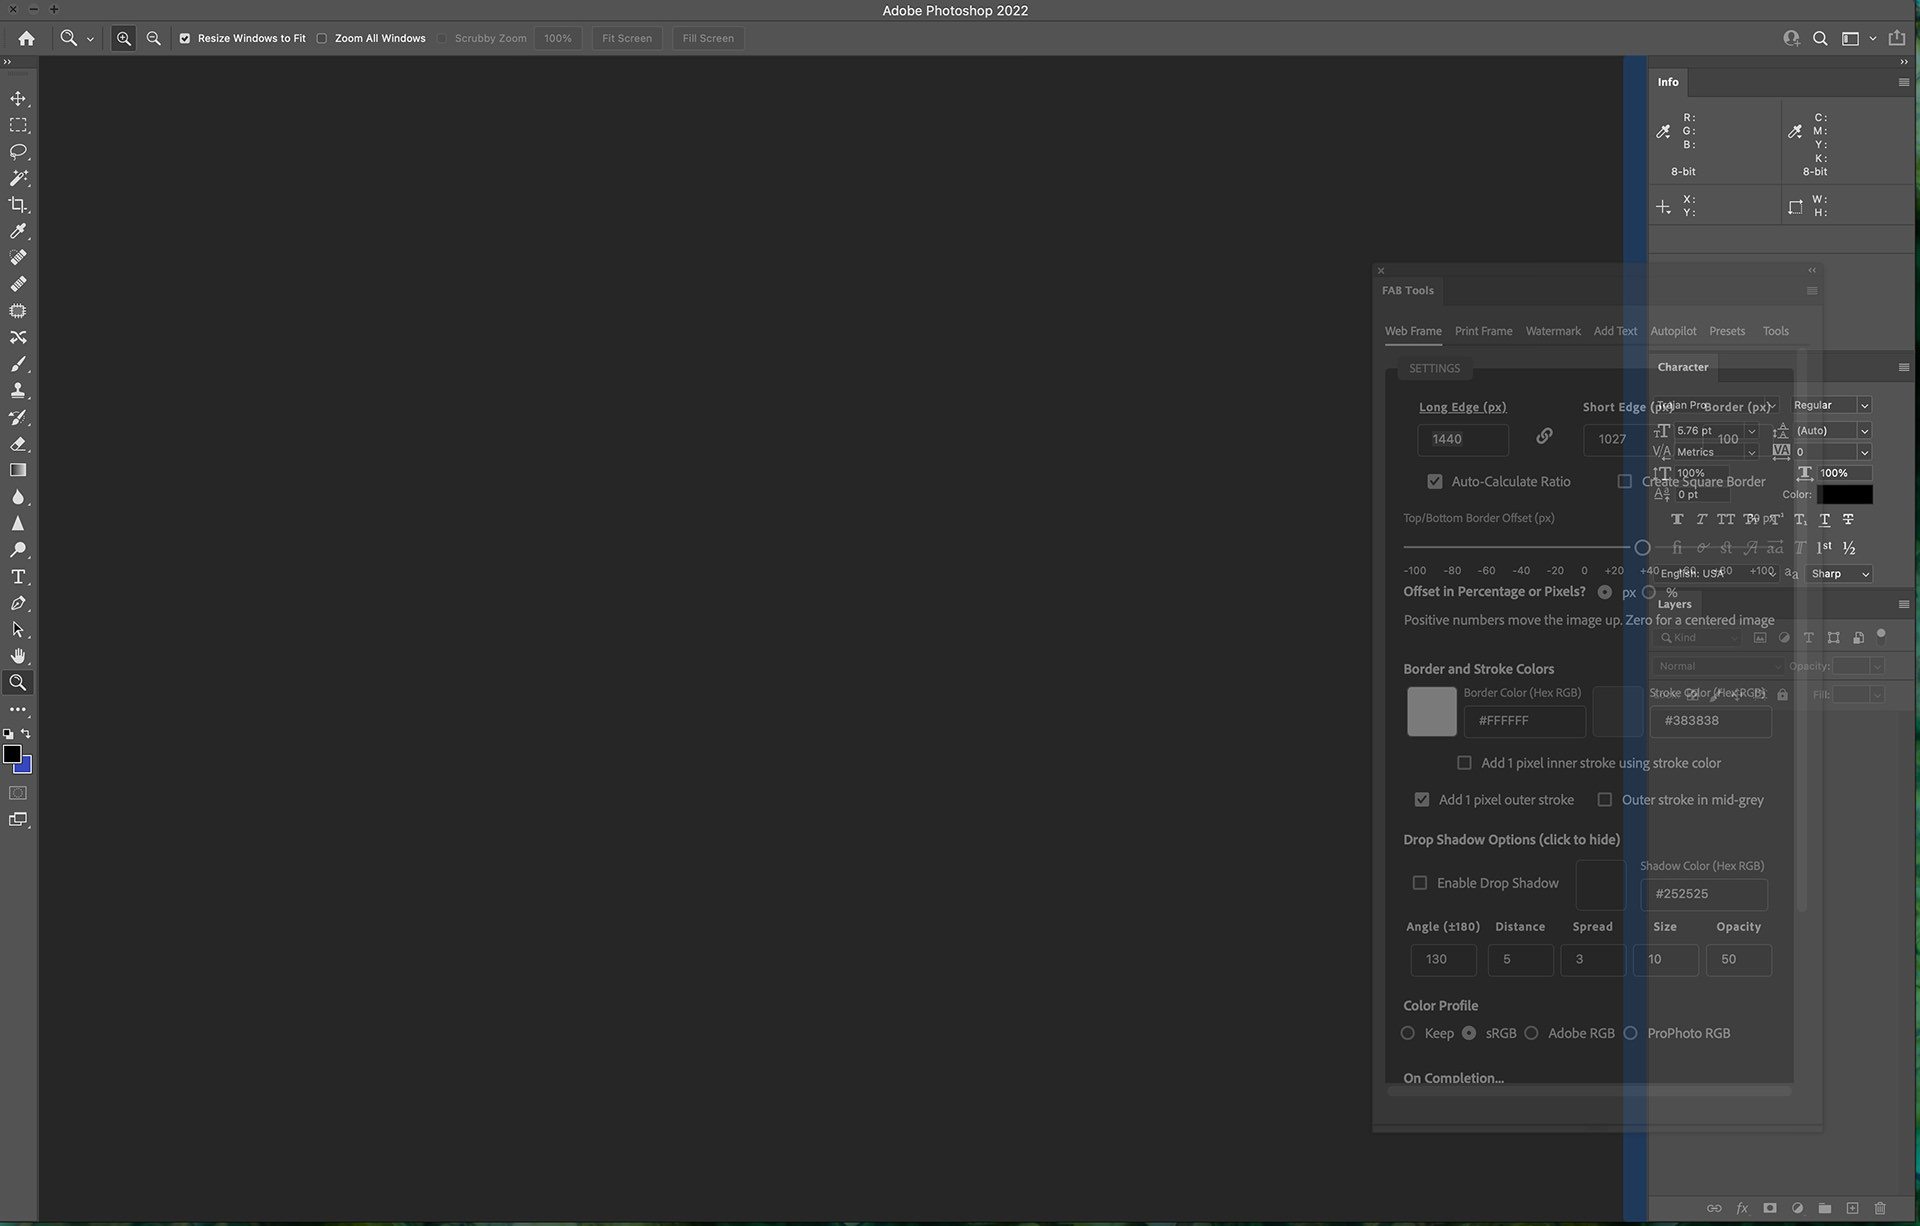
For ease of use and to enable scrolls bars to scroll on tall tool panels, drag the FAB Tools plugins to the edge of either the right or left side of the Photoshop image area, until you see a blue line as seen in the below screenshot. Once you see the blue line, let go of FAB Tools and they will be docked in that location ready for use.
FAB Tools Modules
The MBP Fine Art Border Tools are split into multiple modules that perform different tasks based on your requirements. The Web Frame and Print Frame modules can both call the Watermark and Add Text Modules so that you can resize for either Web or Print and add a Watermark or Text with one click once configured. There is also an Autopilot module to run tasks automatically or in Batch Mode and a Presets module to store your settings to recall later. The Tools menu contains some useful tools and reset buttons, as well as some generic options that affect all of FAB Tools.
- Web Frame Module
- Print Frame Module
- Watermark Module
- Add Text Module
- Autopilot Module
- Presets Module
- Tools Module
Web Frame Module
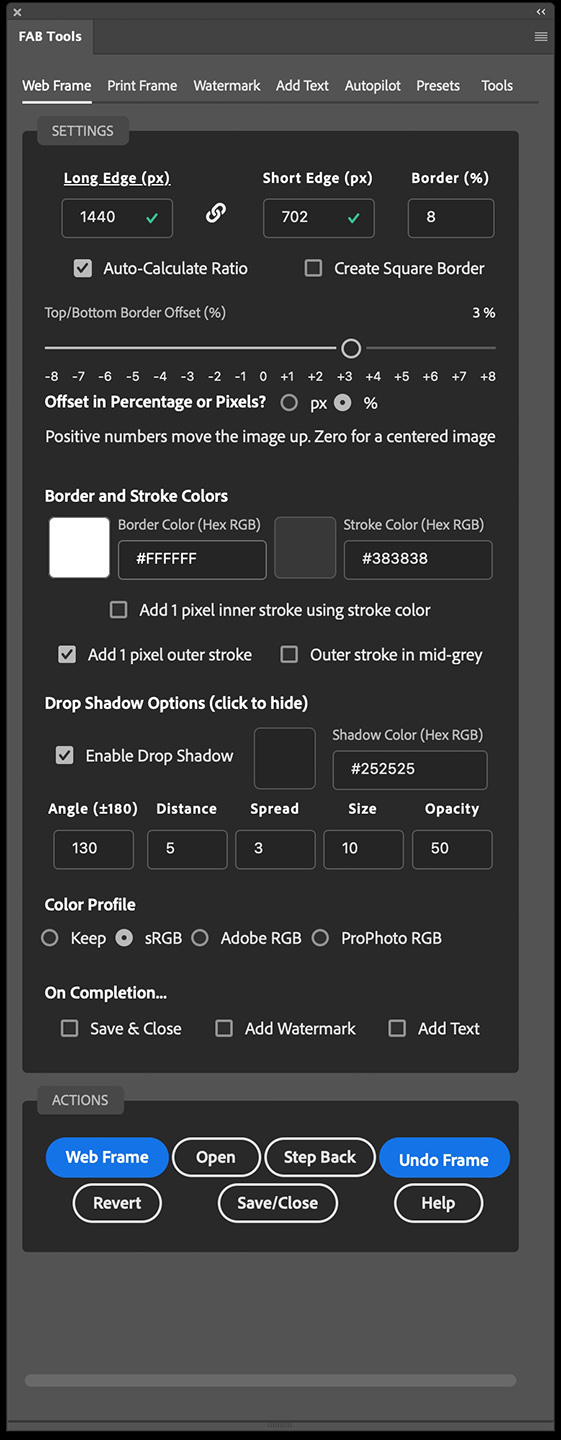
As the name implies, the Web Frame module is designed to help you resize and frame images for use on the Web. The top three fields are to enter your Long Edge and Short Edge sizes in pixels, and the width of your border. By default, the Border is also set in pixels, but we recommend changing this to use a percentage by selecting the % option below the Border Offset slider.
A pleasing border width to start with is 8%, which represents 8% of the width of the image, or around 100 pixels for an image between 1280 and 1440 pixels wide. If this is too wide for your tastes, try something narrower, such as 60 pixels or 5%, depending on your setting.
The Offset
One of the core goals of the MBP Fine Art Border Tools is to provide you with a way to offset the resized image within the frame. Moving the image up slightly in the frame gives it a more pleasing balance and visual distribution while giving you room to sign your work, or add a watermark and/or text below the image, and we’ll cover that shortly.
The amount you offset or move your image up is personal preference, but moving it up by around 3% gives a very balanced image, especially when adding text or watermarks below the image.
Note too that we use the terms Long Edge and Short Edge instead of height and width because FAB Tools automatically recalculates dimensions depending on whether your image is landscape orientation, portrait orientation, or square. So for landscape orientation images, the long edge is the width, but for portrait orientation images, the long edge becomes the height, and you don’t have to worry about which it is.
Save & Close Checkbox
If you are working on multiple images, for faster processing, there is an option at the bottom of the Web Frame and Print Frame modules to Save and Close the image once processing is complete.
Color Your Frame
You can also change the color of the frame that you apply to both Web and Print Frames. Say, for example, you want to frame an image and move away from the standard white frame that we’ve had so far, all you have to do is open your image and click on the colored square on the left of the two which is the Border color, and you can select a color using the regular Photoshop color patches and sliders, but your mouse pointer will change to a picker so you can also sample any color your want from your image, as you see in this screenshot.

Print Frame Module
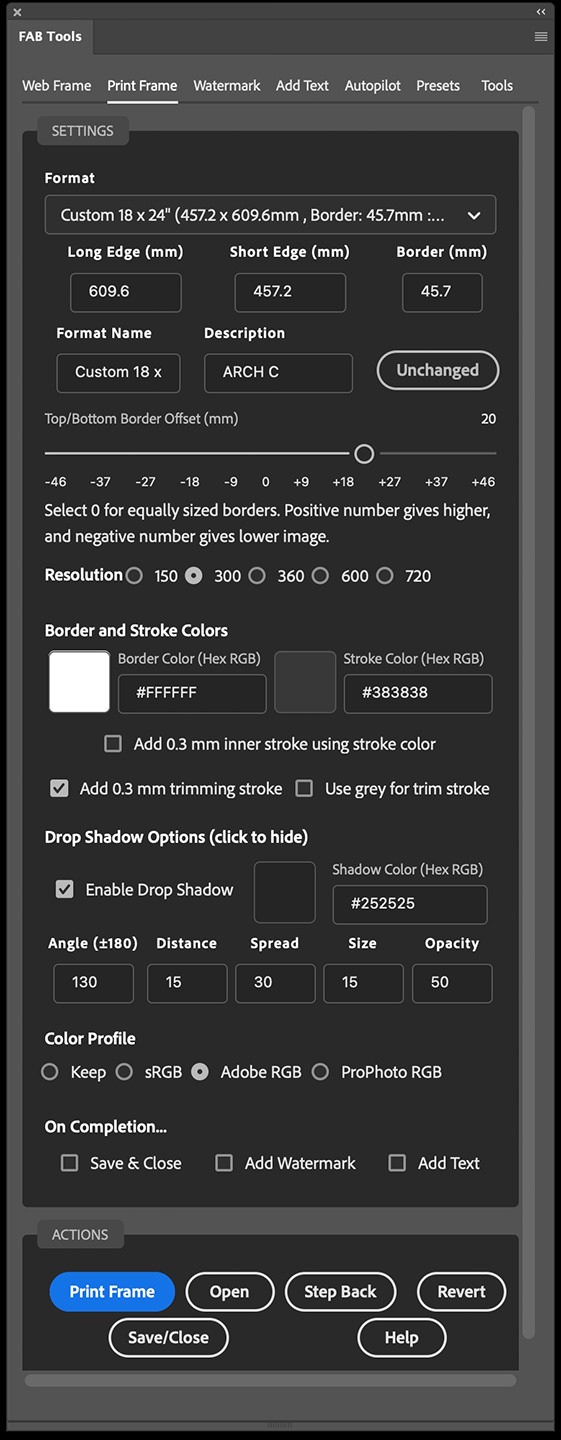
The Print Frame module is for framing for Fine Art Prints. There are 30 presets which, to protect the integrity of the media formats, cannot be modified, other than the border size and vertical offset. If you change the border size it will automatically be saved for future use, and a Revert button will appear, to remind you that you’ve modified the preset and to revert to the preset default border size if necessary.
In addition to the 30 media presets, there are ten customizable formats, based on popular media size and a few square frames. You can take these and make whatever you want. You can enter the Long Edge, Short Edge, Border width, all in millimeters, as well as a custom name for your format and a short description. Each of these fields is saved as you move away from the field. If you ever need to reset a format and start again, just select a saved custom format and hit the Revert button.
Print Resolution
You can also select your resized image resolution. We are not actually able to set the resolution of your images during the resize, but with the value selected for the resolution, we can ensure that your images are the correct size. Resolutions start at 150 ppi which is about the lowest resolution you want to be working with for print. 300 and 600 ppi are common values for printing with Canon printers, and 360 and 720 are common with Epson printers.
The resize algorithm used by Photoshop when resizing is selected automatically and is optimized based on whether you are downsizing or upsizing your image.
Watermark Module
In the Watermark module, you can add graphical watermarks with precision to pretty much any location on your image. Start by selecting one of the nine anchor points, including the four corners, center sides, and the center of the image. From there, you can nudge the watermark up to 100% of the image away from the anchor point.
You can load multiple images and change or delete images easily from a pulldown. You can scale the image to a percentage of the width of your resized image, and change the opacity, which is useful if you are placing a watermark over the image area. Scale and Opacity values are stored separately for each image that you load to your list.
Once you’ve specified your settings, you are ready to apply your watermark. When you are happy with the placement, you can also turn on the checkbox in either of the resize modules to automatically apply the watermark after resizing. There’s no need to worry about the image orientation. We calculate the position based on your image size and orientation, so unless something goes wrong, the watermark will be placed perfectly each time.
You can select to anchor your watermark Inside your resized image or Outside the resized image on the border. Until the image is resized, these options will be displayed in red, because they cannot be used until the image is resized, but your settings will be used as configured. You can apply a watermark anchored to the canvas edge at any time, even without performing a prior resize with the frame.
Add Text Module
The Add Text module gives you the ability to store multiple text strings that can be applied to any location on the image, anchored to your resized image or the canvas. The Inside and Outside image options are displayed in red until you perform a resize, but they can be configured and will be used accordingly when you perform your resize.
To save space when not in use, most of the text options are hidden by default and are opened with a button next to the Scale and Opacity fields, which remain visible for ease of access. When you unhide the text options you have the option to modify the currently selected text or add a new string. Regardless of which you select, your changes are automatically saved, and the font and color options are all saved on a per string basis, so they are recalled with each string as you select it.
Unless you want to confirm or change the settings, you can apply and switch between saved text strings without unhiding the text options, simply by selecting a different string in the Text pulldown. To delete any string, just select the string and hit the Delete Selected button.
Automatic Text
FAB Tools can automatically fetch information from your embedded image data for inclusion in your text watermark! Select information such as the Title, Shutter Speed, Aperture, ISO, Focal Length, Date & Time, Camera, Lens, Artist, and Copyright! You can either replace your watermark text or append your automatic text to it, and there’s an option to split the text over multiple lines if you prefer. There is a new preview feature, so you can see how your text will look before you apply it, including your font and styling.
Second Text Line (from V1.5)
From version 1.5 released in December 2021, there are now more text customization options than ever! We’ve covered this in the version 1.5 update video in the tutorials that you can view above, but to explain, you can now add a second line of text that you manually enter for your Text Watermark.
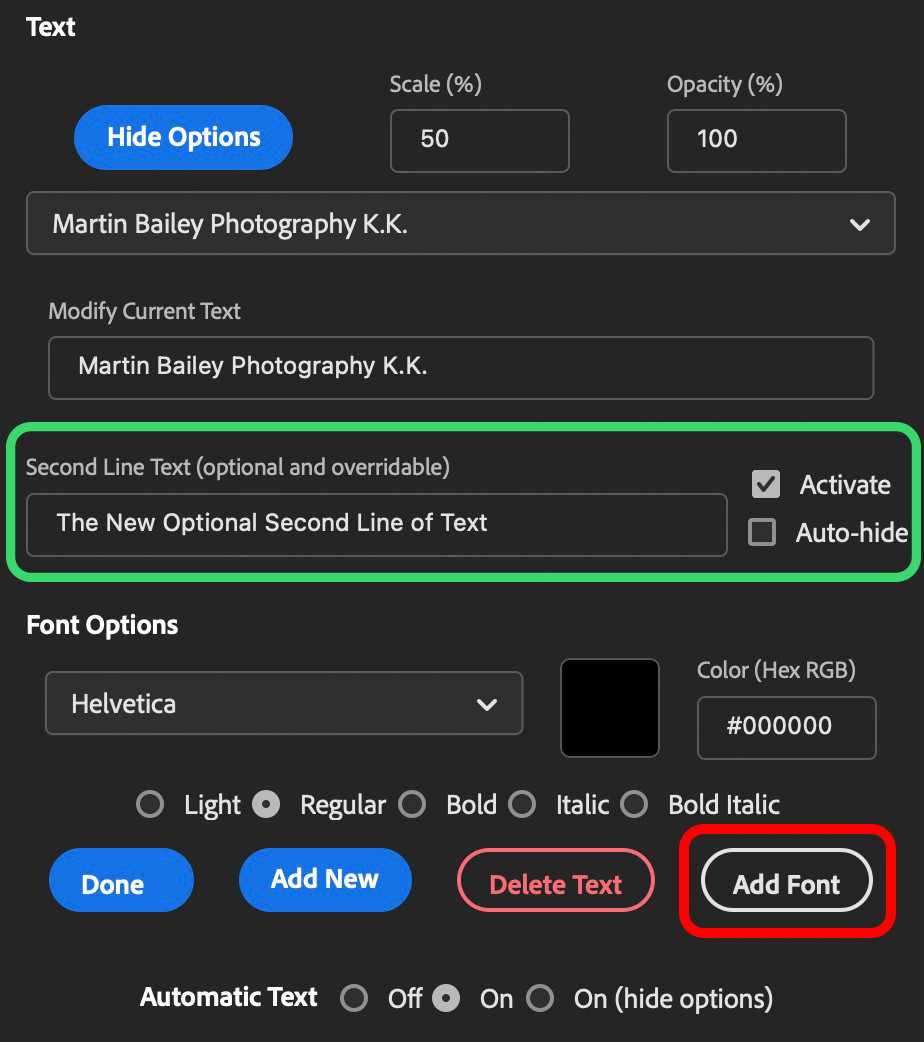
All you have to do to use the second line of text is to select the Second Line Text field (inside the green box in this screenshot) and type in your text. When you tab away from the text field your text is automatically saved with your first line and other options, such as font, font style, and font color.
If you don’t need to embed your second line in your watermark, you can either delete the text or uncheck the Activate check box to the right of the Second Line Text field. If you want to change your text regularly, leave the Auto-hide button unchecked, and the field will remain on the screen when the other options are hidden.
Custom Fonts
Please note that due to limitations in the plugin framework, we cannot list and display all fonts that are installed on your system with FAB Tools. We have included 19 fonts by default that represent a wide selection of font styles, and you can add any other fonts on your system manually for use in the Add Text module.
Another new feature in version 1.5 is the ability to add any font that you have installed on your system to the Font pulldown for use in the Text Watermarks. To get started just click on the Add Font button that can be seen after clicking on Show Options in the Add Text module. If you haven’t added a Text Watermark yet, you need to add something before these options are visible.
After clicking the Add Font button, you will see six text fields. The first is for the font name, and the following five fields are for the various styles that you commonly find in a font. The name can be anything you want, but so that you can recognize the font, using the Font Name is recommended. For the remaining Postscript name fields, you can use the font file name without the extension, or get the font style name from the Font Book under Applications on a Mac or from the System Font Viewer on Windows. These names have to match the actual font names or your custom font will not work. After entering the style names, click the Store Font button, and check the preview to see that the font is working. If you have added more than one font style, also check that the style changes in the preview when selected.

You can add different styles to the five provided, for example, you might add an Extra Light font style instead of Light, or Extra Bold instead of bold, but note that the style will only be displayed by the available style radio button with the default names. Once you have added a custom font, you can press the Edit Font button that will be displayed when a Custom Font is selected and reopen the font text fields to check or change what you added. There is no limit to the number of fonts that you add.
Note too that the fonts are added to the MBPCustomFonts.txt file that you can find along with the other preference files that are stored. To see your Custom Fonts file and potentially make a backup, go to the Tools module and click on the Show Settings Folder Path button, then copy the path to the clipboard, and paste that path into the dialog that appears when you select the Finder > Go > Go to Folder option on a Mac, or paste the path into the Explorer path field in Windows.
Description Text Wrapping Options
Version 1.5 also introduced two new Description Text wrapping options. The Description text is automatically extracted from your image if you added a description, either in the File Information > Description field in Photoshop, or in another application, like Capture One Pro or Lightroom. If you add a Description in Photoshop, note that you must save and close then reopen the file before MBP FAB Tools will be able to read the Description from the image file.
The first of the two new wrapping options is to return after the number of words entered into the first of the two optional fields. Your description will automatically be wrapped after the number of words entered. The second new wrapping option is to wrap when FAB Tools finds a specific character or character string in your Description. By default, this is an opening parenthesis bracket. As you can see in the example screenshot above, I wrapped the description after the two words “The Abyss” by including the remaining Description inside parenthesis. I’ve not limited the character wrap to the first instance of a character, so you could theoretically wrap line after line by including the wrap character multiple times.
Note that the Description formating checkboxes are grayed out when your image has no Description embedded. To add a description in Photoshop, open File Info from the File menu, or add it to the EXIF information in third-party products like Capture One Pro and Lightroom.
Safe Text Scaling
The last major update in this release is the Safe Text Scaling option. As it is now possible to build text watermarks that can potentially overflow the space provided in the border surrounding your resized image, I’ve added the Safe Text Scaling option and turned it on by default, and this will essentially prevent your text from overflowing the border and being cut off.
The cool thing about this is if you do work with multi-line text watermarks, and are happy for them to fill the border space vertically, you can now just set a larger Scale percentage than necessary, and allow the Safe Text Scaling option to resize your text to fit the border automatically. So, for example, instead of trying to find the percentage required to fill the border, which might be say 32%, you can now just specify a 50% border, and leave the rest to FAB Tools. Needless to say, it works with landscape or portrait orientation images, as well as square and panorama images.
If you want to know whether Safe Text Scaling is kicking in, look below the three options under the Text Anchor Target section in the Add Text module while adding a text-based watermark. You’ll see a green message quickly flash onto the screen saying “Text Auto-Scaled!” To actually be on the Add Text screen if you are adding a Watermark during the resizing process, select Apply Web Border from the hamburger menu in the top right of the FAB Tools plugin panel.
Autopilot Module
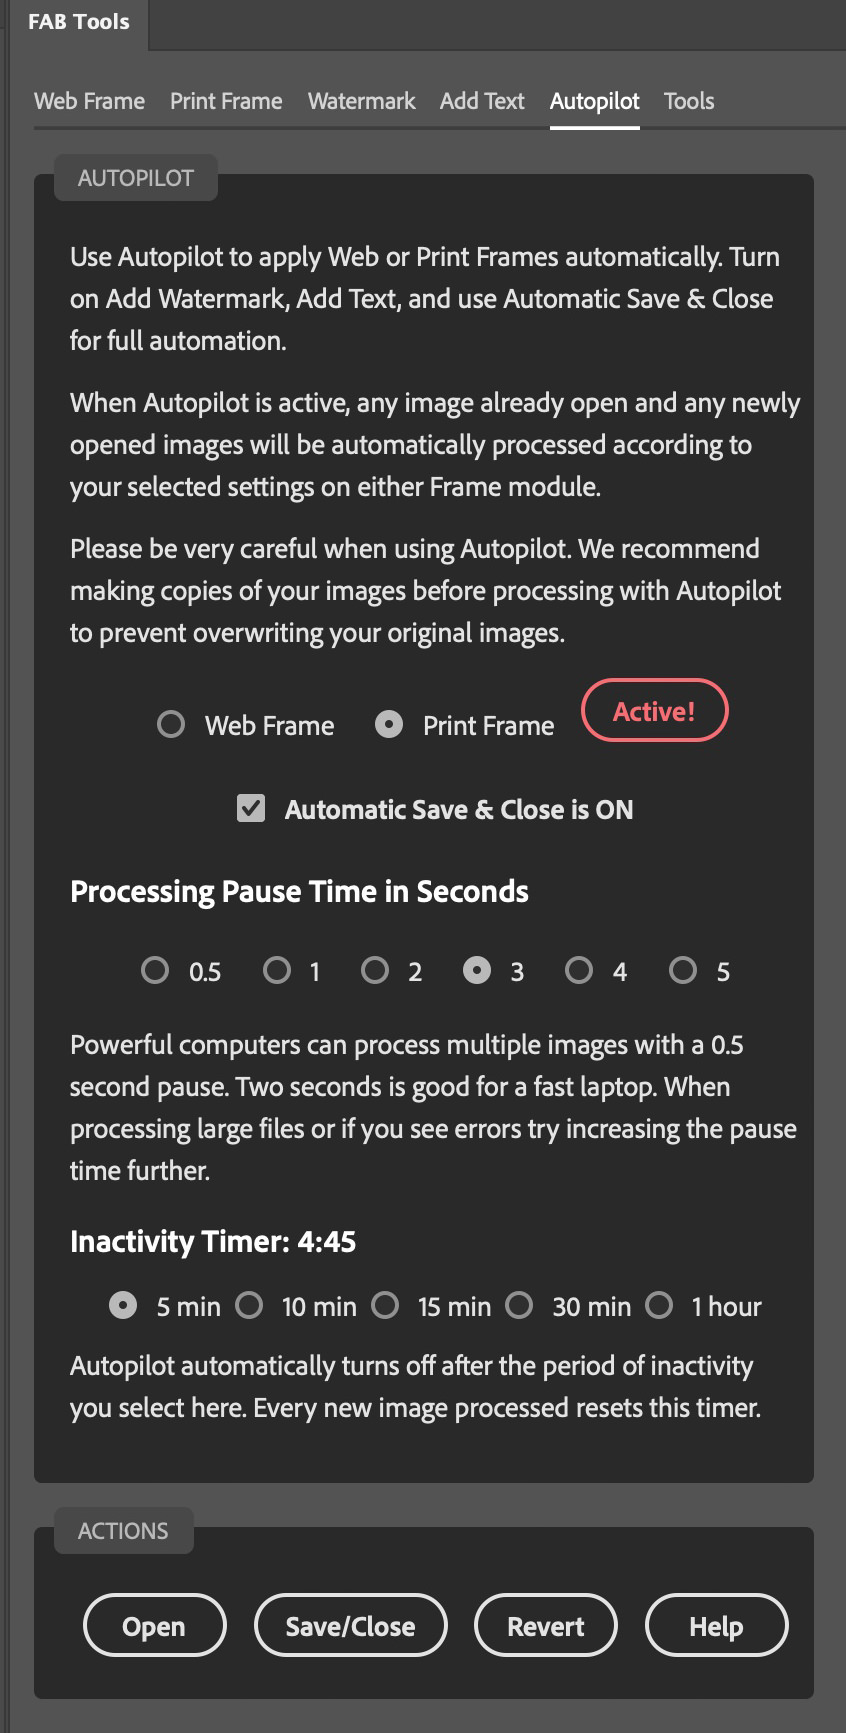
FAB Tools includes a robust Autopilot module. With Autopilot you can now turn on the Add Watermark and Add Text checkboxes on either of the resizing and framing modules and apply your frames in batch. This helps as you try various settings, as you can simply leave Autopilot on, allow it to process your open images, and walk through your images to check how the frames look.
We remember which images have been processed, so your frames won’t be reapplied during that session. However, if you want to apply some changes made, you can simply hit the Revert button to undo your changes, and Autopilot will instantly apply your updated frame and watermarks.
If Autopilot runs too fast for your computer to keep up with, you may see errors that will cause Autopilot to deactivate. If this happens, increase the number of seconds pause between actions with the radio buttons provided. For example, on my iMac Pro with an 8-core CPU, I can select 0.5 seconds pause and batch process twenty or so 50 megapixel TIFF files without any issues. On a 13″ Mac Book Pro though, with a 2-core CPU, one second is generally a long enough pause.
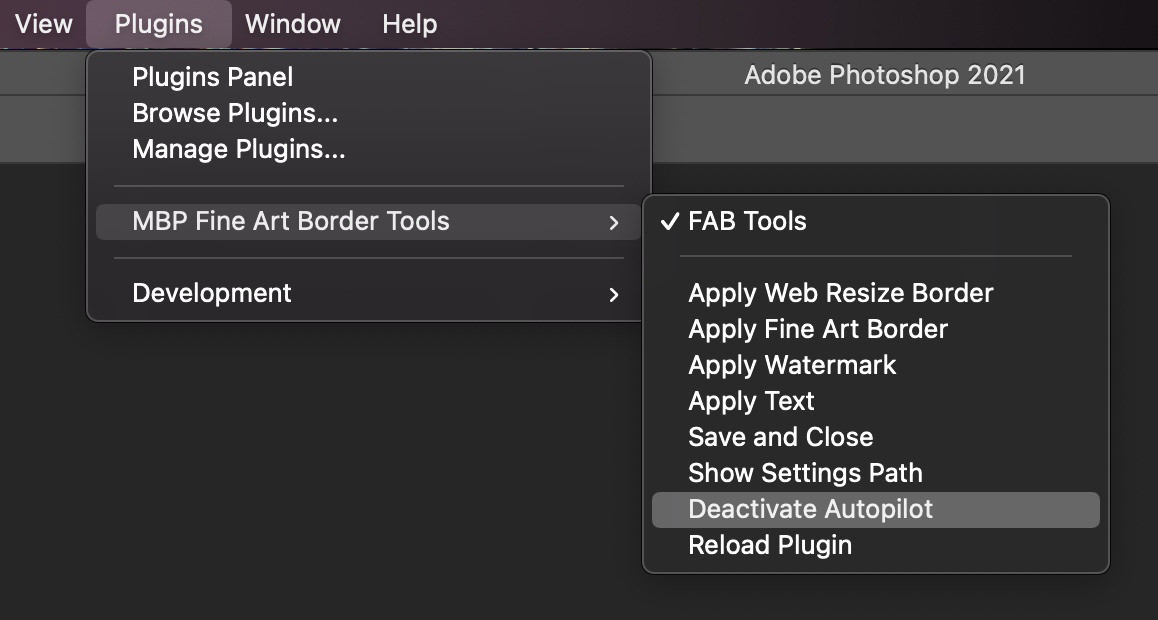
If you should need to deactivate the Autopilot, note that you can select FAB Tools from the Plugin menu as seen in this screenshot. There is also an option to Deactivate Autopilot in the Shortcut menu, so you don’t have to open the plugin to turn it off. If you do select FAB Tools while the Photoshop welcome screen is displayed, Photoshop will open and the plugin will be displayed, enabling you to change the settings or deactivate Autopilot.
We strongly recommend working on copies of your images when working in Autopilot mode. We’ve tried very hard to make it as robust as possible, but occasionally errors may occur, especially if you are using a short pause, and if you have Automatic Save & Close turned on, you may end up saving errors and need to rerun a file or two. Ideally, run through a few batches without Save & Close turned on first to get a feel for how Autopilot works, and find a good place for the pause radio buttons. Then, once you strike a good balance, you can turn on Save & Close and blast through large batches of images relatively quickly.
Inactivity Timer
Because Photoshop will revert to its welcome screen when all files are processed, there is an inactivity timer built into Autopilot to help you avoid forgetting that the Pilot is on, and inadvertently framing and saving a file that you open in Photoshop. The default timer is five minutes, but you can change this to up to one hour with the available radio buttons. Note too that the inactivity timer resets every time you process an image, so five minutes is generally fine.
Round-Robin Processing
A longer inactivity timer may be useful if you are working on images in another program, and want to round-robin to Photoshop. For example, you can leave Autopilot turned on in Photoshop, and even minimize the FAB Tools plugin window to an icon, and then send your images to Photoshop, and they will be automatically processed and saved back into your base application.
Presets Module
You can save any and all settings in presets and recall them at any time. When you save a Preset you can select which of the four main modules to include, and even if you save them all, you can deselect any module when restoring, giving you full control of what you include and restore. You can even restore deleted watermarks!
Tools Module
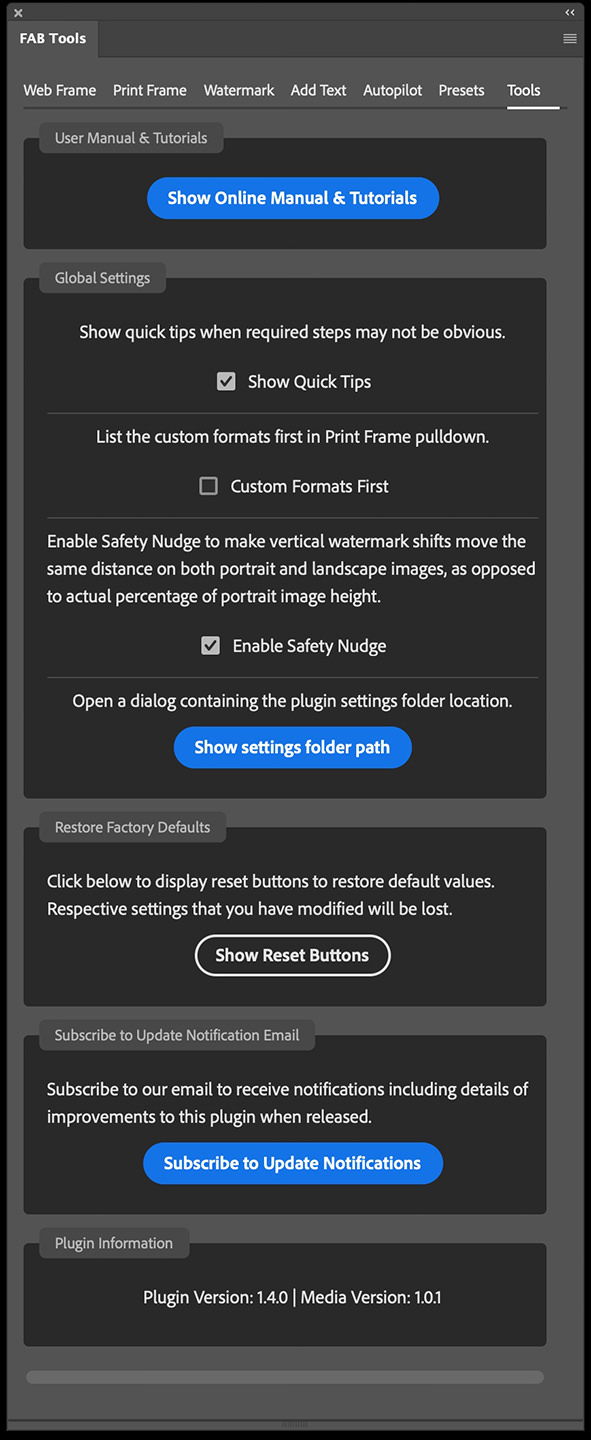
The final panel provides a number of tools to help you maximize your use of the MBP Fine Art Border Tools plugin.
At the very top, you’ll find a button that links to this page, the FAB Tools User Manual. Below that is a group of Global Settings. There are a few operations that may require clarification so contextual tips appear when you perform certain tasks. If you don’t want these Quick Tips to appear, uncheck the Show Quick Tips checkbox.
The Custom Fonts First checkbox is used to reorder the many available Media Formats under the Format dropdown list in the Print Frame module so that the Custom Formats appear at the top of the list. Unchecking this checkbox makes the Custom Formats appear after the non-customizable Media Formats.
The Enable Safety Nudge checkbox is on by default and essentially ensures the positioning of watermarks and text that you can add to your image are calculated so that they are positioned in the same place regardless of the image orientation. Without this checkbox on, you may find that in some situations your watermarks and text are higher or lower compared to the frame or inner image edges when applied to portrait orientation images compared to landscape orientation images.
Use the Show Settings Folder Path button if you need to make a backup of your settings, or if you have a problem with FAB Tools and are requested to send your settings files to support.
Click on Show Reset Buttons to display multiple buttons that erase any settings you’ve made and restore factory presets if you have any problems with FAB Tools. There are buttons for each module and to reset the Custom Media Formats. There is also a red button to Completely Reset FAB Tools, which resets everything with one click. If you have to use this, we also recommend clicking on the hamburger icon in the top right corner of the FAB Tools panel and selecting Reload the Plugin.
There is a button to Subscribe to Update Notifications so that you receive an email from us when an important or useful update is released, and at the bottom of the Tools module, you’ll find the version of the plugin and the media version, which we may ask you to check or provide to us if you should require technical support at any time.
Technical Support
If you can’t find the answers you need on this page, or if you have any suggestions for future updates, please feel free to contact us with the provided contact form.