
0:0044:21 | Visit Library for MBP Pro eBooks |
Today we’re going to look at both Depth of Field and his cousin Hyperfocal Distance, and take this to Infinity and Beyond in one post. I’ve covered Depth of Field and Hyperfocal Distance a number of times in different posts, but an update that I just completed for my iOS app Photographer’s Friend introduces a new concept related to Infinity, so I figured I’ll pull all of this into one post that will hopefully be all you need to reference to get a good understanding of these theories. We’ll start with the basics, and then geek out a little with some of the calculations, and then move on to some examples to illustrate why keeping your eye on your depth of field is important.
What is Depth of Field?
Let’s start with an explanation of Depth of Field, which is the area of a photograph that is in focus at any given setting. The depth of field is affected by a number of factors. On your camera, the setting that affects Depth of Field the most is your aperture. Wide apertures like ƒ/2.8 or ƒ/4 have a shallow depth of field, where not much is in focus, and smaller apertures, like ƒ/16 and ƒ/22, have very deep depth of field with a lot of the image in focus.
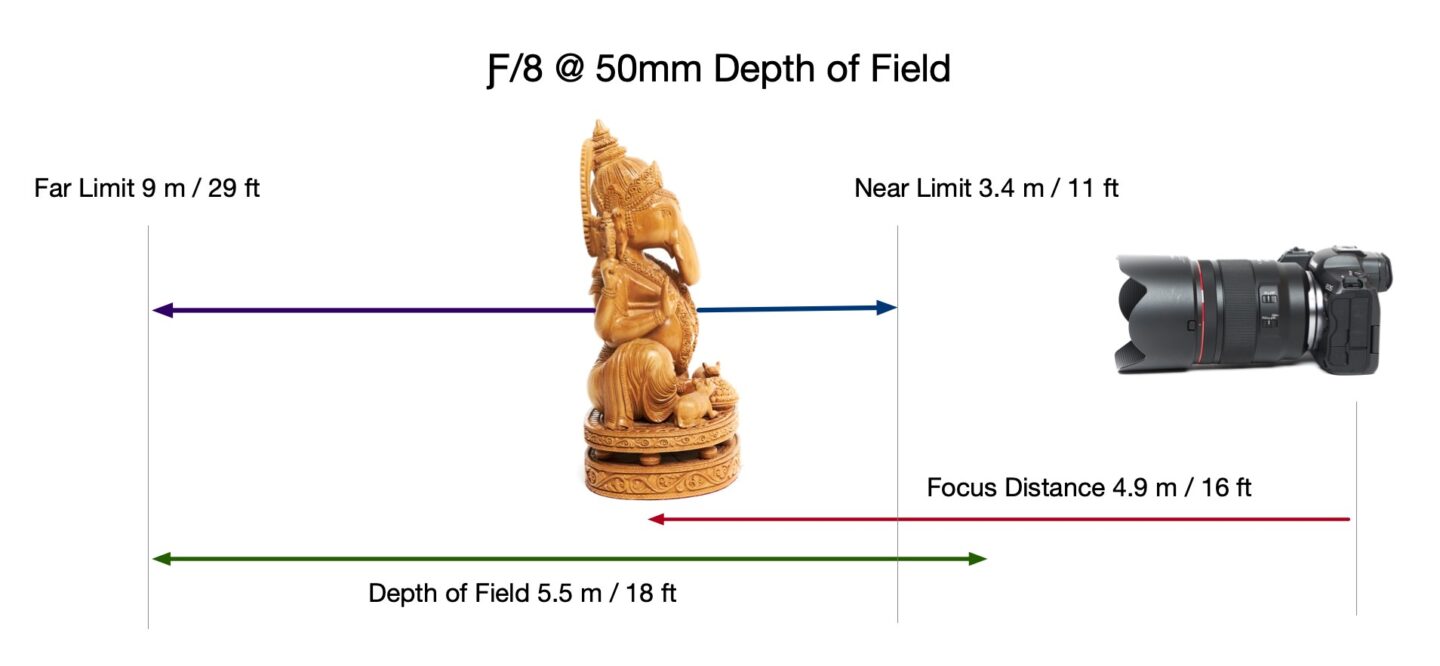
The other main parameters that affect the depth of field are your focal length and focus distance. Wide focal lengths like 24mm have more depth of field and longer focal lengths like 100mm have less depth of field, so the more you zoom, the shallower your depth of field gets. And the closer you focus, the shallower your depth of field gets as well. Let’s note too that when using smaller apertures at close range, in general, depth of field extends on third towards your camera from the point at which you are focused, and two-thirds back. The far focus limit extends out more as you approach hyperfocal distance, but we’ll talk about that shortly. For example, say you focus a 50mm lens with the aperture set to ƒ/8 at 18 feet or 5.5 meters, the near limit of the focus would be at 11 feet or 3.4 meters, and the far limit of the focus would be at 29 feet or 9 meters. So approximately one-third in front of your subject and two-thirds behind.

Keep in mind that the focus doesn’t just switch abruptly from being sharp to not being sharp. The point at which you focus your lens is the sharpest image that your lens and camera can resolve, and the image gets gradually softer as you move away from this point. The depth of field is the area that we would consider acceptably sharp, and it is a gradual defocussing of the image to the point where we would consider it no longer acceptably sharp, and these are the near and far limits of the depth of field.
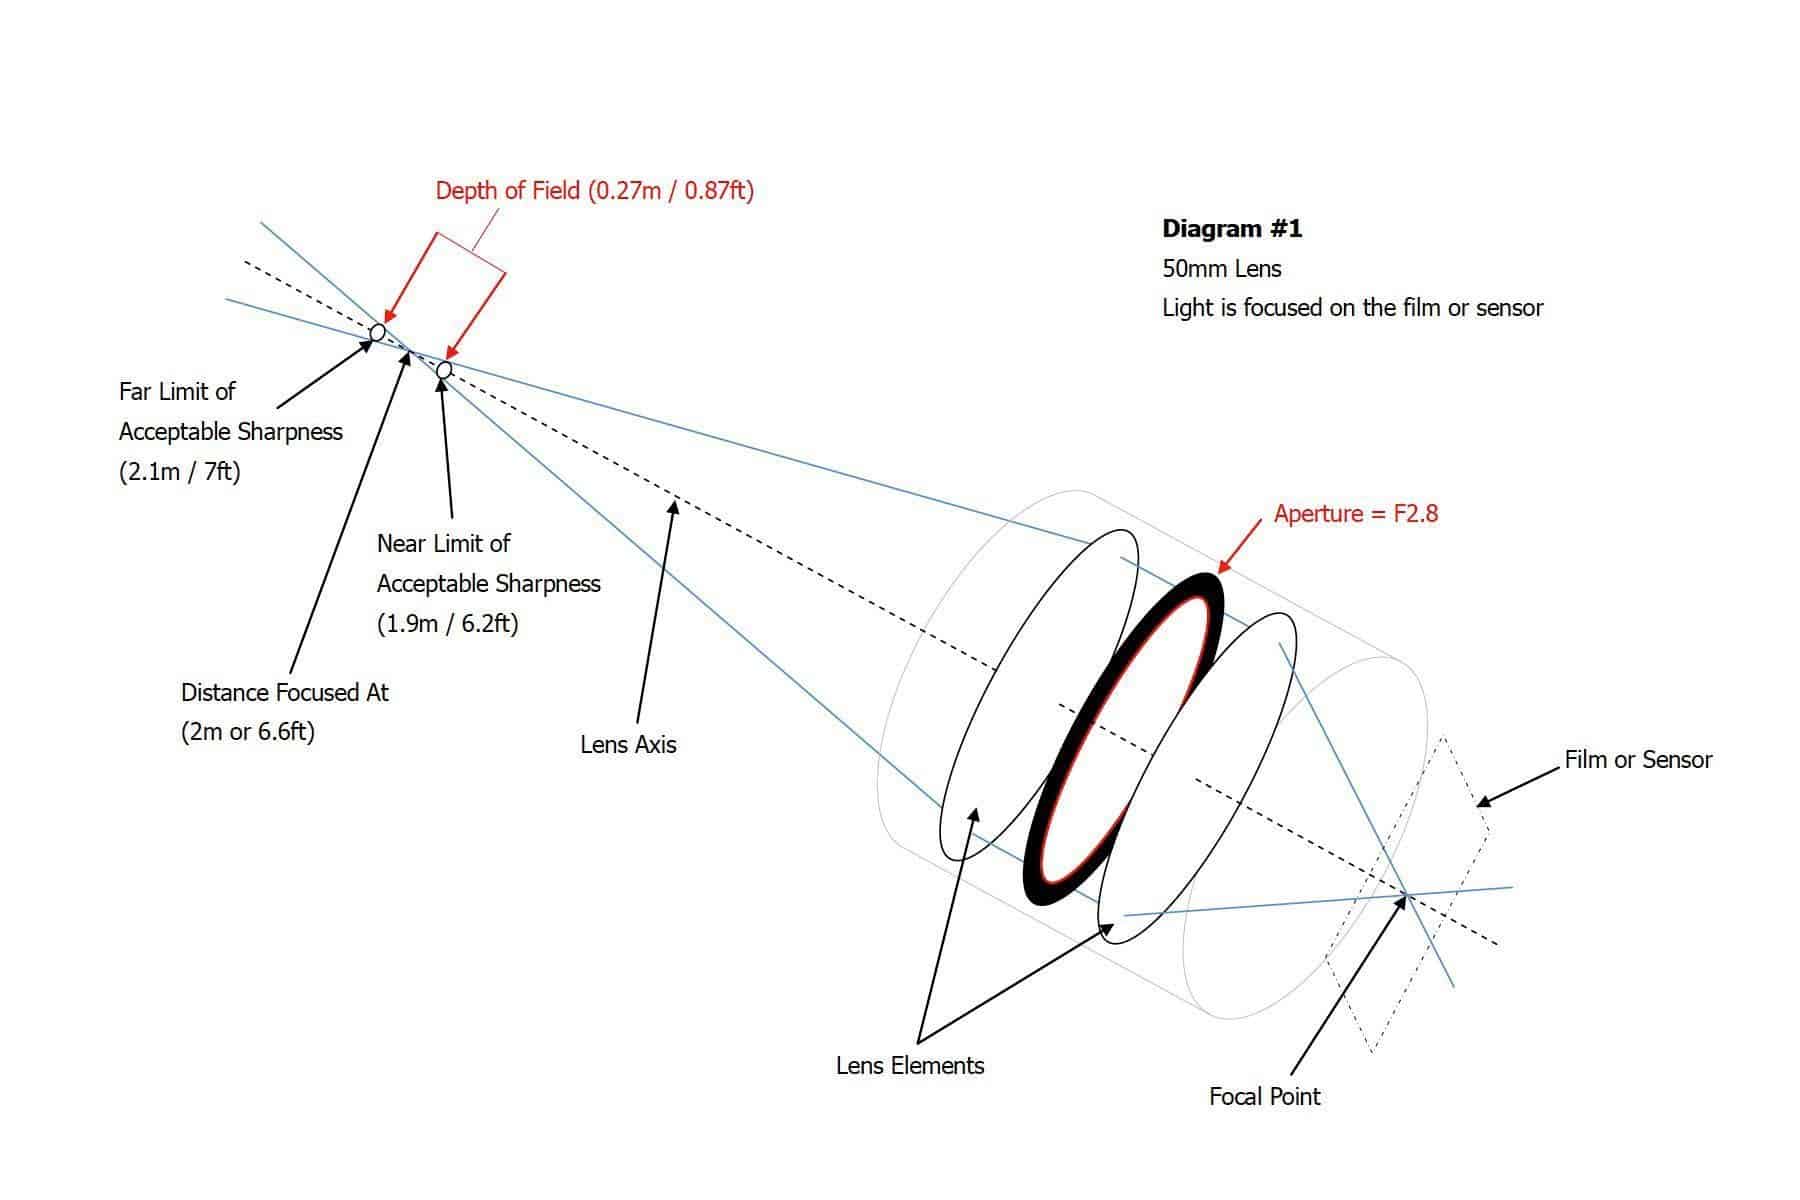
Long-time followers might recall the following six diagrams showing the mechanism of depth of field at different focal lengths and focus distances. It’s important to understand the relationship between aperture, focal length, and focus distance before we go on, so while trying not to go into too much detail, let’s outline what I’ve covered in these diagrams. Diagram #1 shows the depth of field with a 50mm lens with the aperture set at ƒ/2.8 and focussed at 2 meters or 6.6 feet. Because the aperture is wide at ƒ/2.8 the light is focussed at a more acute angle, between the two widest points of the aperture. This means that the circle made by the light as it passes through the aperture reaches a point where it is no longer acceptably sharp quite quickly. You can see that the near limit is just 1.9 meters or 6.2 feet and the far limit is 2.1 meters or 7 feet. The total depth of field is just 27 cm or just under one foot.
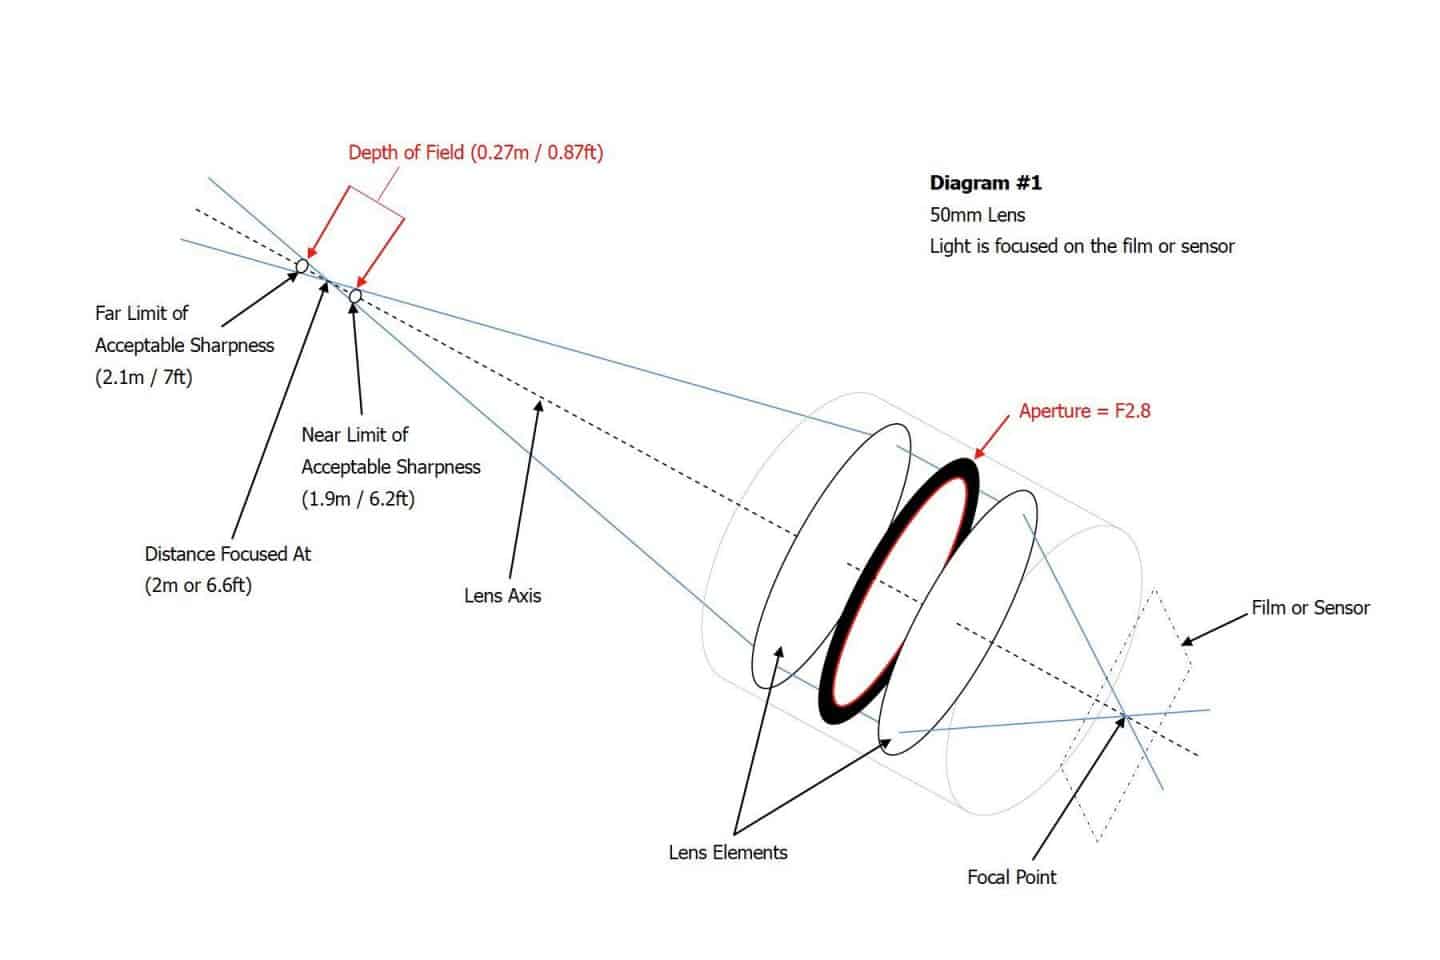
DOF Diagram #1
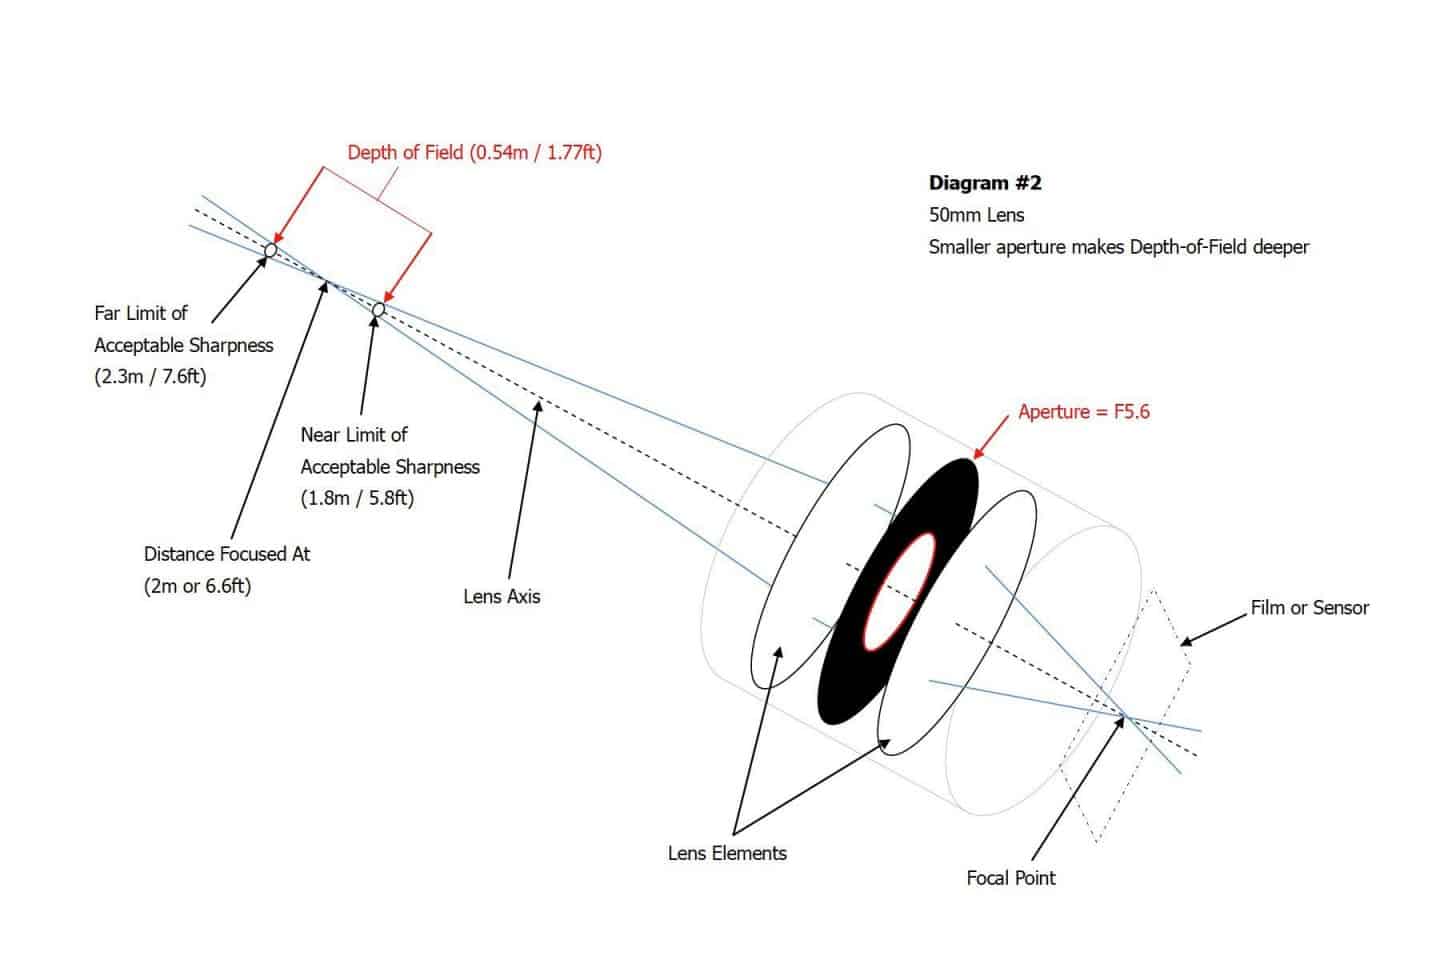
DOF Diagram #2
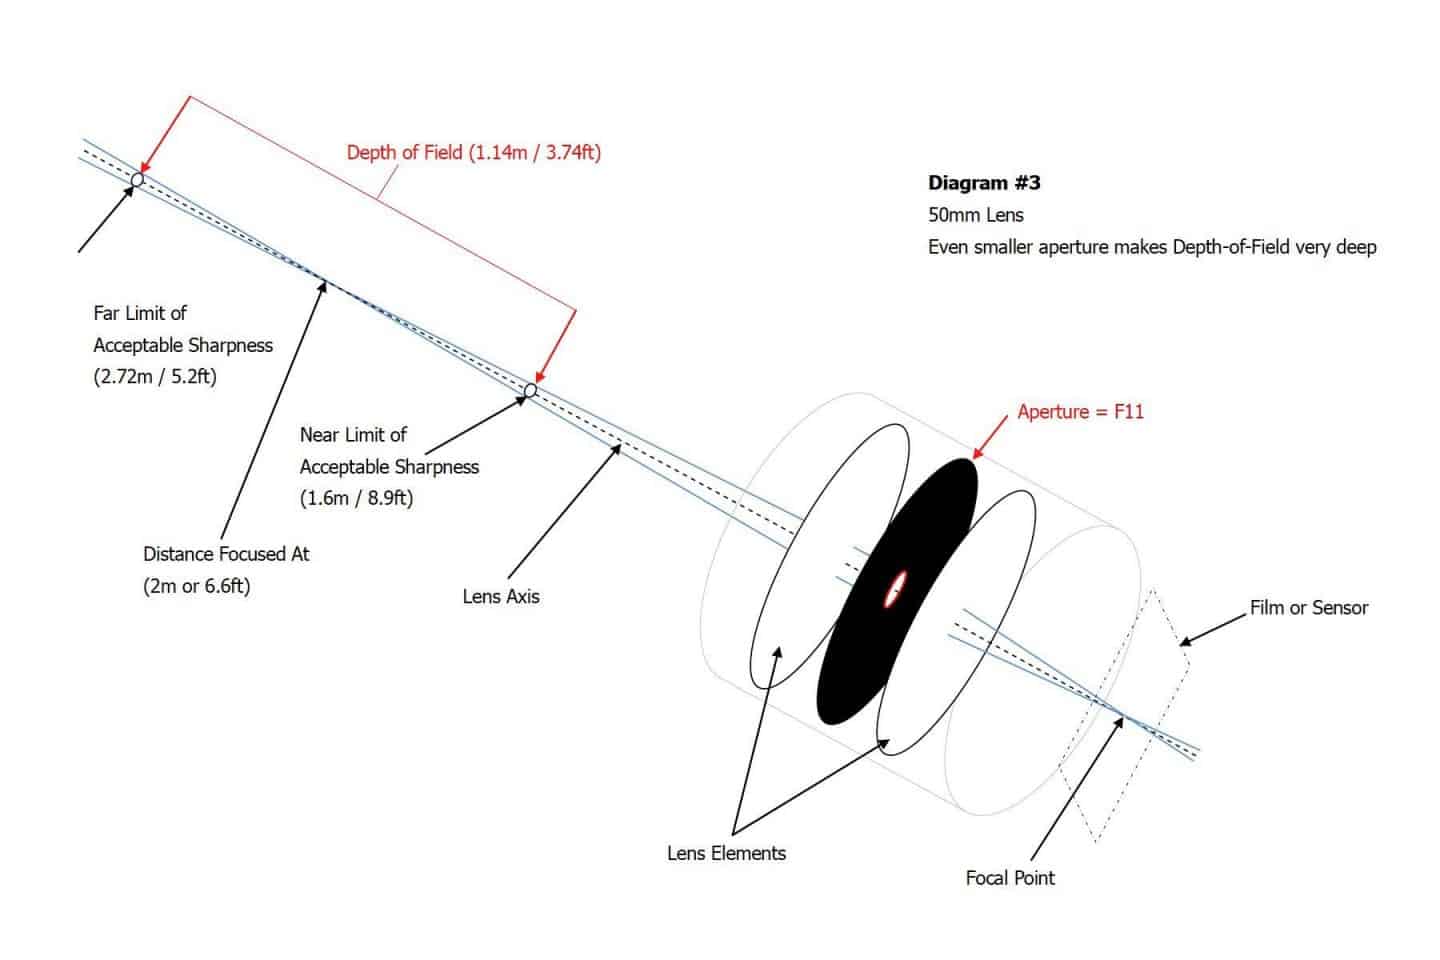
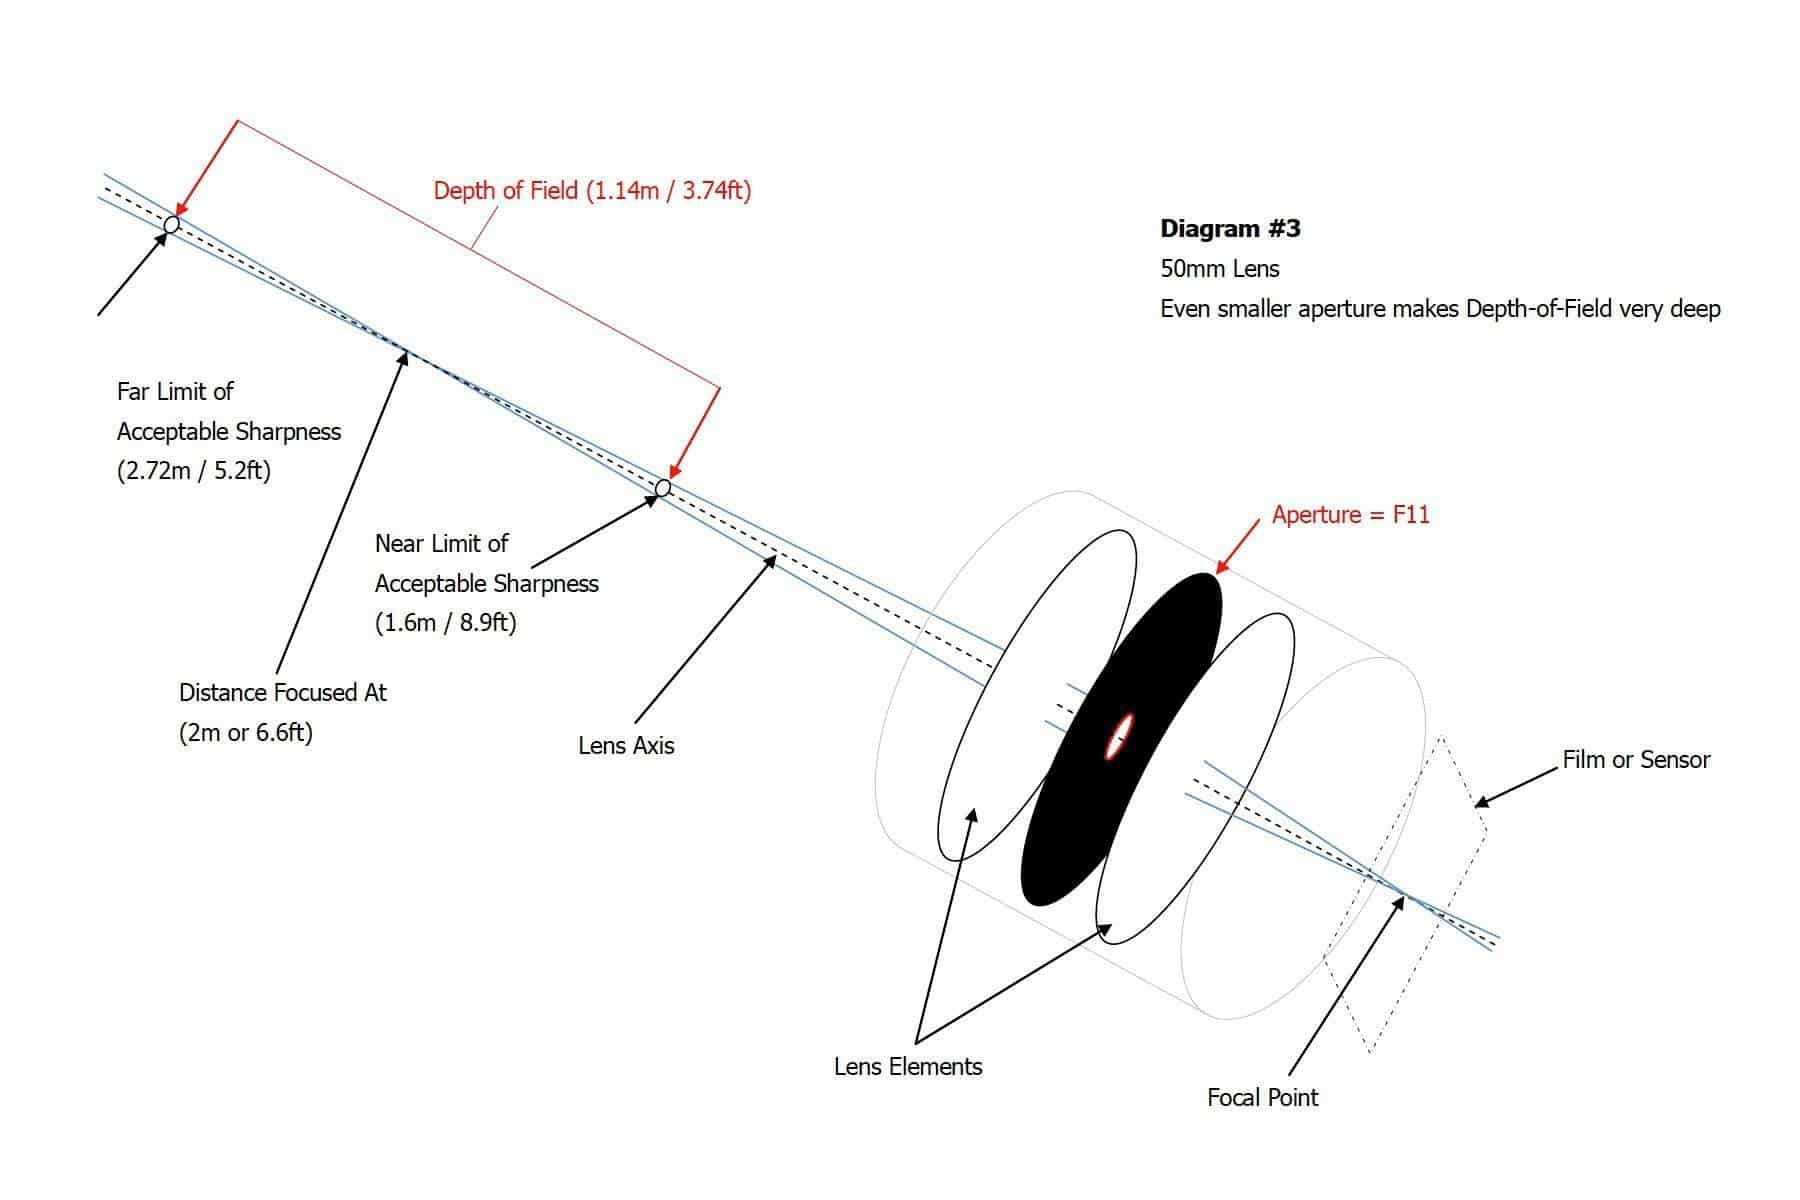
DOF Diagram #3
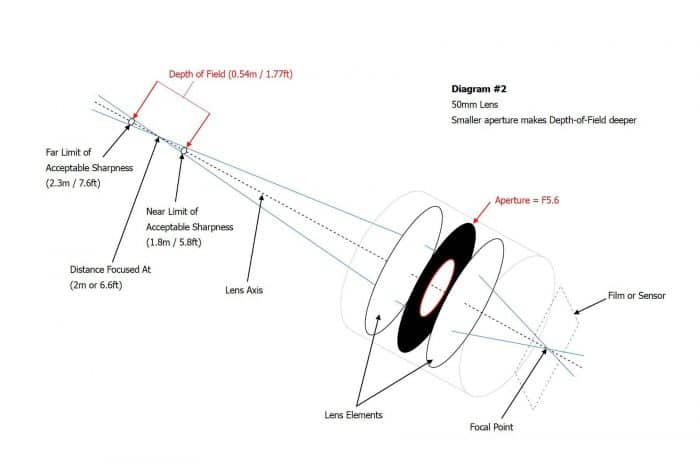
In Diagram #2 we stop the aperture down to ƒ/5.6 at the same distance and the depth of field increases to 54 cm or 1.8 feet. This is just because the angle of the light passing through the aperture is now less acute. In Diagram #3 with an aperture of ƒ/11 the depth of field increases to 1.14 meters or 3.8 feet at the same focus distance, once again, because the light is passing through a smaller aperture and therefore the circle of acceptable sharpness is reached much further away from the point at which the lens was focussed. All three of these diagrams were assuming a 50mm lens focussed at 2 meters or 6.6 feet.
In Diagram #4 we take the same 50mm lens and this time focus it at 5 meters or 16.4 feet with an aperture of ƒ/5.6 and we now get a depth of field of 3.8 meters or 12.5 feet so by increasing the focus distance from 2 to 5 meters or 6.6 to 16.4 feet our depth of field is almost eight times deeper at the same aperture. Again, this is because focussing further away gives us a shallower angle of the light, so the circles of acceptable focus are further away from each other.
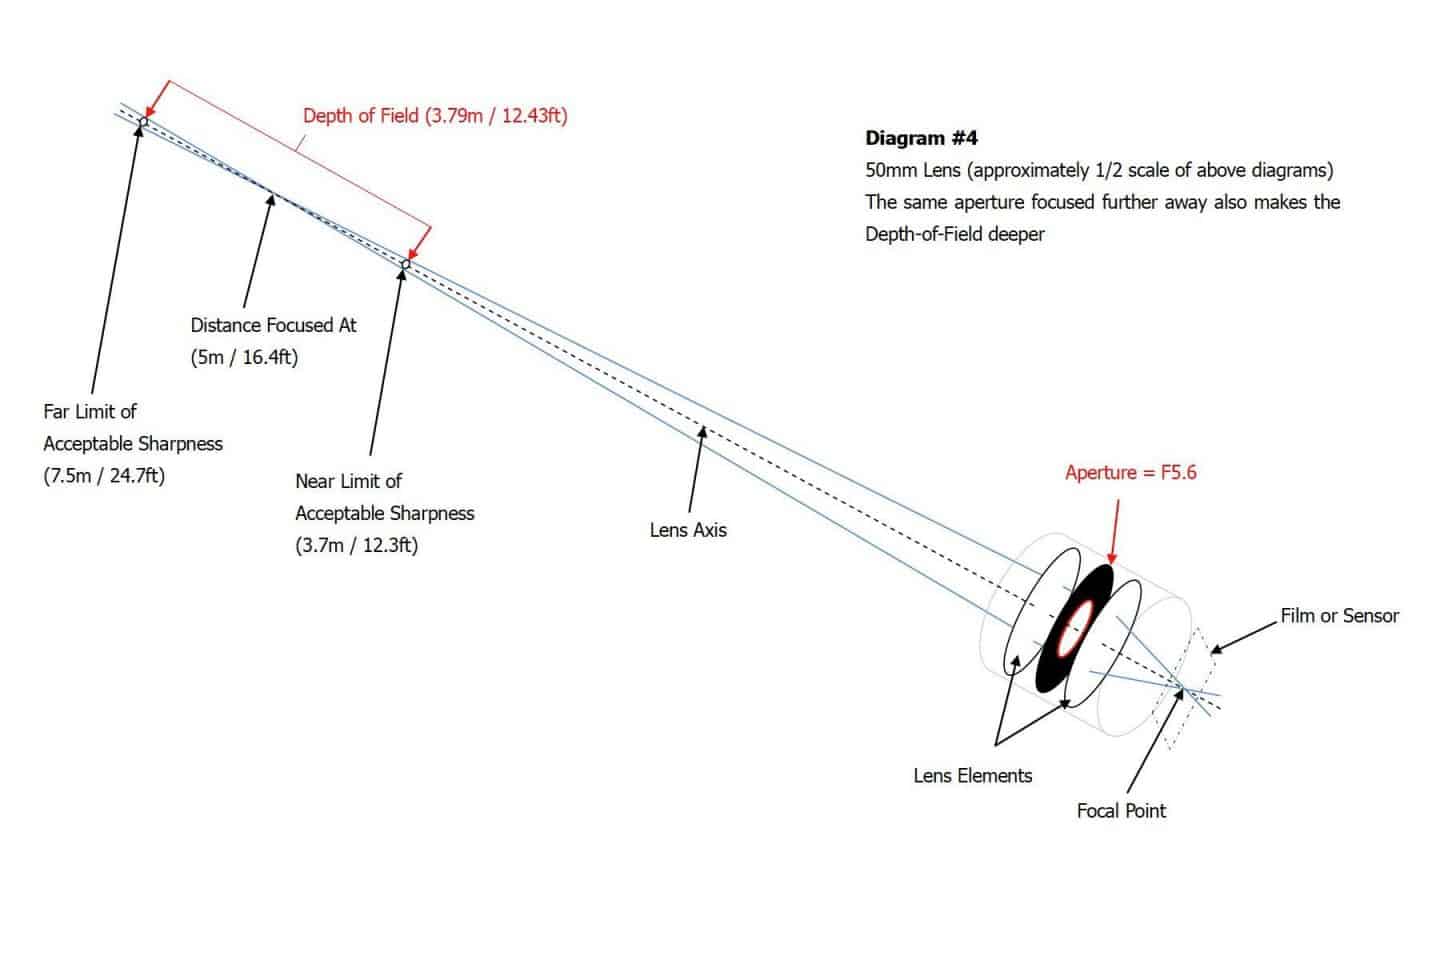
DOF Diagram #4

DOF Diagram #5
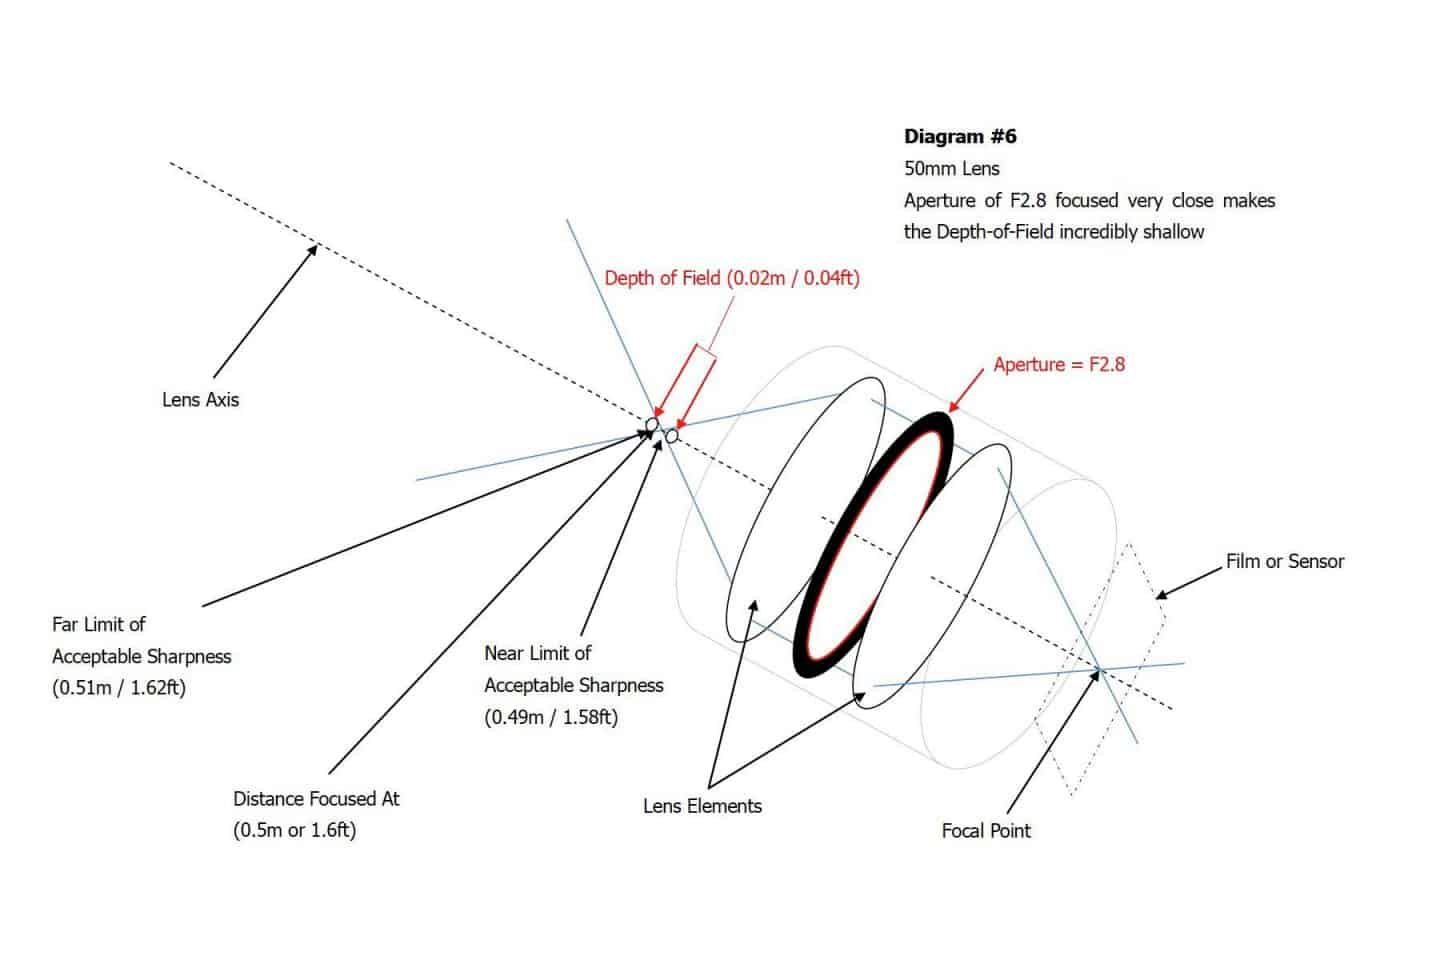
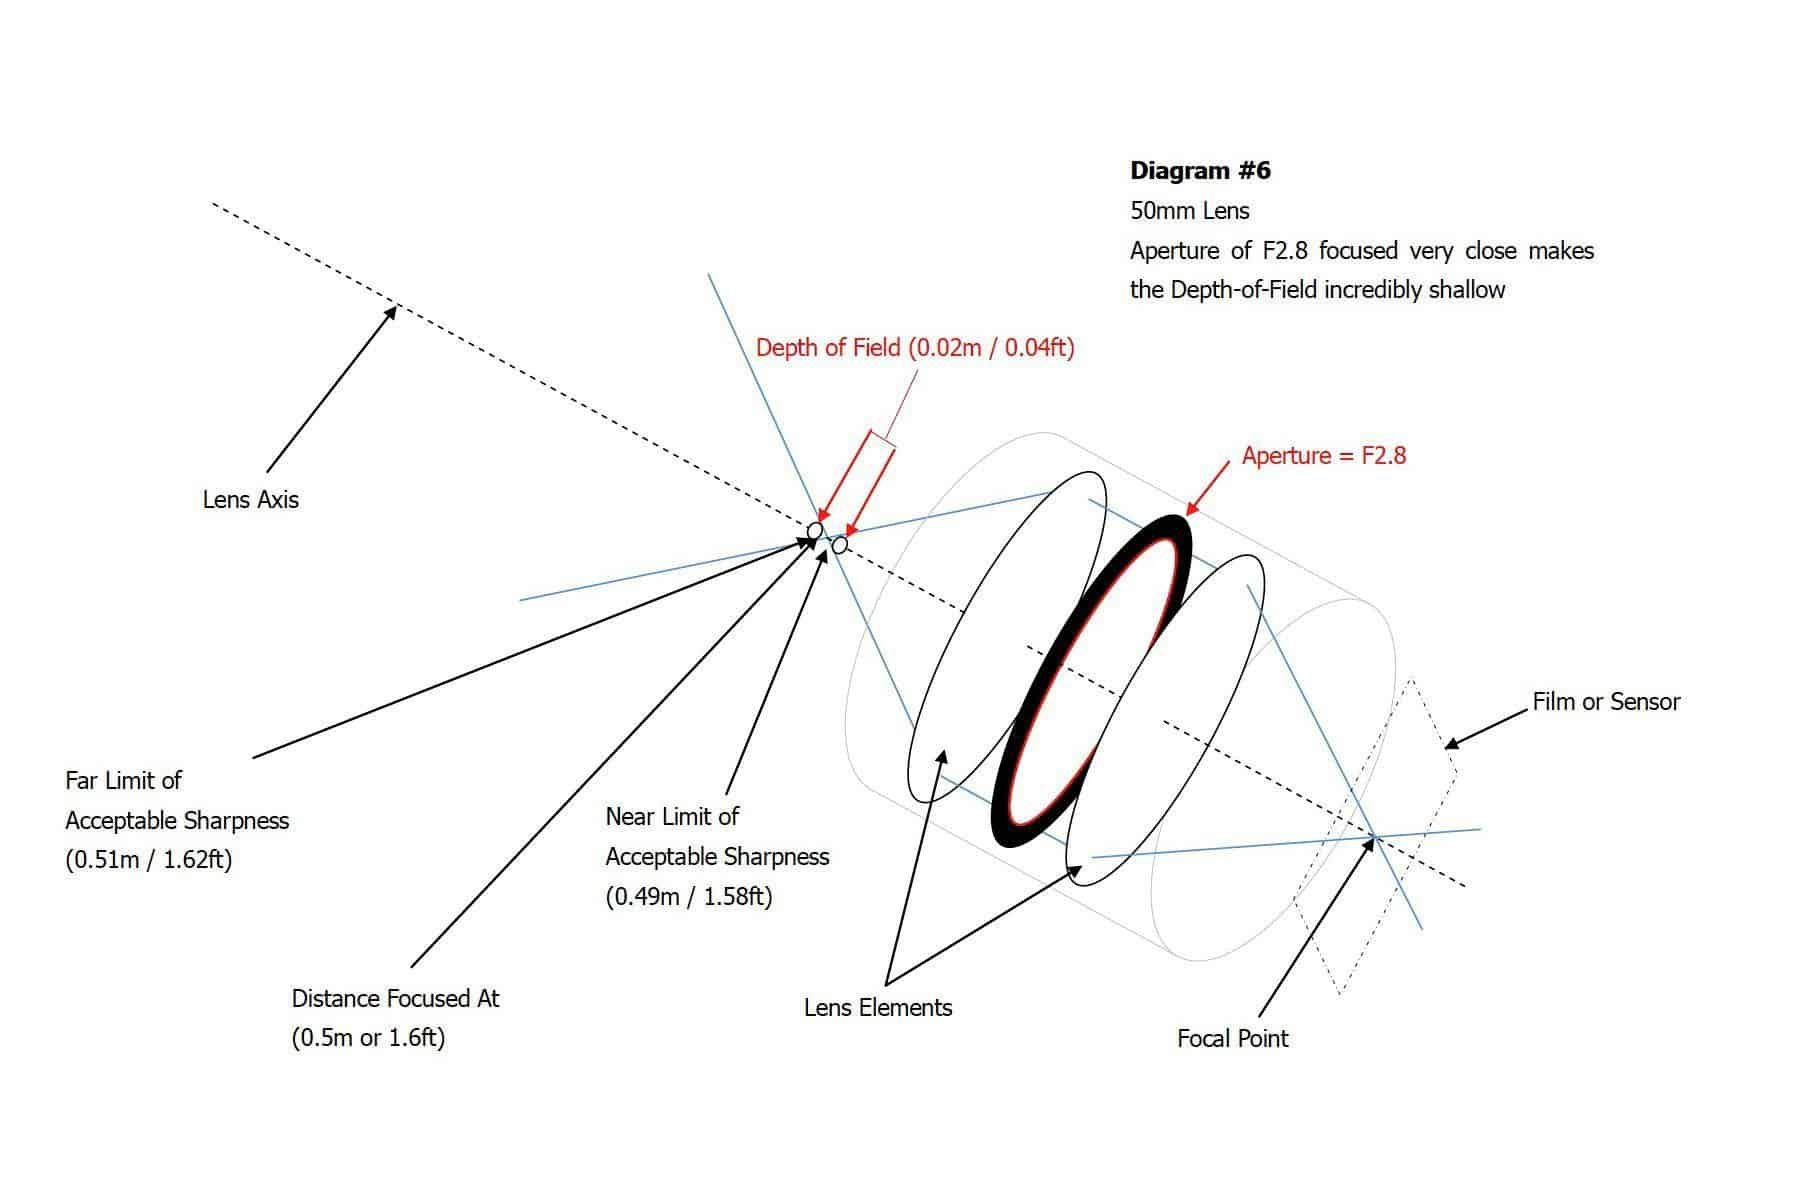
DOF Diagram #6
Conversely, in Diagram #5 we focus closer to the lens, still with an aperture of ƒ/5.6 and see that the angle of the light is much more acute and the acceptable focus circles are close together, giving us a depth of field of just 3cm or just over an inch. And the final diagram shows the angle being more acute still as the light passes through a wider aperture of ƒ/2.8 for just 2cm or 3/4 of an inch depth of field. If any part of this was new to you, I hope it’s relatively easy to understand how depth of field is affected by the aperture and focus distance. I’ll share a formula shortly that will help you to understand the relationship with the focal length as well, but before that, let’s talk about Hyperfocal Distance.
Hyperfocal Distance
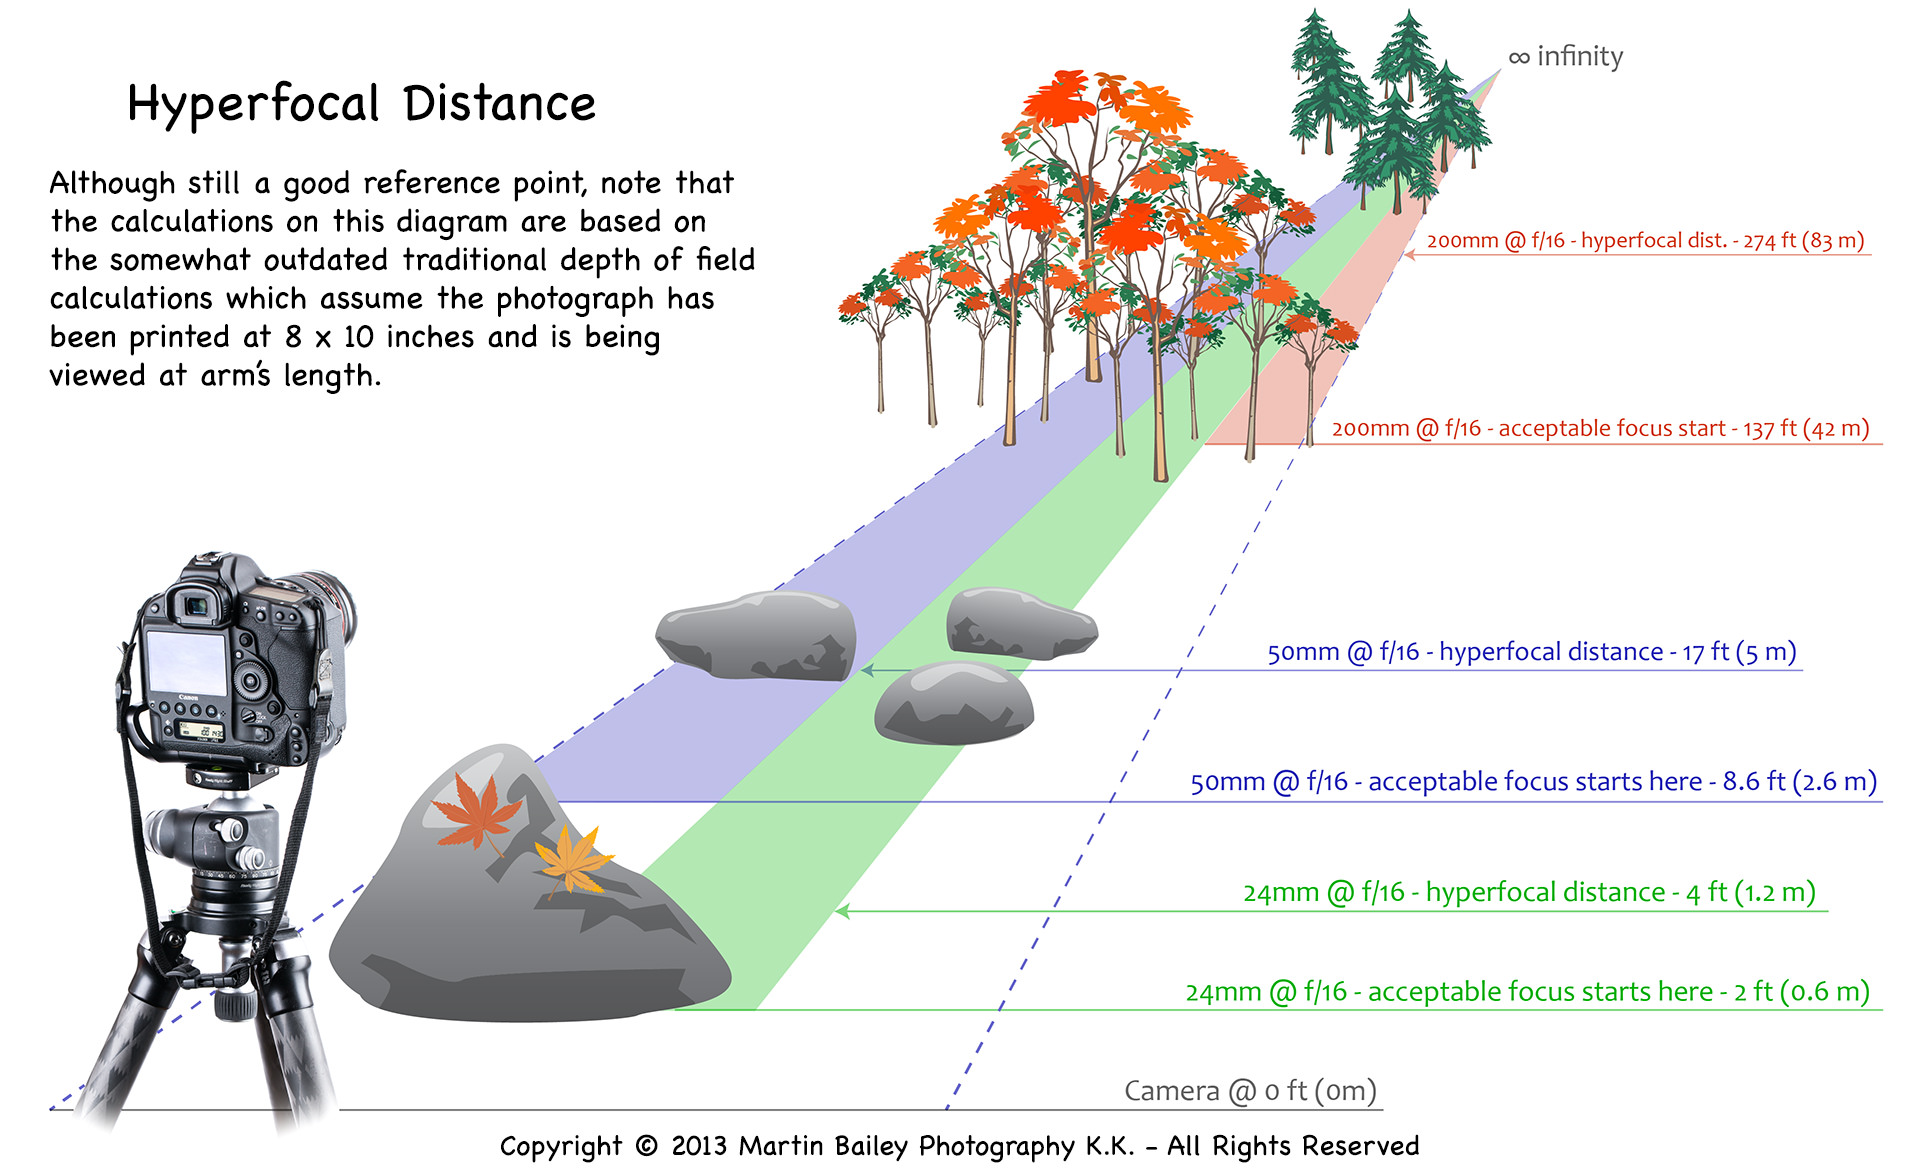
For any given focal length and aperture combination, there is a point at which the far limit of the depth of field is so far away that everything after the near limit of your depth of field can be considered acceptably sharp, and this is what’s known as the Hyperfocal Distance. Here is a diagram that I created to illustrate this back in 2013, although you may see this stolen and illegally rebranded on other sites, and you can see that for a 24 mm lens at an aperture of ƒ/16 the hyperfocal distance is much closer than with a 50 mm lens, and much closer still than a lens set to a focal length of 200 mm.
You’ll see that I’ve added a note which reads: Although still a good reference point, note that the calculations on this diagram are based on the somewhat outdated traditional depth of field calculations which assume the photograph has been printed at 8 x 10 inches and is being viewed at arm’s length. I’ll explain more about why this might be something you need to be concerned about shortly, but these numbers are still a good standard to help talk about the theory, and before we jump further down the rabbit hole, there is another part to all of this that we’ve already touched on but need to cover the terminology first, and that is the Circle of Confusion.
The Circle of Confusion
Until now I’ve been calling it the circle of acceptable focus, to avoid ‘confusion’ but in optical physics, it’s known as the Circle of Confusion. In terms of focus, this is the limit that the light rays can spread out but still appear to be in focus. In this diagram from a post an older post, you can see that I have included light from the near and far focus limits, and tried to show how it gets gradually more blurry as we move away from the critical focus point, which is light coming from the point at which we focussed the lens.
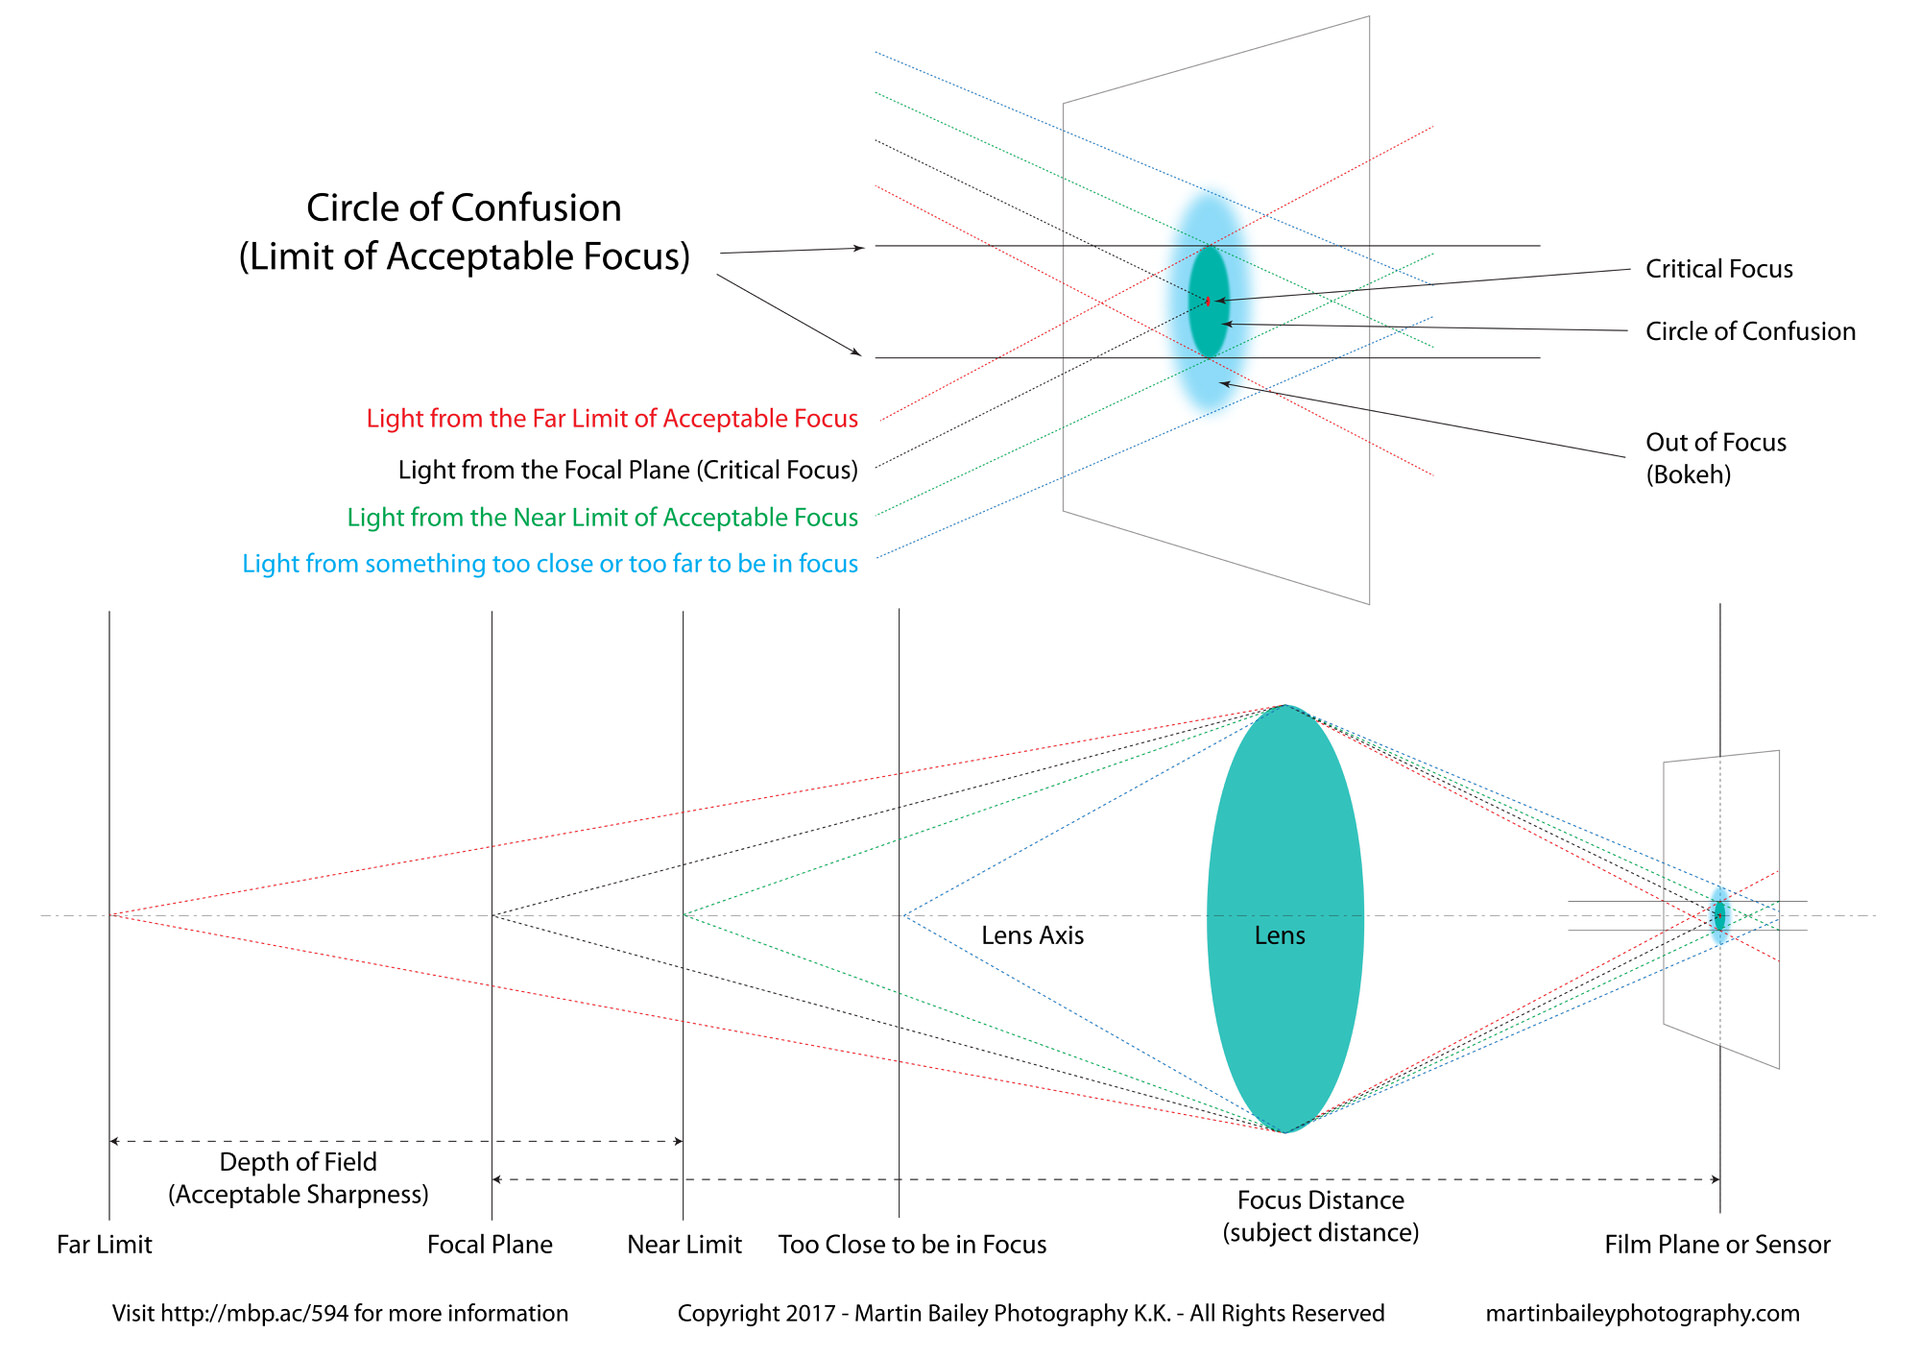
The reason that the Circle of Confusion is important to this topic is that it is required to calculate Hyperfocal Distance. The calculation is actually not very difficult, so let’s go over that quickly before we move on. First here is the formula with words rather than numbers. So we have Focal Length to the power of two over the Aperture multiplied by the Circle of Confusion. This gives us the Hyperfocal Distance.

If we replace the words with some real numbers now, we’d do, for example, 24 to the power of two over 16 multiplied by 0.030, which gives us 1200. This is 1.2 meters, which is the distance I had in my earlier diagram for hyperfocal distance. This assumes a circle of confusion of 0.030 millimeters or 30 µm (microns or micrometers) which is a commonly used circle of confusion for 35mm sensors.

So, this brings us up to speed on the theory behind Hyperfocal Distance and Depth of Field is calculated from the Hyperfocal Distance, but it’s considerably more complicated, so we won’t go into that much detail today, as the main reason for the inaccuracy of the traditional calculation is the circle of confusion, which we are now up to speed on,
Why is the Traditional Depth of Field Calculation Outdated?
As I mentioned, the traditional Depth of Field calculation based on evaluating sharpness in an 8 x 10 inch print at arm’s length, is outdated because unfortunately, more than 99% of images that are created today are never printed, so it’s really only useful as a standard to discuss the theory. Most people check focus on the computer screen, and most of the time, we check by zooming in to 100% at a point where it is important for the image to be in focus. It’s fashionable to dismiss this kind of evaluation as being too picky, but in the dark corners of our studies, hotel rooms, or basements, I know that people do this. It’s human nature to want the best for our creations, so before we really commit to liking a shot, we have to know that it’s sharp and will bear up to a certain level of scrutiny. Seriously though, if, for example, you are going to print your work out large or display it on a big screen, you have to check that it is sharp unless you did not intend it to be.
Pixel Peeper Mode
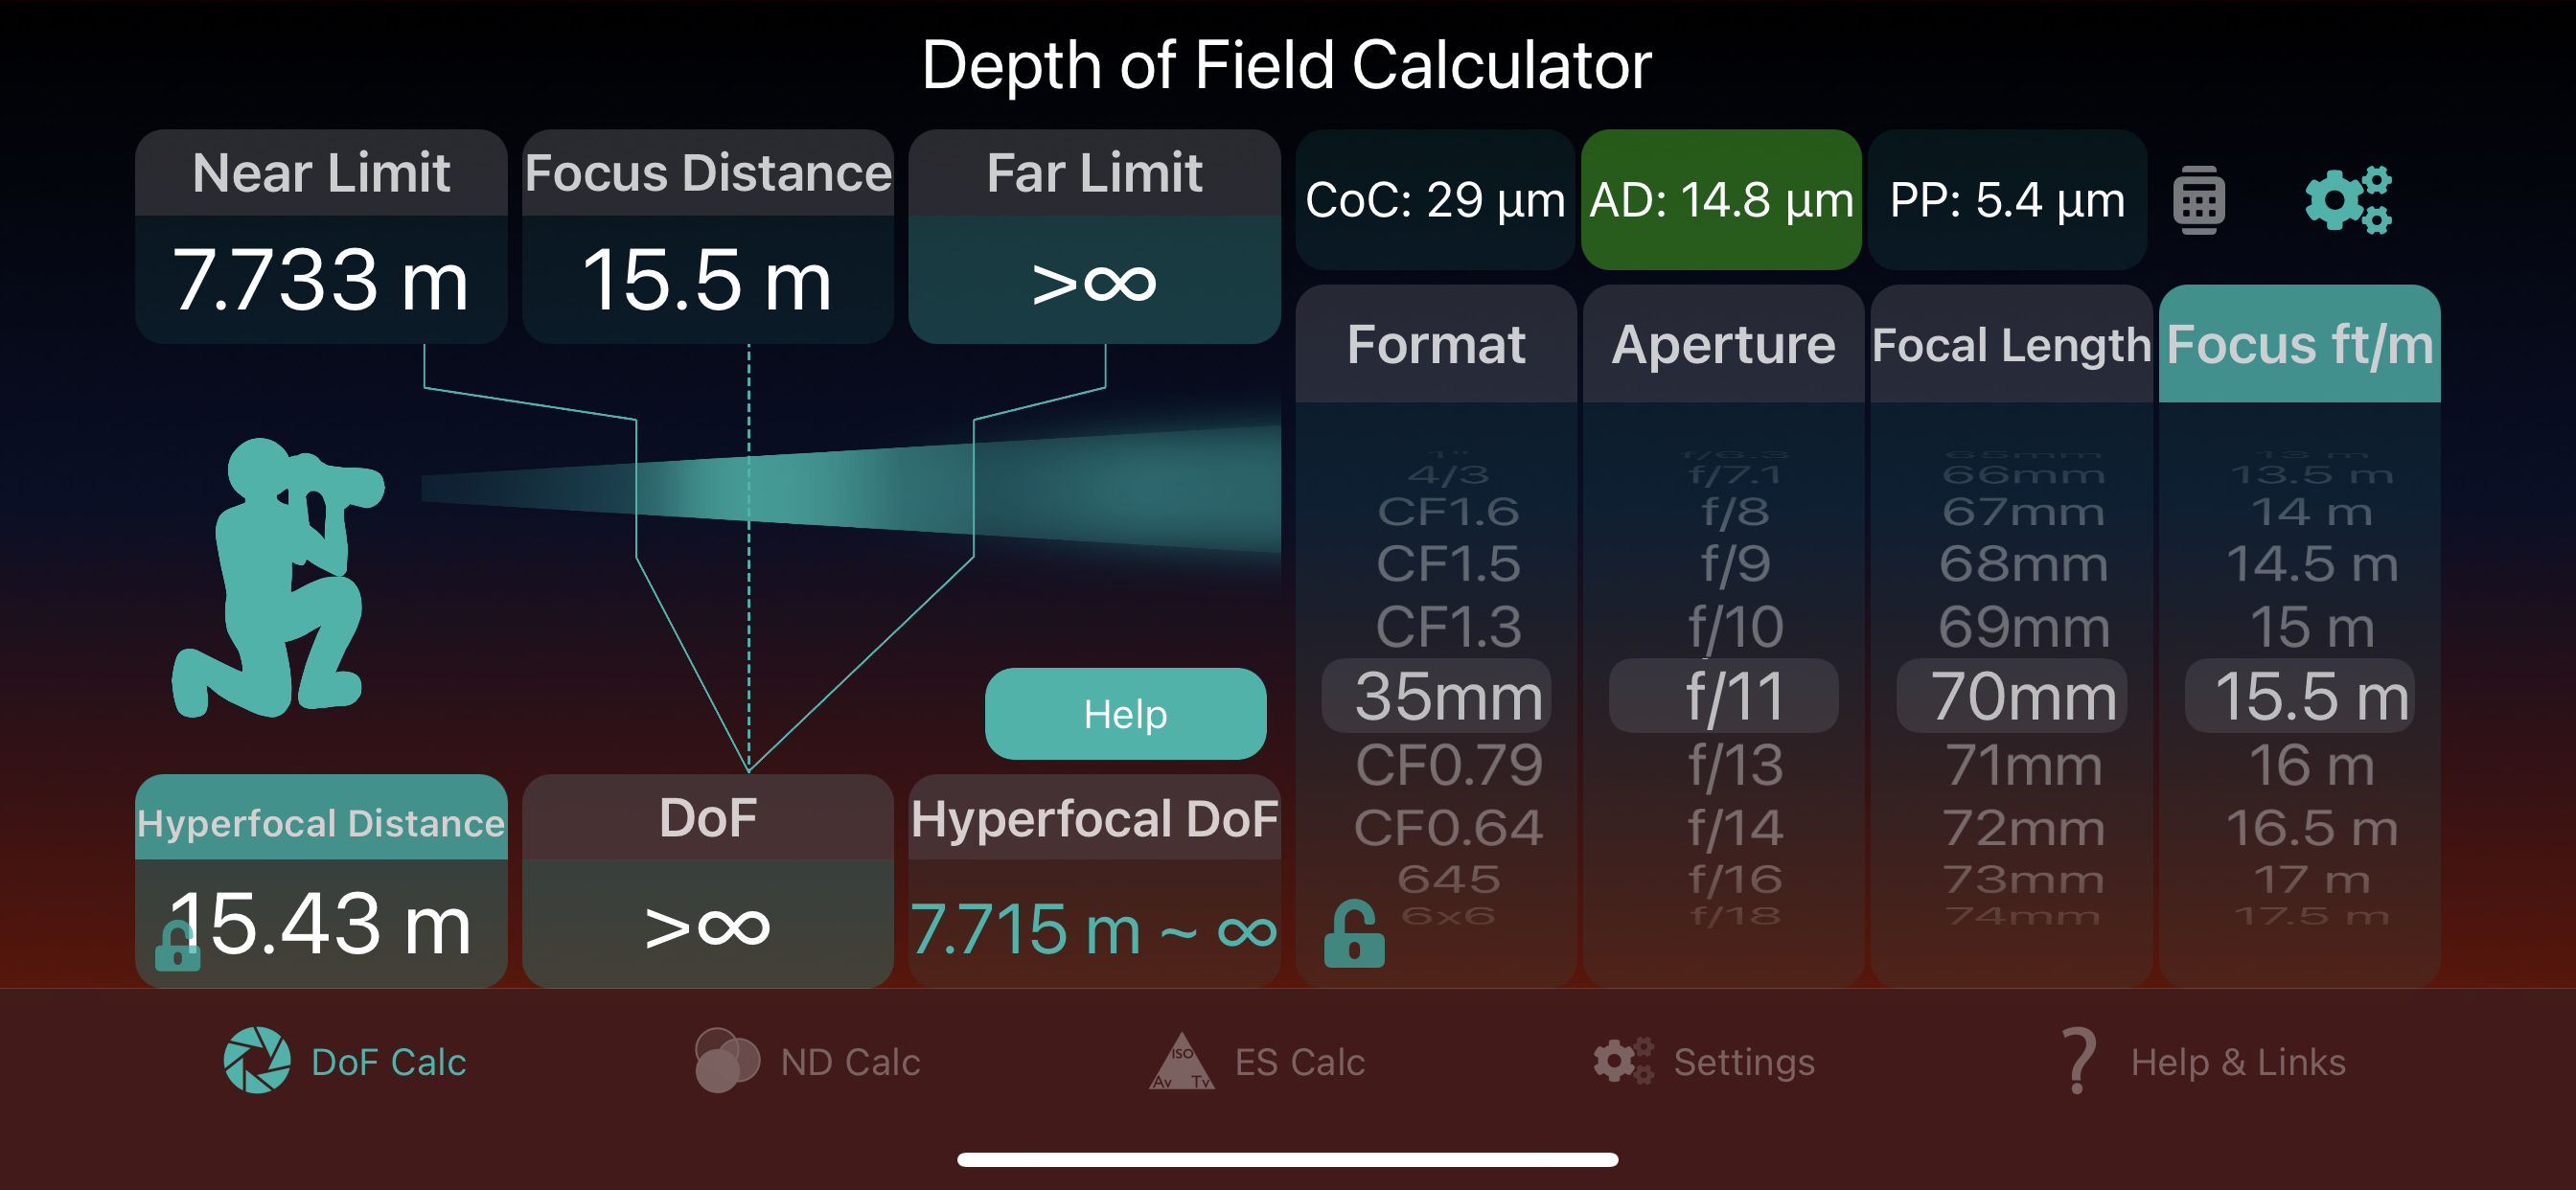
This is why I developed Pixel Peeper Mode for the Depth of Field calculator in my Photographer’s Friend app. When you enable Pixel Peeper mode we calculate the pixel pitch of your sensor based on the sensor format that you select on the main calculator screen and the number of megapixels that you select on the settings screen. I’ve outlined both of these here for anyone that uses Photographer’s Friend. I’ve included two more screenshots to the right though, to illustrate this point and to help with understanding this concept.
The screenshot on the left shows both the Pixel Peeper Mode switch being turned on, and that I have selected the megapixels for my camera, which is the 45 megapixel Canon EOS R5. You will, of course, select whatever the megapixel count is for your own camera. Then on the main calculator screen, select your camera’s sensor format, which in my case is 35mm full-frame. If you use a crop factor camera select the correct ratio, such as CF1.6, 1.5, or 1.3, etc. The larger crop factors are actually for sub-medium format sensors and there are also sizes for medium and some large format sensor and film sizes to choose from.
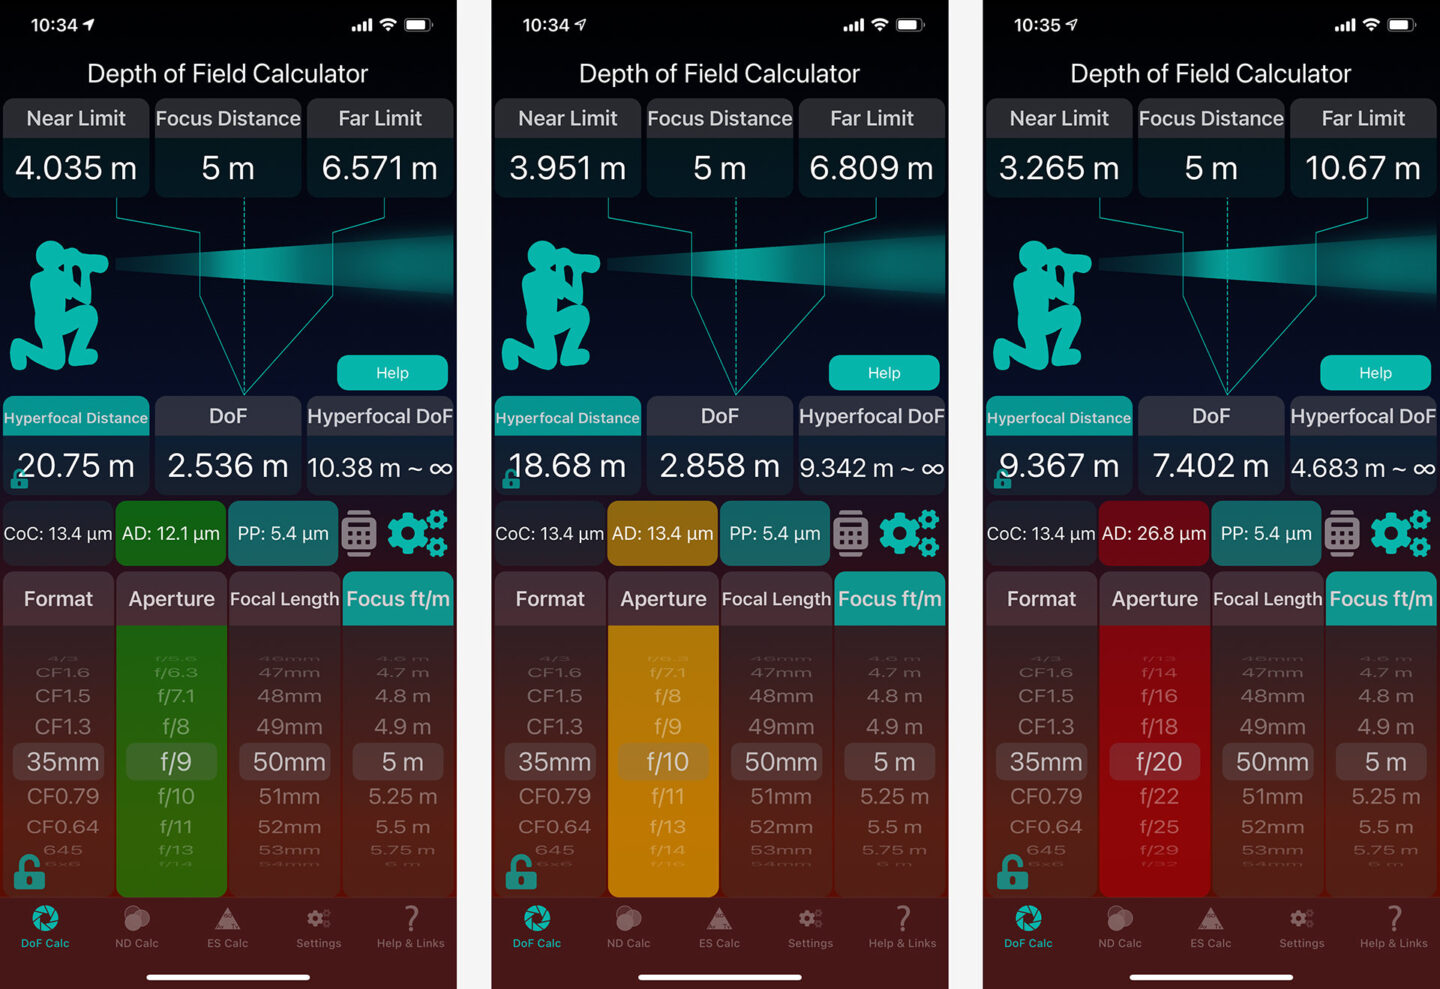
The important thing with regards to depth of field here though can be seen on the two screenshots on the right side. Notice how the Hyperfocal Distance and the Hyperfocal Depth of Field readouts change when we have Pixel Peeper Mode turned on compared to when it’s off. The Hyperfocal Distance changes from 1.26 meters to 3.3 meters, which is 4.15 to 10.9 feet. Under the Hyperfocal DoF section, you can see that with Pixel Peeper mode turned off, we’re looking at the depth of field starting at 63 cm or 2 feet and extending out to infinity, which we will also talk about shortly. With Pixel Peeper Mode turned on, that increases significantly to 5.5 feet or 1.65 meters.
You may be wondering why the non-Pixel Peeper mode number is not 1.2 meters, as we saw in earlier calculations. This is because even without Pixel Peeper mode I am using a slightly smaller circle of confusion, rounded to 29 µm, as this is more accurate than 30 µm used before, and that gives us slightly longer distances. Notice though that when Pixel Peeper is turned on, the CoC label above the Format dial now shows 11 µm for the Circle of Confusion, which is much smaller. This is calculated from the sensor size and the megapixels, which enables me to calculate the Pixel Pitch, which in turn enables me to calculate the Circle of Confusion.

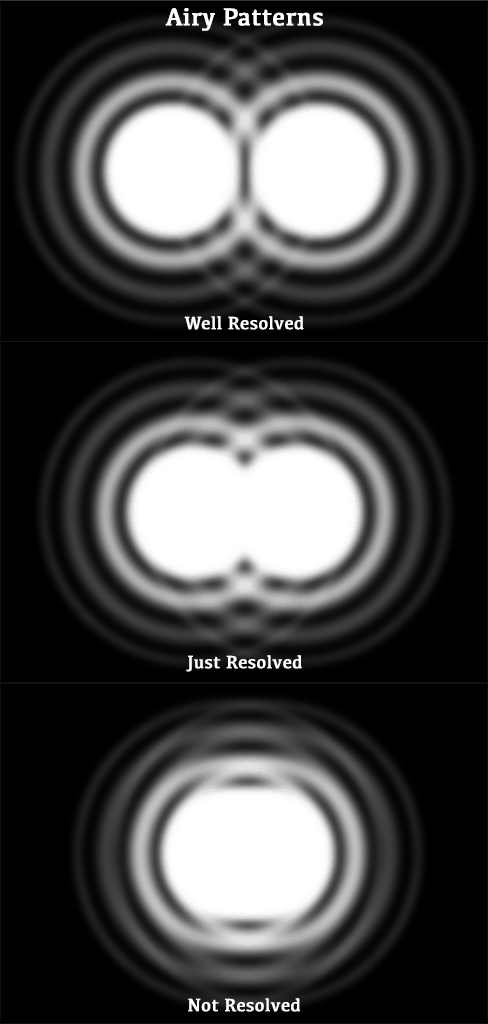
The Airy Pattern
There is actually another somewhat obscure piece to the overall puzzle that we should touch on to really make this post cover everything you need to know about depth of field, and that is the Airy Pattern or Airy Disk. With the understanding that we get greater depth of field as we make our aperture smaller, you’d think that when you want more of your scene to be sharper, you could just select a really small aperture. Many lenses for 35mm format cameras go down to f/22 and sometimes f/32 or smaller, and medium and large format lenses often go to much smaller apertures to get enough depth of field.
But, as good as the manufacturers make our lenses, there is a phenomenon that occurs as light passes through a very small aperture that causes problems. As light passes through a wide aperture, it makes its way to the sensor or film relatively undisturbed, but as light passes through a small aperture, it interferes with other rays of light, causing it to spread out. The result is what’s known as diffraction and to explain that, we need to talk about the “Airy Pattern” (right) with a central “Airy Disk”, both named after George Airy, the person who discovered this phenomenon.

As you can see from the mockup of the Airy Disk on the right, there is a central core of light which makes up about 84% of the light, and then a number of concentric rings. While there is still a gap between the central core or Airy Disk, and the next Airy Disk, the light is said to be “well resolved”. According to the Rayleigh Criterion, the dots are “just resolved” if the center of the first Airy Pattern is superimposed on the first dark ring of the second pattern. When two airy disks become closer than half their width, the light is considered not resolved. This is when you will see diffraction cause everything in your image to be slightly out of focus at small apertures.
Color-Coded Diffraction Warnings
Based on this and the information I already calculated in Photographer’s Friend, I am able to calculate the Diffraction Limits and this is what enables me to provide Color-Coded Diffraction Warnings. The AD label which shows the size of the Airy Disk and the Aperture Dial are color-coded to show the risk of Diffraction as you adjust the aperture dial. If you don’t see this, turn these options on in the Depth of Field Calculator settings.
Because the Circle of Confusion size is rather large in the traditional 8 x 10-inch print calculation method, you actually need to start being concerned when the Airy Disk gets to around 80% of the size of the Circle of Confusion. So, when you are not in Pixel Peeper mode, the color of the Aperture dial will change from green to amber when the Airy Disk passes 80% of the default Circle of Confusion size, and for 35mm format, that is around an aperture of f/18. It then goes red from 100%, which is f/22 at the default settings. This matches my own test results.
In Pixel Peeper mode, these boundaries are a little more conservative, but I set amber to kick in when the Airy Disk reaches the same size as the Circle of Confusion and then the red Diffraction Limit warning when the Airy Disk is twice the size of the Circle of Confusion. These parameters cause the dial to go amber from f/10 for a 35mm format camera at 30 megapixels, and then turn red from f/20.
Based on my own tests, I personally think that f/10 is a little too early, but the physics tells us that there is a possibility of seeing the effects of diffraction at this point, so that’s what we use, but consider this as intended, as an amber warning. Ideally, you’ll do your own tests to see when you start to see diffraction in your images and adjust your expectations accordingly. There are details of how to do diffraction tests in Episode 594, when I originally talked about this.

Infinity and Beyond!
As I mentioned earlier, I’m about to release an update to Photographer’s Friend which adds a number of new features, including translation into a number of new languages and some improvements to the user interface, but the relevance for this discussion comes in the form of a new Infinity slider on the Depth of Field Calculator Settings page. Because of the work involved in bringing you these features this slider is part of the Pro Add-on, which means you need to buy the Pro Add-on for this to be available, but if you already own the Pro Add-on, you’re good to go. What this slider does is allows you to set a custom distance for Infinity. You might initially think, well, infinity is infinity, why would I need to set it? But there are a few reasons why this might be useful, as I’ll explain.
Lens Infinity and Focus Infinity
I’m risking going down a rabbit hole by bringing this up at this point, as this took a lot of wrapping my own head around initially, but I think to ultimately avoid confusion, we should probably talk about the difference between the Infinity symbol that you see on your lenses and infinity in the context of the extent of focus in Depth of Field, because these are really not the same.
If you check your lenses you will see that what is considered Infinity looks slightly different, depending on the lens. For example, when I focus with my RF 15-35mm lens from Canon, in the viewfinder I see distance guides in meters which reads 0.28, 0.4, 0.6, 1, then the Infinity symbol, which, if you follow the spacing of the marked distances, seems to signify about 5 meters. My RF 50mm lens shows distances of 0.4, 0.5, 0.7, 1, 1.5, 3, then the infinity symbol, which in this case seems to signify around 10 meters. Finally, as a reference, my RF 100-500mm lens reads 0.9, 1.2, 1.6, 2, 3, 7, then the infinity symbol, and from my tests, focus stops increasing at around 40m.
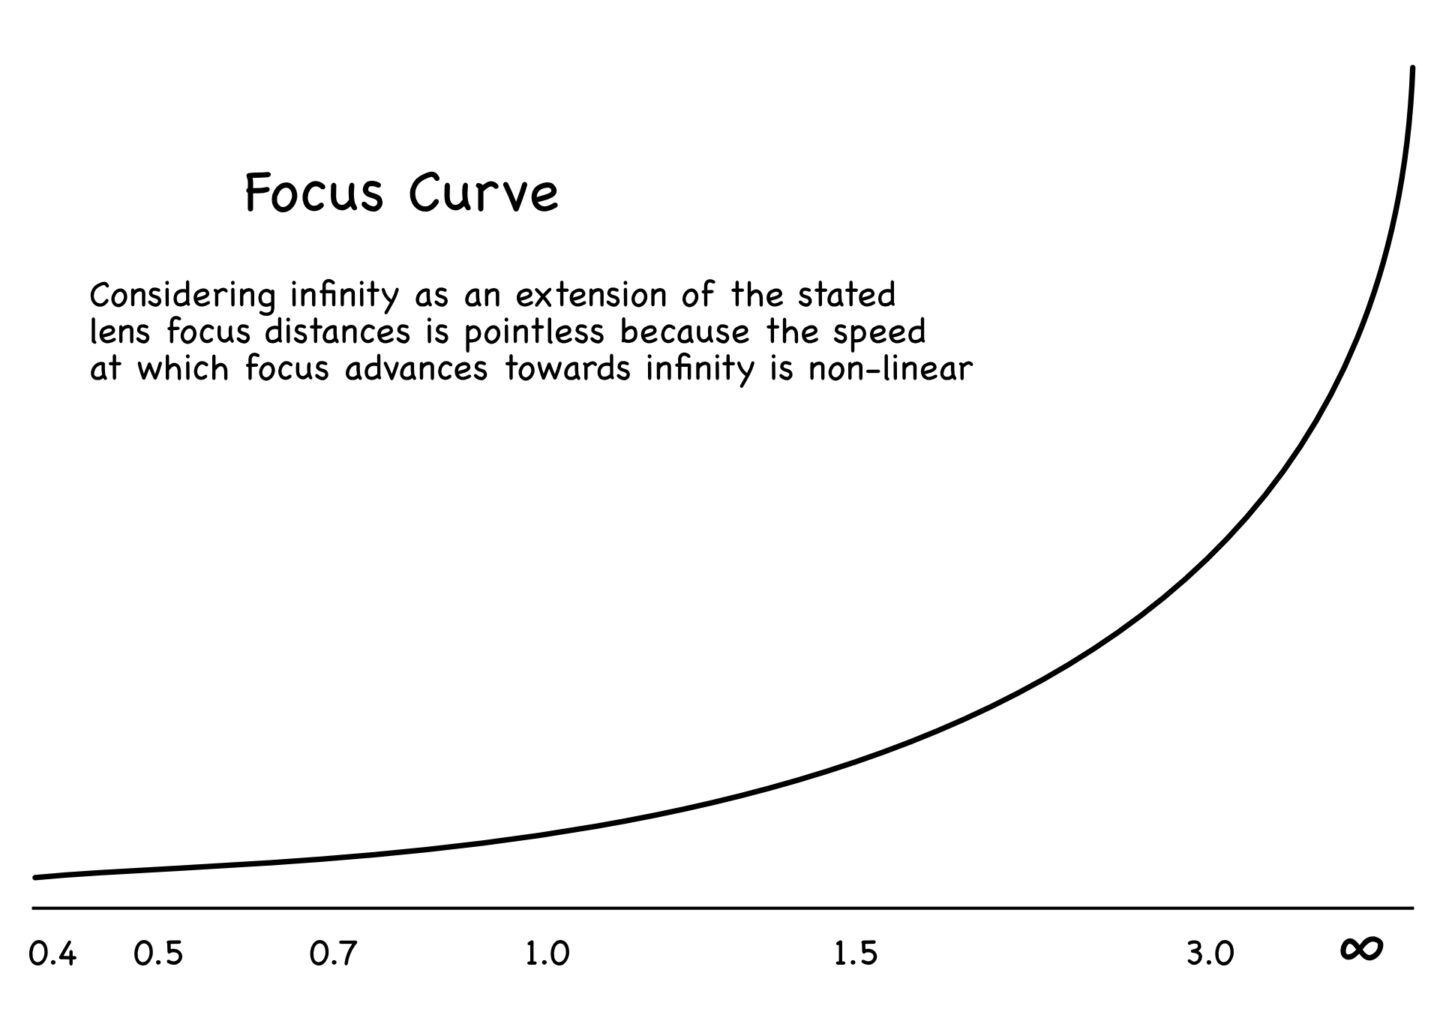
When I initially developed this feature I added the ability to restrict Hyperfocal distance down to as little as 5 meters, or 16 feet, but I found it to be almost completely useless in this context. The reason for that is because the speed at which focus advances towards infinity is non-linear. After my 50 mm lens passes 3 meters when turning the focus ring at the same rate the speed at which focus moves towards infinity starts to increase much more rapidly. Although a quarter of a turn on the focus ring might take me from 1.5 to 3 meters, the following quarter-turn doesn’t take the lens from 3 meters to 4.5 meters. Rather, it takes the lens on a much steeper curve from 3 meters all the way to infinity, and that is really far!

As I researched these changes I found an old forum post where people were laying down the law about infinity by lens, some quoting infinity as being as close as 20 feet, but this assumes a linear increase in the focus and an abrupt stop after the last number of the focus dial or as in the case of my Canon mirrorless camera, the focus range displayed in the electronic viewfinder, as it’s no longer present on the barrel of the lenses. Another observation is that you can actually see the infinity calculations start to peak if you opt to display the calculated Infinity value that I’ll talk about in a moment. It was watching this peek that brought all of this home to me, and that is the reason that I’ve changed this functionality in Photographer’s Friend, because I know I’m not the only geek using it. I get excited when technology helps me to gain a deeper understanding of the world around me, and I wanted to share that.
No More Limits!
Until now, when displaying Infinity in Photographer’s Friend I have simply used 1000 meters as a generic cut-off, and although we showed the infinity symbol for the depth of field, as the distance went past 1000 meters we just showed greater than “>1000 m” and that doesn’t provide the information that feeds my curiosity. So from version 3.7 of Photographer’s Friend which should be available in the App Store in the coming days, whether you own the Pro Add-on or not, you will be able to tap the Depth of Field label or the Far Limit label and cycle through three different infinity display modes.
The default mode displays the preset infinity value in parentheses, which will remain at 1000 meters and display as “>∞ (1 km)” or “>∞ (0.6 mi)”. With the Pro Add-on, the distance will change to whatever you set it to with the Infinity slider on the settings page. The second mode will just show the greater than symbol and infinity symbol “>∞” when the distance is greater than infinity. This really just gives you the option to clean up the interface, making it less cluttered when necessary. The third mode is the geeky one, which shows the calculated distance as it races towards infinity, which actually can extend out way past the originally used 1000 meter limit, so for long focal lengths, you may see something like “>∞ 57 km” or “>∞ 36 mi”. The calculated distances increase very rapidly for wide-angle lenses, so it’s harder to see the gradual increase because of the distance steps, but if you change to a longer focal length like 500mm, you can actually watch the focus increase faster and faster as it heads towards infinity, and I personally find that fascinating.
Once we hit true infinity, the depth of field calculation actually returns a negative number, so I have to convert that to a large positive number, so at that point, I have no choice but to show an Infinity symbol as we really are at infinity.
By adjusting the preset Infinity value with the new slider in the Depth of Field Calculator settings, you are giving yourself more reference points as you shoot. Because of the non-linear nature of the focus advance towards infinity, I don’t recommend trying to use something like 20 feet or a really close number that you might find online, but I have made the slider start at 50 meters or 164 feet, which I feel is close enough to be useful, and it extends out to one mile or just over 1600 meters. You use this to get a reminder of when a wider angle lens is theoretically approaching infinity, because the readout labels for Far Limit and Depth of Field will change color, and you can select any three of the modes I discussed earlier, whichever you find most useful. Personally, I’m enjoying seeing the colored label and infinity symbol kick in, but I’m working mostly with mode three, which shows the actually calculated infinity distance, so you get the best of both worlds.
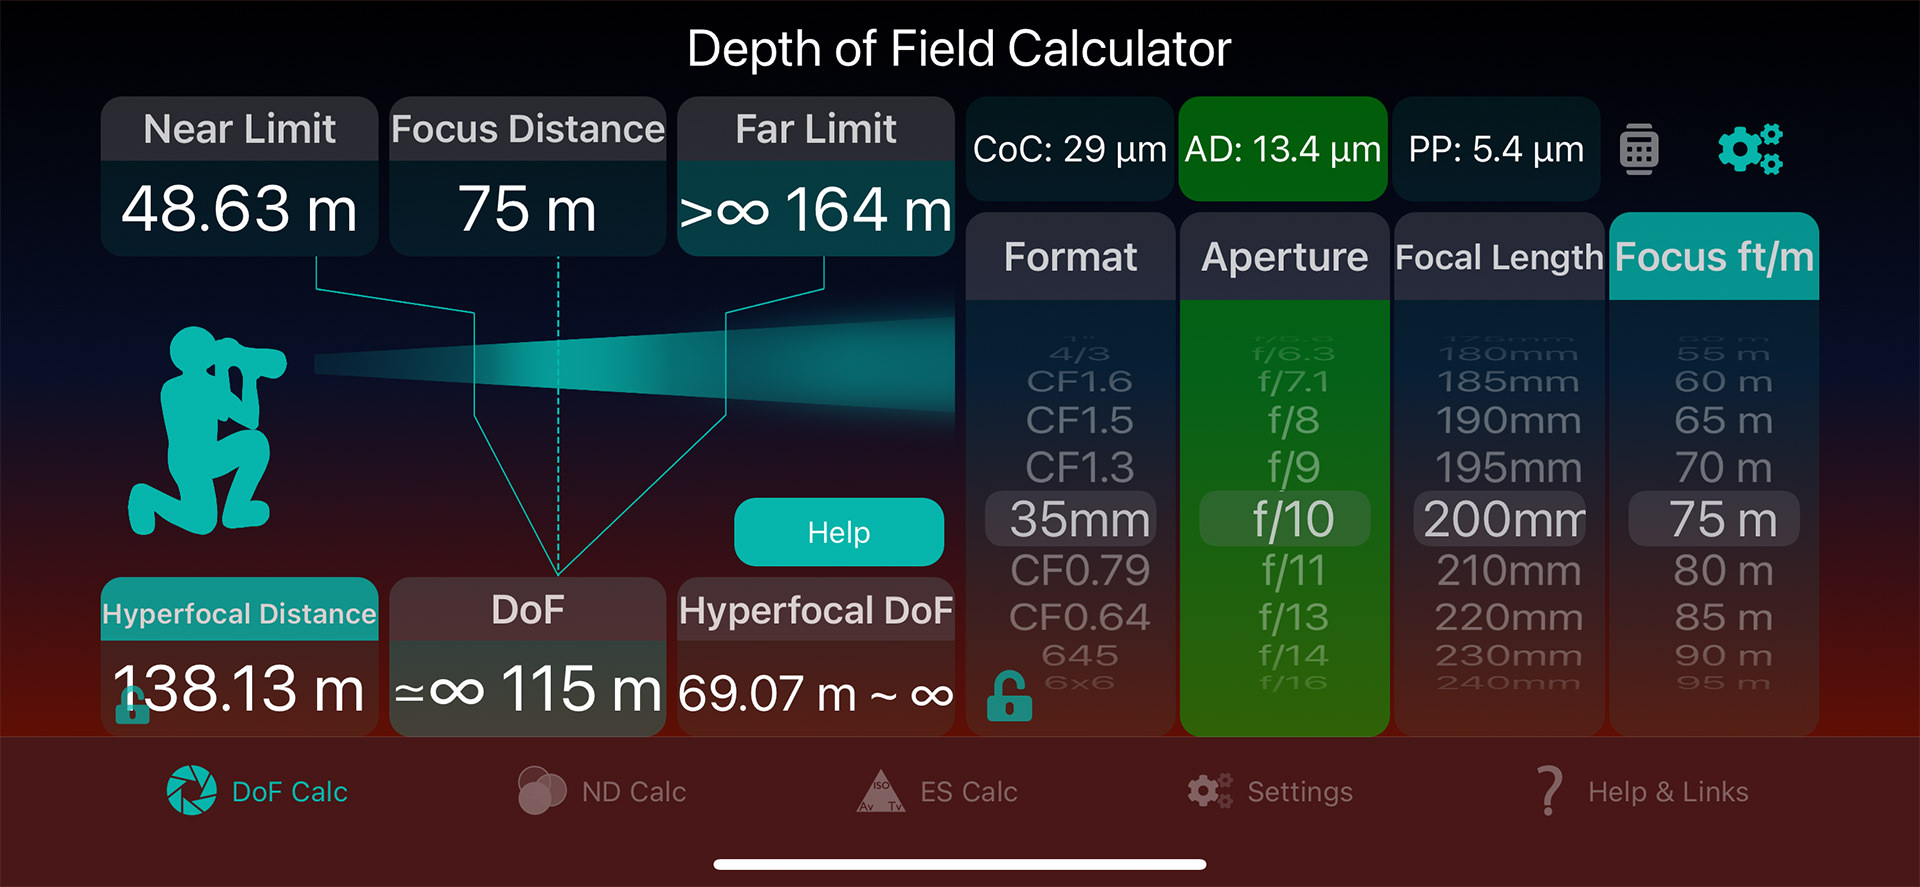
For example, in this screenshot, I have Infinity set to 100m which will put you at 330 feet if you hit the new measurement unit toggle switch that I also just added, or tap the distance dial label. The focus distance is set to 75 meters, which not greater than the calculated Hyperfocal Distance, but because I have the Infinity slider set to 100m I already have a colored label for the Far Limit and the greater than Infinity symbols in place because the far limit is passed the Infinity distance that I have preset, but I have an approximately equal symbol with the infinity symbol in the Depth of Field readout, to tell me that I’ve surpassed by preset Infinity distance, but it’s not yet greater than the calculated infinity distance. Basically, we can now use this as an indication that we’re approaching the calculated Infinity, and we can still monitor that we’re not quite at true infinity because of the approximation symbol.
Or, for example, here I have the focus distance dial past the Hyperfocal Distance and the Infinity display in mode 2, so I just get the greater than infinity symbols for a nice clean readout if that’s all I care about. How you use these features is completely up to you. I’m just providing the tools, and as is often the case with Photographer’s Friend, some uses are practical field techniques, and others are to help you get your head around the technical aspects of photography.
Why is Pixel Peeper Mode Important?

OK, so as we start to wrap this up, I’d like to talk a little about why it’s important to use Pixel Peeper Mode. In the past, I’ve spoken with people that had concerns about focus, and sometimes think there may have been a problem with their camera. Most of the time it turns out that the problems stemmed from a lack of information or full understanding of just how shallow depth of field gets with modern high-resolution cameras. Keep in mind that if you are going to check the focus in your images by making an 8 x 10-inch print and look at it at arm’s length, the traditional calculation is fine, but for larger prints and when checking your focus at 100%, especially on a large screen, your images won’t show as much depth of field as you would think based on the traditional calculations.
To illustrate this point though, take a look at this portrait of a young Himba girl from my Complete Namibia Tour. For this portrait, I used an aperture of ƒ/2.8 which will give us a reasonably shallow depth of field, although the lens would go as wide as ƒ/1.2. It’s tempting to shoot portraits wide open, and at times I do, but you have to understand just how shallow the depth of field is. With the traditional calculation, f/2.8 at a focal length of 50mm, and I see from my EXIF data that I was focussed at 65cm, learn that I have a depth of field of 2.5 cm or one inch. That’s already quite shallow, but if I switch to Pixel Peeper mode, which calculates the actual depth of field for my 30 megapixels Canon EOS R at these settings, I find that I actually only have a depth of field of 1.172 cm which is slightly under a half of an inch.
Now, I like this look and it was intentional, but if you study the image you’ll see that only her right eye, mouth, and part of her headdress are crisply sharp. Everything else gradually gets softer as we move away from this shallow plane of focus, of just over 1 centimeter.
One person that I spoke to in the past said that they couldn’t get a sharp photograph with the Canon EOS 5Ds R, and they were shooting with an 85mm ƒ/1.2 lens wide open at a distance of around 5 feet or 1.5 meters, and they thought they should have a few centimeters of depth of field. With the traditional calculation at these settings, indeed, they would have just over 2 centimeters of depth of field, similar to what I had in this shot of the Himba girl. What they actually had was 7 mm, and when we inspected the images we could see that there was a very thin line of sharpness, rather than the image being completely out of focus as they’d thought.
This is why it is important, especially when working with very shallow depth of field, to understand just how much focus you can expect, and Pixel Peeper mode in my iOS app can provide you with this information simply by turning it on and selecting your sensor’s megapixels. If you don’t already own Photographer’s Friend, you can find it on the Apple App Store here, and there are more details about the Depth of Field and other calculators and features on the product page here.
Stopping Down for Wildlife
Another thing that comes up in conversation a lot is the necessity to stop down your aperture a little for large wildlife subjects. Sure, if you just want the eyes sharp, and yes, that can provide a beautiful look, then staying wide open is fine, but if, for example, you are photographing a large bird in flight, and want to see more of the wings sharp, stopping down a little is important. For example, this Steller’s Sea Eagle shot at 16 meters or 52 feet has a wingspan of around 2.5 meters, just over 8 feet. Even with the wings folded slightly like this, we’re still talking about almost 2 meters from tip to tip. At ƒ/10 with a focal length of 400mm, my depth of field with the traditional calculation is 90 cm or just under 3 feet, but with a 30-megapixel camera, we’re actually looking at less than half that, at 42 cm or 16 inches. Now, I don’t mind the wing tips being out of focus like this, but the amount you see in this photo is based on my selected aperture of ƒ/10. If I’d shot this wide open, there would have been much less focus on the near edge of the wings, and it probably would have bugged the hell out of me.
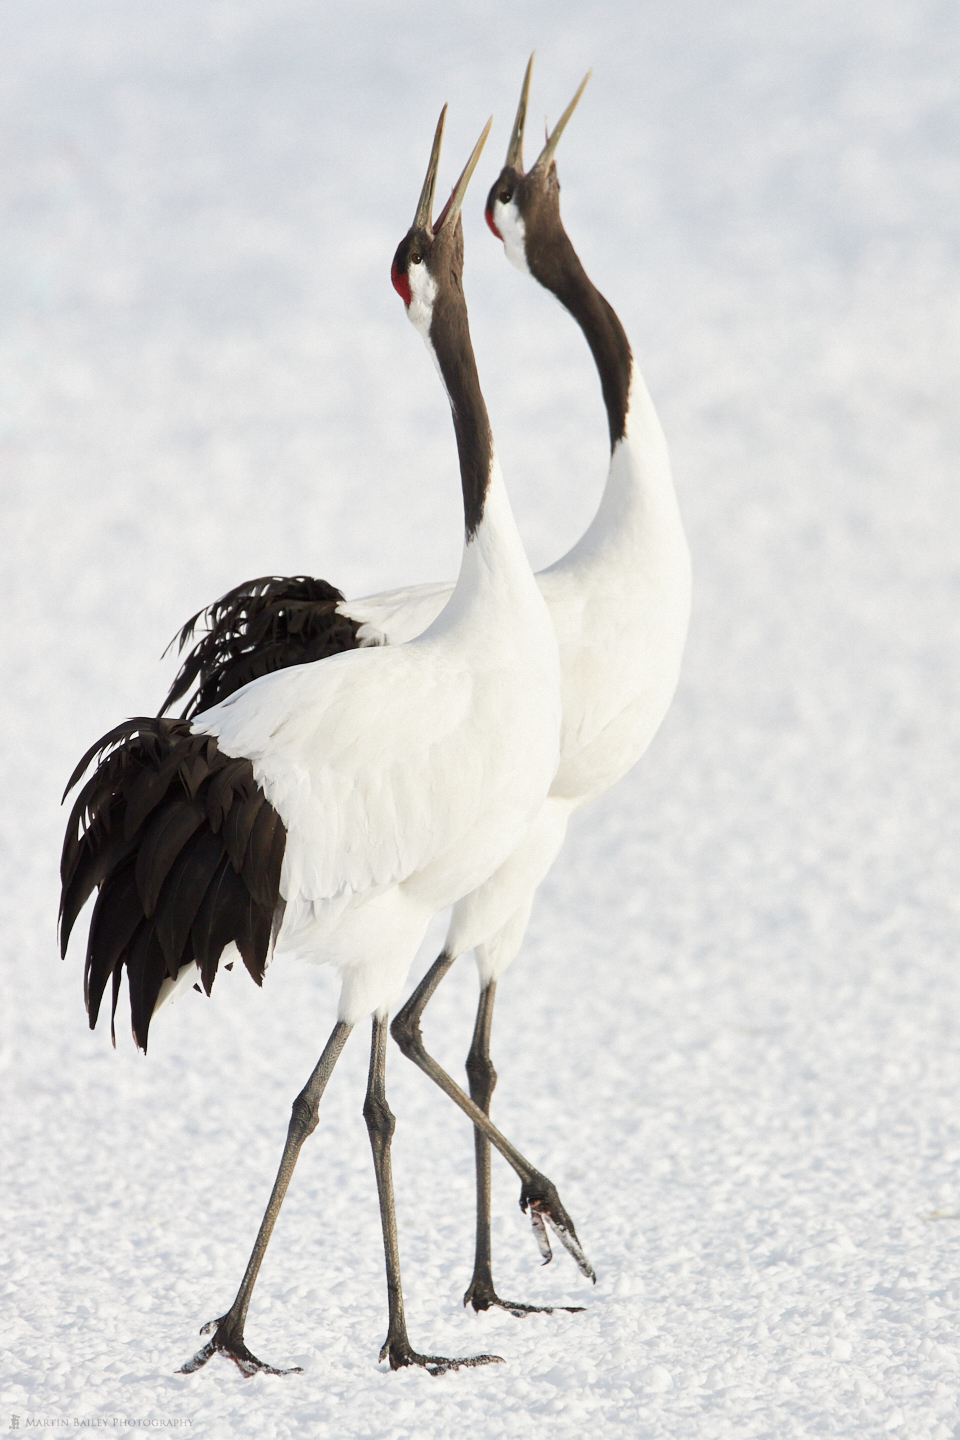
Cranes' Song
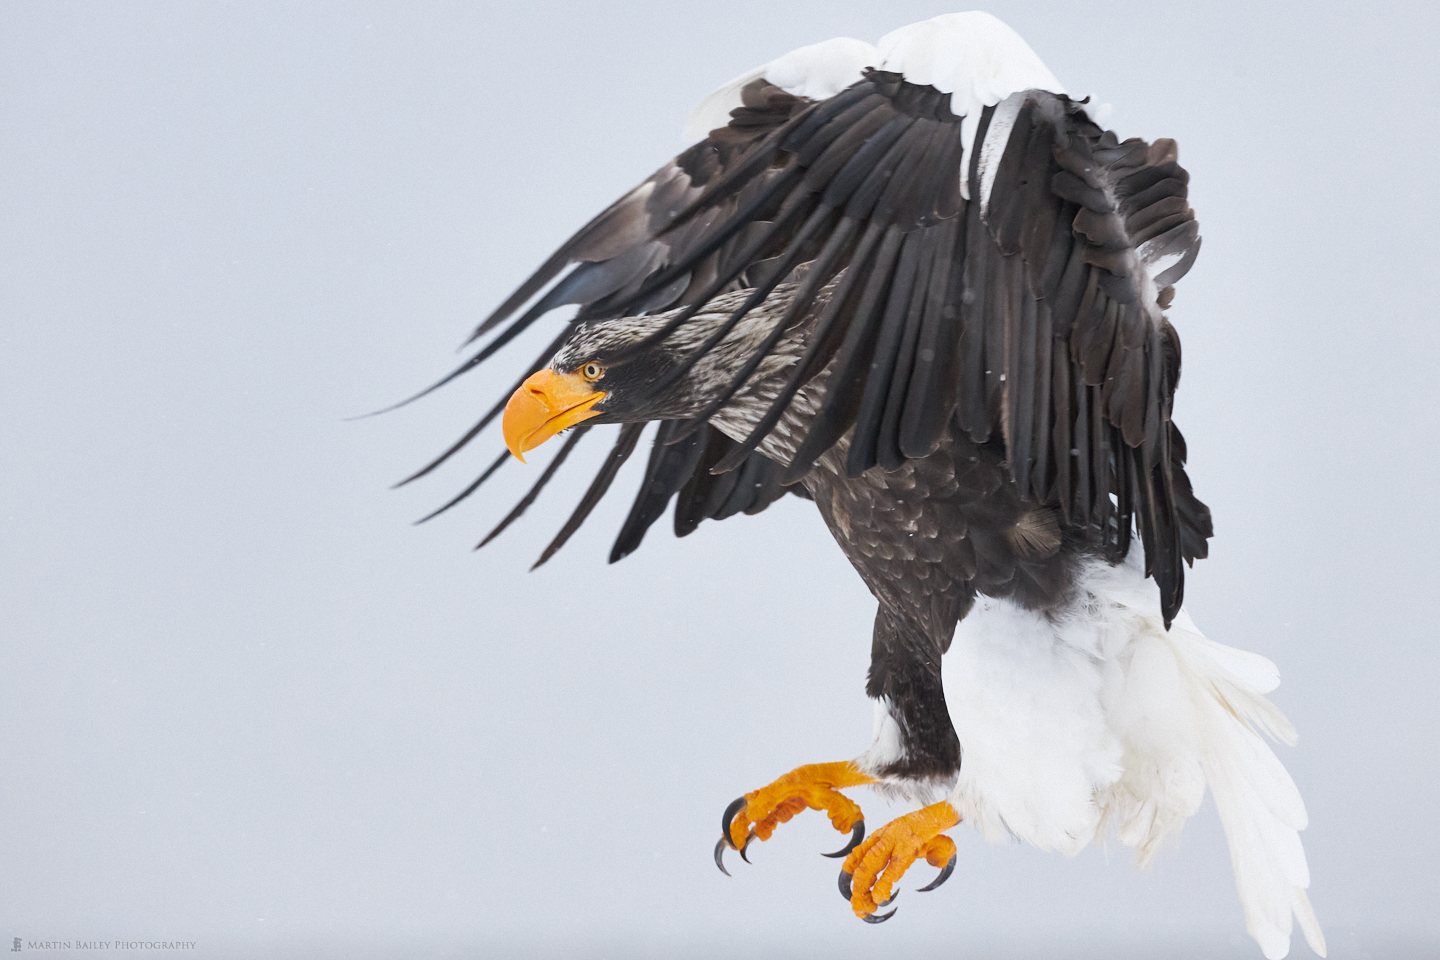
A Steller's Sea flying above the harbour wall in Rausu
For this Crane shot, when there were two subjects, I was focussing at a distance of 35 meters or 110 feet, with a focal length of 700mm, and with the traditional calculation I should have around 1.5 meters or almost 5 feet of depth of field, which would probably have been enough to get both birds sharp, but for a 30-megapixel camera, which is what I was using, in Pixel Peeper mode, I see that I actually only had 68 cm or 26 inches. The result is that the second of the two Red-Crowned Cranes is slightly out of focus, even at ƒ/11. I actually often stop down to ƒ/14 when there are multiple subjects, but didn’t on this occasion, and the results are, to me at least, a little bit disappointing.
Hyperfocal Distance Use in Landscape Photography
Finally, I’d like to mention that when doing landscape photography I actually rarely photograph using Hyperfocal distance. The theory is that if you identify the Hyperfocal distance and then focus at that point, you can ensure that everything from the near limit of your depth of field to infinity will be in focus. With relatively wide-angle lenses though, the depth of field is deep enough that in general, if you focus around a third of the way into the frame, you will be approximately shooting at the Hyperfocal distance, and don’t really need to calculate it. I generally still just focus on the subject that is most important in the frame and from experience I generally know that this is going to give me sufficient depth of field. It’s important to note though that I built that experience by using tools like my Photographer’s Friend Depth of Field Calculator and checking the results of my work to ensure that my understanding of the limitations we face is accurate.
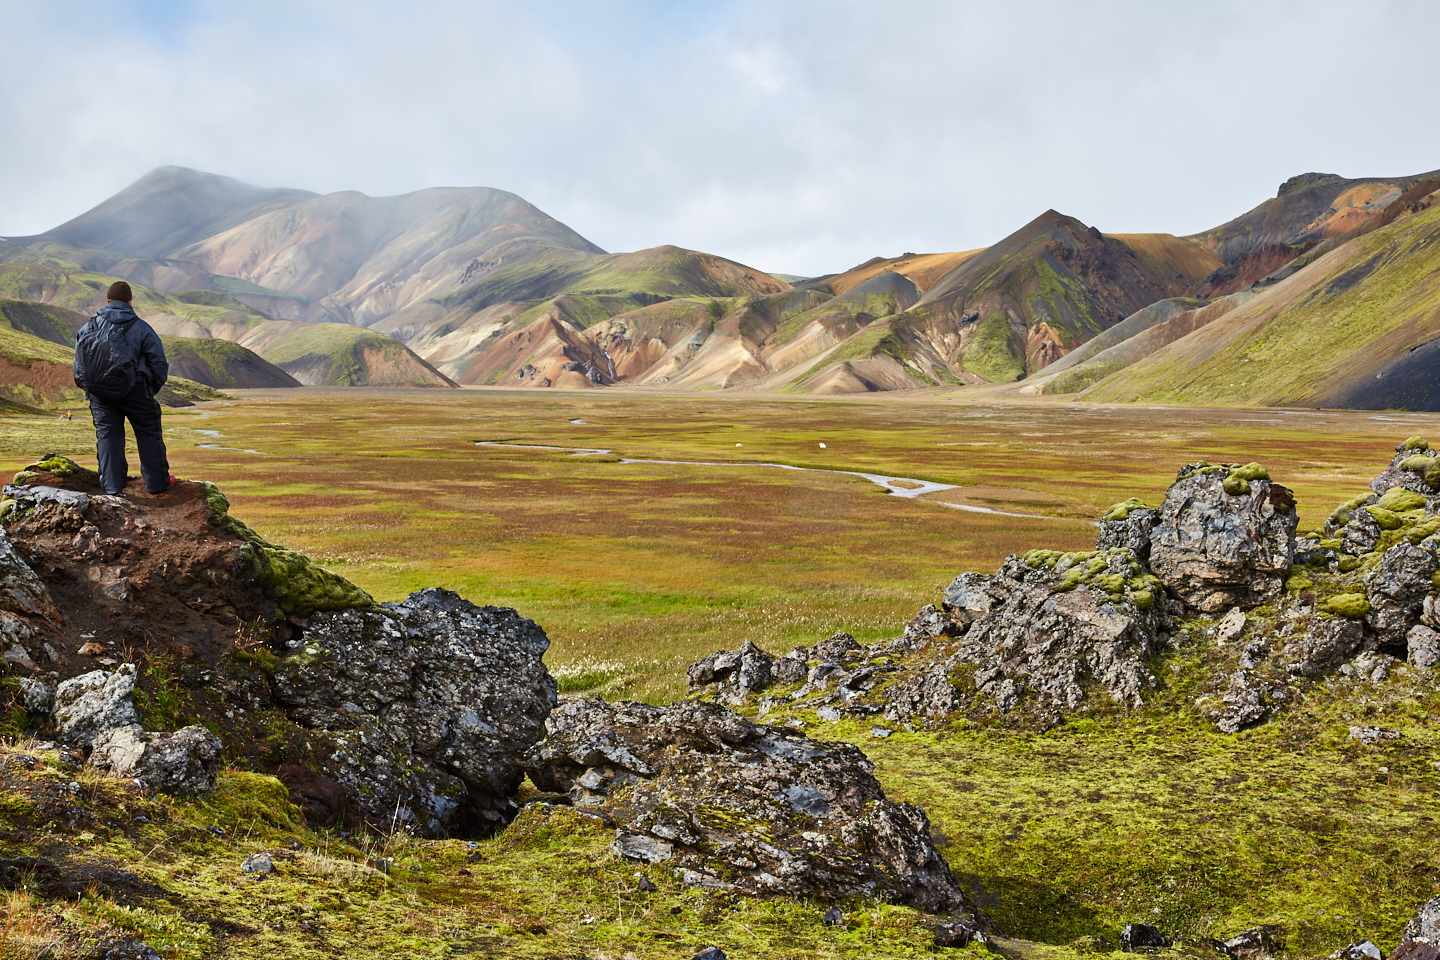
In this image of me looking out across the valley at Landmannalaugar in Iceland, I simply focussed on the rock on which I intended to stand, and everything from the foreground to the distant mountains is in focus because I had a focal length of 38mm and my aperture set to ƒ/16. I had focussed around 10 meters into the frame and the hyperfocal distance is around 8 meters, so everything from 4 meters to infinity was in focus.
When you use longer focal lengths, even for landscape, the depth of field does need to be considered more carefully, so I will sometimes reach for my calculator when using long focal lengths, even for landscape. I love that my Canon mirrorless cameras also now have a distance scale right there in the viewfinder so that I can see the distance at which I’m focusing when I do want to use Hyperfocal distance for maximum depth of field.
Just so that you know, it’s actually not a simple task to find the actual focus distance of an image just by looking at the EXIF data in your computer’s file browser, as few programs actually show this. I use a neat piece of software called RawDigger for this, which allows me to see what Canon interprets as the Near and Far focus limits, and that allows me to approximate my focus distance, so I just wanted to give that mention.
Out of Chicago Live!
I do hope you found this post useful. We’ll wrap it up there, but before we finish I’d like to mention that I will be teaching alongside the world’s best photographers at Out of Chicago LIVE! This will be running from April 9 to 11th, 2021, so SAVE THE DATE! You can find more information at www.outofchicago.com. I hope to see you there!

Freebie Post
This post is unlocked for non-Patrons as it is a sponsored post or advertising Martin Bailey Photography products. If you found it useful and would like to unlock all other posts please click the button below. Thank you for your support!
Become a Patron!
Show Notes
See details of the Out of Chicago LIVE event here: https://www.outofchicago.com
And you can find RawDigger here: https://www.rawdigger.com
Audio
Subscribe in iTunes to get Podcasts delivered automatically to your computer.
Download this Podcast as an MP3 with Chapters.
Visit this page for help on how to view the images in MP3 files.

)
)
)
)
)
)
)
)
)
)
)
)
)
)
)
)
)
)
)
)
)
)
)
)


Martin – I’m not sure where to start… This may get a little disjointed. My understanding of the circle of confusion comes from something I read a long time ago. It was that it was defined as a diameter of 1/750 of an inch. Anything larger was regarded as out of focus. Somewhere along the way I read that it should be revised given the ever increasing resolution of modern sensors. Your tool allows for that. Great! The print at an arm length begs all kinds of questions. Whose arm? What is the viewer using as A criteria for sharpness? What effect did the enlarging system play in the print? And since this comes from the film era. What kind of film what was the developer? (Remember the never ending debate about Microdol vs D-76?)
Since your tool is purely a calculated value I wonder what modern lens design does to it. I’ll elaborate. For an ‘old’ design such as a Zeiss Tessar I can understand it being applicable. But for modern Aspherical designs with lots more elements where part of the effort is to compensate for spherical aberration I wonder what happens to the depth of field. Same question with diffraction. I also kind of wonder what a zoom lens does to depth of field.
Long ago lenses had depth of field indications on them that one could use to get an idea of depth of field when focused at a given distance. If you have access to any older folding camera you will notice a depth of field “calculator” where at a given aperture you could see what the lens depth of field would be. Most of them included a hyperlocal marking so that if you set your focus at the indicated distance and aperture at F8 everything from infinity back to some near distance would be in focus. Those have disappeared with modern zoom lenses and auto focus. It seems with all computational power inside modern digital cameras the manufacturers could supply that information in the interface. I have noticed with my Canon R that in the manual focus mode there is a very rough distance indication whith RF mount lenses. By the way I purchased the Canon R based on your podcast a while back.
In closing I have the photographers friend and I use it mostly with my macro photography. I like it. It is helpful.
All the best in the very trying times we are living in – Rich
Hi Rich,
Cool comment. Thanks!
So, the arm is the one that belongs to the person looking at the photo, and that, of course, makes it completely subjective, but then so is each individual’s eyesight, and as you say, the process to make the print and the media on which it is printed will also vary. But, the end result is that some parts of the image in the print will look sharp, and others won’t. The one’s that are, are within the depth of field, and the one’s that aren’t, aren’t.
In Photographer’s Friend I calculate the pixel pitch from the sensor size and megapixels. From my tests of various sizes and resolutions I’ve found it to be very, very accurate, with variance generally less than 2-3% in the size of the pixels in micrometers. The focal length dictates a large part of the depth of field, and it doesn’t matter whether it is a zoom lens or prime that gets you to any given focal length. The resulting calculated depth of field will remain the same. The acuity of the resulting will change based on the optics, and I think that may be what you are talking about, but that is separate to the Depth of Field.
The camera’s do save a lot of depth of field and hyperlocal distance information deep in the EXIF information, but much of it is still based on the traditional calculations, and therefore not a lot of use. I do enjoy having the focus distance scale in the EOS R and now R5. That is very helpful, and works well with Photographer’s Friend.
Note that I spent an extra few weeks on releasing the latest update for Photographer’s Friend, because I have added Diffraction Limit Guide Adjustment sliders to the DoF Calculator’s Settings screen. These are part of the Pro Add-On, but do enable us to tweak the points at which the Diffraction Warnings kick in and change the Aperture Dial to amber, and then red, or back to green as the possibility of diffraction goes away. I will created an updated post on testing for diffraction next week and hopefully have the latest update in the App Store before I release that.
I just have a few more screenshots from the various new languages to update in the Watch Help and it’s ready to go.
Regards,
Martin.